
Related Manuals for Horizon Hobby Ultimate 2


Summary of Contents for Horizon Hobby Ultimate 2
- Page 1 Ultimate Instruction Manual Bedienungsanleitung Manuel d’utilisation Manuale di Istruzioni...
-
Page 2: Safety Precautions And Warnings
Do not use with incompatible components or alter this product in any way outside of the instructions provided by Horizon Hobby, LLC. This manual contains instructions for safety, operation and maintenance. It is essential to read and follow all the instructions and warn- ings in the manual, prior to assembly, setup or use, in order to operate correctly and avoid damage or serious injury. -
Page 3: Table Of Contents
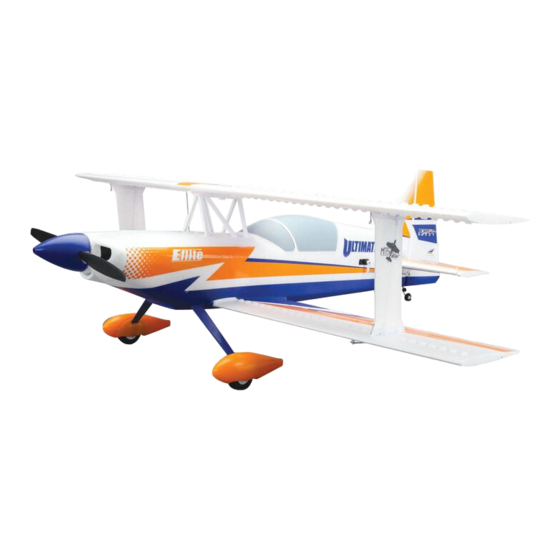
Box Contents Quick Start Information Transmitter setup is required. Refer to Transmitter the transmitter setup section in this Setup manual. Center of 89mm back from leading edge at the center of the top wing. Gravity (CG) Flight Timer 5 minutes Setting Specifi... -
Page 4: Prefl Ight
Prefl ight Remove and inspect contents. Make sure linkages move freely. Read this instruction manual thoroughly. 10 Perform the Control Direction Test with the transmitter. Charge fl ight battery. 11 Perform the AS3X Control Direction Test with the aircraft. Setup Transmitter using transmitter setup chart. 12 Adjust fl... -
Page 5: Transmitter Setup For This Safe ® Technology Aircraft
® Transmitter Setup for this SAFE Technology Aircraft It is extremely important to folow these transmitter setup charts to assign your transmitter switches correctly to operate the fl ight modes and Panic Recovery Non-Computerized Transmitter Setup correctly. (DX4e and DX5e) The installed AR636 receiver has been programmed for operation specifi... -
Page 6: Model Assembly
Model Assembly Landing Gear Installation 1. Install the landing gear assembly (A) on the fuselage and secure in place using 3 screws (B). Horizontal Stabilizer Installation 1. Slide the horizontal tail tube (A) into the hole in the rear of the fuselage. 2. -
Page 7: Wing Installation
Model Assembly Continued Wing Installation Bottom Wing Installation 1. Connect the aileron servo connectors (A) to the respective connectors in the fuselage. Right aileron servo to port 2 in the receiver and the left aileron into port 6. 2. Align the bottom wing mounting pins with the fuselage mounting plate to attach the bottom wing to the fuselage. - Page 8 Model Assembly Continued 3. Slide the left and right wing strut in place, between the upper and lower wings as shown. Ensure that the logo on the strut is facing out. 4. Secure the wing struts to the top and bottom wing with the 4 included pins (A).
-
Page 9: Control Surface Centering
Control Surface Centering After assembly and transmitter setup, confi rm that the control surfaces are centered. If the control surfaces are not centered, mechanically center the control surfaces by adjusting the linkages. IMPORTANT: DO NOT use sub-trim and trim to center control surfaces. The AS3X system requires sub-trim and trim set at 0. -
Page 10: Transmitter And Receiver Binding
Transmitter and Receiver Binding Binding is the process of programming the receiver to recognize the GUID Remove the bind plug from the bind port. (Globally Unique Identifi er) code of a single specifi c transmitter. You need to ‘bind’ your chosen Spektrum ™... -
Page 11: Battery Installation And Esc Arming
Battery Installation and ESC Arming Battery Selection We recommend the E-fl ite ® 2200mAh 11.1V 3S 30C Li-Po battery (EFLB22003S30). Refer to the Optional Parts List for other recommended batteries. If using a battery other than those listed, the battery should be within the range of capacity, dimensions and weight of the E-fl... -
Page 12: Center Of Gravity (Cg)
Center of Gravity (CG) The CG location is measured from the leading edge at the center of the top wing.This CG location has been determined with the recommended Li-Po bat- tery (EFLB22003S30) installed. 89mm back from leading edge at center of the top wing. -
Page 13: As3X Control Direction Test
AS3X Control Direction Test This test ensures that the AS3X ® control system is functioning properly. Aircraft AS3X Reaction Assemble the aircraft and bind your transmitter to the receiver before movement performing this test. 1. Raise the throttle just above 25% and then lower the throttle to activate AS3X. -
Page 14: Flying Tips And Repairs
Flying Tips and Repairs Consult local laws and ordinances before choosing a fl ying location. main landing gear fi rst while the tailwheel is still off the ground. The aircraft can also be landed in a three-point attitude, where all three wheels touch down at the same time. -
Page 15: Motor Service
Motor Service CAUTION: Always disconnect the fl ight battery before performing motor service. Disassembly 1. Remove the screw (A), Spinner (B), Propeller nut (C) and washer (D). 2. Remove the propeller (E), spinner backplate (F) backplate (G), and collet (H) from the motor shaft. -
Page 16: Troubleshooting Guide
Troubleshooting Guide Problem Possible Cause Solution Throttle not at idle and/or throttle trim too high Reset controls with throttle stick and throttle trim at lowest setting Aircraft will not re- Throttle servo travel is lower than 100% Make sure throttle servo travel is 100% or greater spond to throttle but responds to other Throttle channel is reversed... -
Page 17: Ama National Model Aircraft Safety Code
AMA National Model Aircraft Safety Code Effective January 1, 2014 A. GENERAL B. RADIO CONTROL A model aircraft is a non-human-carrying aircraft capable of sustained fl ight 1. All pilots shall avoid fl ying directly over unprotected people, vessels, in the atmosphere. It may not exceed limitations of this code and is intended vehicles or structures and shall avoid endangerment of life and property exclusively for sport, recreation, education and/or competition. -
Page 18: Limited Warranty
Product, (iv) attempted service by copy of your original sales receipt must be included for warranty consideration. anyone other than a Horizon Hobby authorized service center, (v) Product not Be sure your name, address, and RMA number are clearly written on the purchased from an authorized Horizon dealer, or (vi) Product not compliant outside of the shipping carton. -
Page 19: Contact Information
EFL Ultimate BNF (EFL4350) EU Compliance Statement: Horizon Hobby, LLC hereby declares that this product is in compliance with the essential requirements and other relevant provisions of the R&TTE and EMC Directive. A copy of the EU Declaration of Conformity is available online at: http://www.horizonhobby.com/content/support-render-compliance. -
Page 20: Replacement Parts
Set montanti: Ultimate 2 EFL108010 Strut Wire Clips (4): Ultimate 2 Ultimate 2: Strebenclips Ultimate 2 - Clips de haubans Clips per fi li montanti (4): Ultimate 2 EFL108011 Pushrod Set: Ultimate 2 Ultimate 2: Gestängeset Ultimate 2 - Tringleries... - Page 21 © 2015 Horizon Hobby, LLC. E-fl ite, AS3X, DSM, DSM2, DSMX, the DSMX logo, Bind-N-Fly, Z-Foam, ModelMatch, EC3, Celectra and the Horizon Hobby logo are trademarks or registered trademarks of Horizon Hobby, LLC. The Spektrum trademark is used with permission of Bachmann Industries, Inc.
Need help?
Do you have a question about the Ultimate 2 and is the answer not in the manual?
Questions and answers