
Related Manuals for Horizon Hobby HobbyZone AeroScout S


Summary of Contents for Horizon Hobby HobbyZone AeroScout S
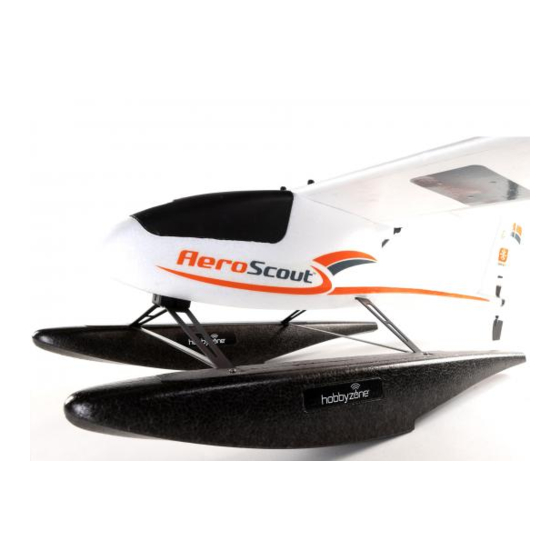
- Page 1 AeroScout S 1.1m Float Set Instruction Manual | Bedienungsanleitung HBZ3811 Manuel d’utilisation | Manuale di Istruzioni...
-
Page 2: Safety Precautions And Warnings
This product is not intended for use by children without direct adult supervision. Do not use with incompatible components or alter this product in any way outside of the instructions provided by Horizon Hobby, LLC. This manual contains instructions for safety, operation and maintenance. - Page 3 Original Fuselage New Fuselage (plastic part not included) (plastic part included) Assemble the Float Set – New Fuselage 1. Using the 1.5mm hex driver, install the water rudder shaft into the water rudder. M2 x 8mm M1.7 x 6mm 2. Install the front strut mount using the two included screws (M2.5 x 15mm).
- Page 4 3. Install the front strut into the front strut mount using the two included screws (M3 x 10mm). 4. Slide the right and left rear struts into the rear strut mount. M3 x 10mm ®...
- Page 5 5. Assemble the struts, carbon cross braces, and floats using the included screws (M3 x 45mm). M3 x 45mm Aeroscout S 1.1m Float Set...
- Page 6 Assemble the Float Set – Original Fuselage 1. Using a 1.5mm hex driver, install the M1.7 x 6mm screw into the water rudder. M1.7 x 6mm 2. Insert the torque rod into the 2mm hole. The rod will pass through the fuselage. Cut the slot for the torque rod, taking care not to cut through the rudder.
- Page 7 3. Install the water rudder onto the rod, using the included setscrew (M2 x 3mm). Ensure the setscrew in the water rudder collar aligns with the flat on the torque rod. M2 x 3mm 4. Verify the aircraft rudder and water rudder align. Adjust as needed before applying adhesive in the following step.
- Page 8 6. Double-sided tape is installed on the front strut mount. Attach the front strut mount to the existing nose gear mount. Front Front Left Right Rear 7. Apply super glue to the gaps between the existing nose gear mount and front strut mount. ®...
- Page 9 8. Press and hold the front strut mount for 15–20 seconds, until the mount is secure. 9. Install the front strut into the front strut mount using the two included screws (M3 x 10mm). 10. Slide the right and left rear struts into the rear strut mount.
-
Page 10: Replacement Parts
11. Assemble the struts, carbon cross braces, and floats using the included screws (M3 x 45mm). M3 x 45mm Replacement Parts Part # Description Part # Description HBZ3820 Screw Set: AeroScout Floats HBZ3823 Carbon Fiber Cross Bars (2) HBZ3821 Water Rudder with Mount Post and Screws HBZ3824 Rear Struts w/Screws HBZ3822... - Page 11 Flying with the Optional Float Set IMPORTANT: Only install the floats if you are comfortable To land on water: flying your aircraft and have repeatedly taken off, flown and • Determine where and in which direction you wish to landed with success. Flying from water poses a higher risk to land, preferably into the wind.
-
Page 12: Sicherheitsmaßnahmen Und Warnungen
Schäden am Produkt oder anderem Eigentum entstehen. Dieses Produkt ist nicht für den Gebrauch durch Kinder ohne direkte Aufsicht eines Erwachsenen vorgesehen. Versuchen Sie nicht, das Produkt ohne Zustimmung von Horizon Hobby, LLC zu zerlegen, mit nicht kompatiblen Komponenten zu verwenden oder beliebig zu verbessern. Dieses Handbuch enthält Sicherhe- itshinweise sowie Anleitungen zu Betrieb und Wartung. - Page 13 Originalrumpf Neuer Rumpf (Kunststoffteil nicht enthalten) (Kunststoffteil enthalten) Montage des Schwimmer-Satzes – Neuer Rumpf 1. Bringen Sie mit dem 1,5mm Sechskantschlüssel die Wasserruderstange im Wasserruder an. M2 x 8mm M1,7 x 6mm 2. Bringen Sie mit den beiden enthaltenen Schrauben (M2,5 x 15mm) die Halterung der vorderen Verstrebung an.
- Page 14 3. Bringen Sie mit den beiden enthaltenen Schrauben (M3 x 10mm) die vordere Verstrebung in ihrer Halterung an. 4. Schieben Sie die rechte und linke hintere Verstrebung in die Halterung der hinteren Verstrebung. M3 x 10mm ®...
- Page 15 5. Montieren Sie die Verstrebungen, Karbon-Querstreben und Schwimmer mit den enthaltenen Schrauben (M3 x 45mm). M3 x 45mm Aeroscout S 1.1m Float Set...
- Page 16 Montage des Schwimmer-Satzes – Originalrumpf 1. Bringen Sie mit einem 1,5mm Sechskantschlüssel die M1,7 x 6mm Schraube im Wasserruder an. M1,7 x 6mm 2. Setzen Sie die Drehmomentstütze in die 2mm-Öffnung ein. Die Stütze wird durch den Rumpf geführt. Schneiden Sie den Schlitz für die Drehmomentstütze und achten Sie dabei darauf, nicht durch das Ruder zu schneiden.
- Page 17 3. Mit der enthaltenen Feststellschraube (M2 x 3mm) bringen Sie das Wasserruder an der Stange an. Stellen Sie sicher, dass die Feststellschraube in der Hülse des Wasserruders mit der flachen Seite auf die Drehmomentstütze ausgerichtet ist. M2 x 3mm 4. Überprüfen Sie, dass Seitenruder des Fluggeräts und Wasserruder aufeinander ausgerichtet sind.
- Page 18 6. Auf die Halterung der vorderen Verstrebung wird doppelseitiges Klebeband angebracht. Befestigen Sie die Halterung der vorderen Verstrebung mit der existieren- den Bugfahrwerkhalterung. Vorne Vorne Links Rechts Hinten 7. Bringen Sie Sekundenkleber an den Lücken zwischen existierender Bugfahrwerkhalterung und Halterung der vorderen Verstrebung an.
- Page 19 8. Halten Sie die Halterung der vorderen Verstrebung 15 bis 20 Sekunden lang gedrückt, bis die Halterung gesichert ist. 9. Bringen Sie mit den beiden enthaltenen Schrauben (M3 x 10mm) die vordere Verstrebung in ihrer Halterung an. 10. Schieben Sie die rechte und linke hintere Verstrebung in die Halterung der hinteren Verstrebung.
- Page 20 11. Montieren Sie die Verstrebungen, Karbon-Querstreben und Schwimmer mit den enthaltenen Schrauben (M3 x 45mm). M3 x 45mm Ersatzteile Teile-Nr. Beschreibung Teile-Nr. Beschreibung HBZ3820 Schraubensatz: AeroScout Schwimmer HBZ3823 Kohlefaser-Querstreben (2) Wasserruder mit Befestigungspfosten und HBZ3824 Halterung hintere mit Schrauben HBZ3821 Schrauben HBZ3825 Halterung vordere mit Schrauben...
- Page 21 Mit dem optionalen Schwimmersatz fliegen WICHTIG: Schwimmer nur installieren, wenn die Zum Landen auf dem Wasser: Flugeigenschaften des Flugzeugs bekannt sind und mehrere • Festlegen, wo und in welcher Richtung gelandet werden Starts, Flüge und Landungen erfolgreich durchgeführt soll, vorzugsweise gegen den Wind. wurden.
-
Page 22: Précautions Et Avertissements Liés À La Sécurité
REMARQUE La totalité des instructions, garanties et autres documents est sujette à modification à la seule discrétion d’Horizon Hobby, LLC. Pour obtenir la documentation à jour de ce produit, veuillez consulter le site www.horizonhobby.com ou towerhobbies.com et cliquez sur l’onglet de support du produit. - Page 23 Fuselage d’origine Nouveau fuselage (pièce en plastique non incluse) (pièce en plastique incluse) Assemblage de l’ensemble de flotteurs – Nouveau fuselage 1. À l’aide de la clé à six pans de 1,5 mm, installez l’arbre du gouvernail marin dans le gouvernail marin. M2 x 8mm M1,7 x 6mm 2.
- Page 24 3. Installez le hauban avant dans son support à l’aide des deux vis incluses (M3 x 10 mm). 4. Faites glisser les haubans arrière droit et gauche dans leur support. M3 x 10mm ®...
- Page 25 5. Assemblez les haubans, les entretoises en carbone et les flotteurs au moyen des vis fournies (M3 x 45 mm). M3 x 45mm Aeroscout S 1.1m Float Set...
- Page 26 Assemblage de l’ensemble de flotteurs – Fuselage d’origine 1. À l’aide d’une clé à six pans de 1,5 mm, installez la vis M1,7 x 6 mm dans le gouvernail marin. M1,7 x 6mm 2. Insérez la barre de torsion dans l’orifice de 2 mm. La barre traversera le fuselage.
- Page 27 3. Installez le gouvernail marin sur la barre, à l’aide de la vis sans tête incluse (M2 x 3 mm). Veillez à ce que la vis sans tête de la bague du gouver- nail marin soit correctement alignée avec le méplat de la barre de torsion.
- Page 28 6. Du ruban adhésif double-face est appliqué sur le sup- port de hauban avant. Fixez le support de hauban avant sur le support de train avant existant. Avant Avant Vers la Vers la gauche droite Arrière 7. Appliquez de la colle cyanoacrylate sur les espaces entre le support de train avant existant et le support de hauban avant.
- Page 29 8. Appuyez et maintenez enfoncé le support de hauban avant pendant 15 à 20 secondes, jusqu’à ce que le support soit bien fixé. 9. Installez le hauban avant dans son support à l’aide des deux vis incluses (M3 x 10 mm). 10.
-
Page 30: Pièces De Rechange
11. Assemblez les haubans, les entretoises en carbone et les flotteurs au moyen des vis fournies (M3 x 45 mm). M3 x 45mm Pièces de rechange Référence Description Référence Description HBZ3820 Jeu de vis : Flotteurs AeroScout HBZ3823 Entretoises en fibre de carbone (2) HBZ3821 Gouvernail marin avec support et vis HBZ3824... - Page 31 Vol avec l’ensemble facultatif de flotteurs IMPORTANT : installez les flotteurs uniquement lorsque Pour atterrir sur l’eau : vous maîtrisez le pilotage de votre avion et après plusieurs • Déterminez où et dans quelle direction vous souhaitez décollages, vols et atterrissages réussis. Le pilotage au- atterrir, de préférence face au vent.
- Page 32 AVVISO Tutte le istruzioni, le garanzie e altri documenti pertinenti sono soggetti a modifiche a totale discrezione di Horizon Hobby, LLC. Per una documentazione aggiornata sul prodotto, visitare il sito www.horizonhobby.com o towerhobbies.com e fare clic sulla sezione Support del prodotto.
- Page 33 Fusoliera originale Fusoliera nuova (parte in plastica non inclusa) (parte in plastica non inclusa) Montaggio del set di galleggianti - Fusoliera nuova 1. Con un cacciavite esagonale da 1,5 mm, montare l’albero del timone di navigazione al timone. M2 x 8mm M1,7 x 6mm 2.
- Page 34 3. Montare il montante anteriore al supporto del montante con le de viti in dotazione (M3 x 10mm). 4. Far scorrere i montanti posteriori destro e sinistro nel supporto del montante posteriore. M3 x 10mm ®...
- Page 35 5. Montare montanti, traverse in carbonio e galleggianti con le viti in dotazione (M3 x 45 mm). M3 x 45mm Aeroscout S 1.1m Float Set...
- Page 36 Montaggio del set di galleggianti - Fusoliera originale 1. Con un cacciavite esagonale da 1,5 mm, montare la vite M1,7 x 6 mm nel timone di navigazione. M1,7 x 6mm 2. Inserire l’asta di torsione nel foro da 2 mm. L’asta passerà...
- Page 37 3. Installare il timone di navigazione sull’asta, utilizzando la vite di fissaggio inclusa (M2 x 3 mm). Assicurarsi che la vite di fermo nel collarino del timone di navigazione sia allineata con la superficie piatta sull’asta di torsione. M2 x 3mm 4.
- Page 38 6. Il nastro biadesivo è fissato sul supporto del montante anteriore. Fissare il supporto del montante anteriore al supporto del carrello anteriore esistente. Avanti Avanti Sinistro Destro Posteriore 7. Applicare super colla negli spazi tra il supporto del carrello anteriore e il supporto del montante anteriore. ®...
- Page 39 8. Tenere premuto il supporto del montante anteriore per 15–20 secondi, finché il supporto non è ben saldo. 9. Montare il montante anteriore al supporto del montante con le de viti in dotazione (M3 x 10mm). 10. Far scorrere i montanti posteriori destro e sinistro nel supporto del montante posteriore.
-
Page 40: Pezzi Di Ricambio
11. Montare montanti, traverse in carbonio e galleggianti con le viti in dotazione (M3 x 45 mm). M3 x 45mm Pezzi di ricambio Pezzo # Descrizione Pezzo # Descrizione HBZ3820 Set di viti: Galleggianti AeroScout HBZ3823 Barre trasversali in fibra di carbonio (2) HBZ3821 Timone di navigazione con montante e viti HBZ3824... - Page 41 Flying with the Optional Float Set IMPORTANTE: installare i galleggianti solo se ci si sente • Scendere a una quota di circa mezzo metro dalla a proprio agio nel far volare l’aeromodello e si è già fatta superficie dell’acqua. esperienza di decollo, volo e atterraggio con successo. •...
- Page 44 © 2022 Horizon Hobby, LLC HobbyZone, the HobbyZone logo, E-flite, SAFE, the SAFE logo, DSM, DSM2, DSMX, IC3, Bind-N-Fly, the BNF logo, and the Horizon Hobby logo are trademarks or registered trademarks of Horizon Hobby, LLC. The Spektrum trademark is used with permission of Bachmann Industries, Inc.
Need help?
Do you have a question about the HobbyZone AeroScout S and is the answer not in the manual?
Questions and answers