Table of Contents
Advertisement
Quick Links
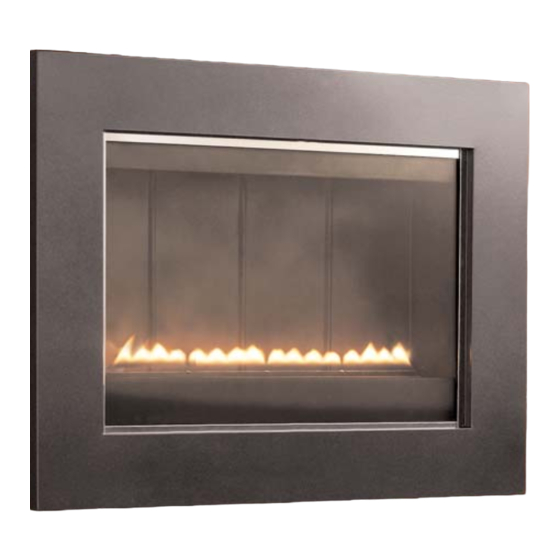
Firecraft
Designed for everyone
F F L L 0 0 5 5 - - F F L L 0 0 6 6
F F L L U U E E L L E E S S S S G G A A S S F F I I R R E E
M M O O D D E E L L : : L L 2 2 3 3 G G
All instructions must be handed to user for safekeeping
Revision A - 08/06
Country(s) of destination - GB/IE
I I N N S S T T A A L L L L A A T T I I O O N N A A N N D D U U S S E E R R I I N N S S T T R R U U C C T T I I O O N N S S
Advertisement
Table of Contents

Related Manuals for Firecraft L23G


Summary of Contents for Firecraft L23G
- Page 1 Firecraft Designed for everyone F F L L 0 0 5 5 - - F F L L 0 0 6 6 F F L L U U E E L L E E S S S S G G A A S S F F I I R R E E...
- Page 2 FL05 FL06...
-
Page 3: Installation Instructions
Read all these instructions before commencing installation. Manufactured by : Firecraft Fires, Reid Street Christchurch, Dorset BH23 2BT Tel: 01202 588 638 Fax: 01202 588 639 www.firecraftfires.com... -
Page 4: Table Of Contents
Section Contents Page No. Section Contents Page No. Important Notes Testing and Commisioning Appliance Data Operating the Appliance Installation Requirements Spark Failure 3.1 Room Sizing Setting pressure Site Requirements Fitting the Decorative Frame 4.1 Ventilation Briefing the customer Unpacking the Appliance 10.0 Servicing 5.1 Component Checklist... -
Page 5: Appliance Data
APPLIANCE DATA Gas Group G20 Natural Gas CAT I2H Inlet Pressure 20 mbar Max Energy Input Gross 2.0 kW 1.8 kW Max Gas Rate 0.20 m3/h Min Energy Input Gross 1.3 kW 1.15 kW Pilot Energy Input Gross 166 W 150 W Burner Pressure High 17.3 mbar. -
Page 6: Ventilation
SITE REQUIREMENTS (continued) Clearances to non-combustibles Non combustible surfaces are defined as brick, metal, marble, concrete etc. and also a number of man- made materials impervious to flame. If in doubt refer to the material manufacturer for further information before proceeding with installation. Clearances to the sides of the appliance are 100mm (4in). -
Page 7: Unpacking The Appliance
VENTILATION (continued) Any ventilation fitted must comply with BS 5871 part 2 and BS 5440 part 2. Ventilation fitted under, or within immediate vicinity of the appliance must not be used as it may adversely effect performance of the ODS system. The appliance MUST NOT be installed in a bedroom, bathroom or any sleeping area. For Republic of Ireland, see relevant rules in force. -
Page 8: Fixing The Appliance
A fitting template is supplied to assist with this. Mark the positions shown as “Gas model L23G” on the wall. If the appliance is to be mounted on the inner leaf of a conventional cavity wall, or a solid wall, drill four holes using a 7mm masonry bit. -
Page 9: Testing And Commissioning
TESTING AND COMMISSIONING Turn on and test the gas supply up to the fire for any leaks, in accordance with the current edition of BS6891. OPERATING THE APPLIANCE The pilot is visible behind the left hand side of the burner. ‘OFF’... -
Page 10: Fitting The Decorative Frame
FITTING THE DECORATIVE FRAME ASSEMBLY FL05 Models : FL05 Models Remove the decorative frame assembly from any protective packaging, and remove any protective film that may be present on the frame. The frame is hung onto the firebox via the two upper hanging brackets and then secured to the firebox via the two lower knurled fixing bolts, which are inserted... -
Page 11: Servicing
10.0 SERVICING Isolate the fire from the gas supply. Ensure that the fire is fully cold before attempting service. A suggested procedure for servicing is detailed below. 1. Lay out the dustsheet and tools. 2. Remove the decorative frame/glass facia assembly. Removal is reverse of section 8.4. 3. -
Page 12: Catalyst
10.3 CATALYST It is recommended that the catalysts are inspected for signs of damage and dirt during routine servicing procedures. The expected life of the catalysts is in excess of 11,000 hours (10 years of normal use). After this time the catalysts should be replaced. If there are any deposits of dirt or soot on the catalyst they should be cleaned with a soft brush and a vac- uum cleaner. -
Page 13: Troubleshooting Guide
11.0 TROUBLESHOOTING GUIDE Fire sparks but pilot does not light No gas to fire, check isolators are open. Pipe work blockage, clean out. Air not fully purged, re purge supply or wait longer. Spark earthing to metal work, reset gap correctly. Blocked pilot, clean out internally. -
Page 14: User Instructions
USER INSTRUCTIONS Section Content Page No Important Notes Clearances to Combustibles Ventilation & Room Size Operating Instructions Combustion Monitoring System Cleaning Servicing List of Replacement Parts IMPORTANT NOTES The installation and Servicing of this fire MUST only be carried out by a competent person (such as a CORGI registered fitter) in accordance with the Gas Safety (Installation and Use) Regulations 1998, the relevant British Standards, Codes of Practice, the Building Regulations and the manufacturer's instruc- tions. -
Page 15: Clearances To Combustibles
CLEARANCES TO COMBUSTIBLES Clearances to combustible materials Combustible materials are defined as wood, fabrics, or other materials likely to combust if exposed to flame. Generally, any material, which is likely to discolour, melt or misshape when exposed to moderate heat, should be considered as a combustible material or surface. Clearance to the sides of the appliance are 100mm(4in) but curtains, drapes and other fabrics are not per- mitted within a distance of 500mm(20in) of the appliance sides. -
Page 16: Operating Instructions
VENTILATION AND ROOM SIZE (continued) The room size should be a minimum of 23m (e.g. 10’2” x 10’2” x 8’) to allow adequate circulation of air and ensure the correct operation of the fire. This volume may include adjacent spaces but these spaces must not be separated by a door.
Need help?
Do you have a question about the L23G and is the answer not in the manual?
Questions and answers