Table of Contents
Advertisement
Instruction Manual
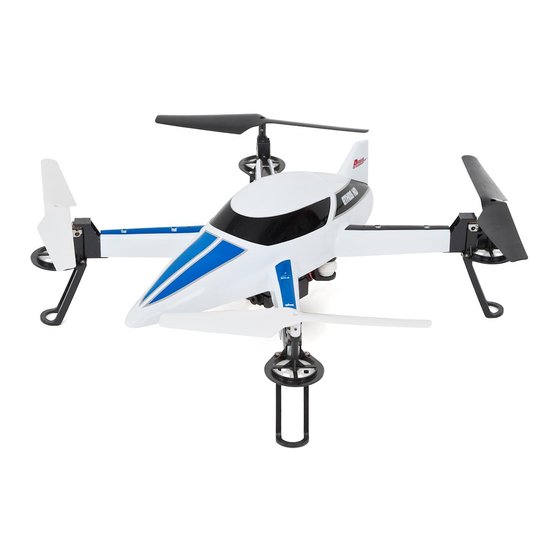
Quad Specifications
Length:
Length including rotors:
Height:
Rotor Diameter:
Weight with Battery:
Motors:
Battery:
Charger:
Transmitter:
On-Board Electronics:
11.5'' (292.1mm)
18.75'' (476.25mm)
5" (127mm)
7.75" (196mm)
11 oz. (312 grams)
350 brushed motors; ball bearings on
prop shaft
2s 7.4v 1200mAh 25C LiPo
2S LiPo AC balance charger
2.4 GHz, 4-channel flight function,
2-channels for camera operation
5-in-1 control board
Advertisement
Table of Contents

Related Manuals for Ares Ethos FPV


Summary of Contents for Ares Ethos FPV
- Page 1 Instruction Manual Quad Specifications Length: 11.5’’ (292.1mm) Length including rotors: 18.75’’ (476.25mm) Height: 5” (127mm) Rotor Diameter: 7.75” (196mm) Weight with Battery: 11 oz. (312 grams) Motors: 350 brushed motors; ball bearings on prop shaft Battery: 2s 7.4v 1200mAh 25C LiPo Charger: 2S LiPo AC balance charger Transmitter:...
-
Page 2: Table Of Contents
Table of Contents Introduction Safety Precautions FCC Information Contents Required to Complete Flight Checklist LiPo Battery Warnings Charging the LiPo Battery Transmitter Details Dual Rate Button Flight Control and Trimming Flight Battery Installation Control Unit Initialization Radio Binding/Linking Flying the Quadcopter LED Light System Auto Flip Mode FPV Camera Specifications FPV Camera Setup FPV Camera Power Camera Control from Tx Downloading Video & Photos FPV Flying FPV Range Exploded View Parts List Optional Equipment Warranty and Support... -
Page 3: Introduction
Introduction The Ares Advantage Ethos FPV is the ideal platform for budget-minded customers in the market for a large quad to take high-quality FPV video. The large size of the Ethos FPV makes it easy to see in flight and the Aegis 6-axis Flight Stability System (FSS) gives it the control you need to get the quality footage you want. A high-quality camera that films 720p HD video at 30 FPS comes installed on the Ethos FPV along with an Anti-Vibration Mount that helps hold the camera steady so you can avoid shakes and bumps in your video footage. The signal from the camera is sent to a 4 ½ inch LCD screen that mounts directly to the transmitter and receives the live feed. Also included is an Anti-Glare Shield that frames the screen to eliminate glare when flying and filming on bright, sunny days. The Ethos FPV even comes with a high speed SD memory card and a USB card reader so you can view your videos and photos nearly anywhere. With all these features coming standard on the Ethos FPV, it’s easy to see why it’s the fastest route to quality FPV aerial video! When you’re ready to take a break from filming and just have some fun, the Ethos FPV has you covered. Like its little brother, the Ares QX 130, the Ethos FPV comes with an integrated LED light system and is capable of doing 360° flips at the touch of a button. Plus, the same fun accessories (Rocket Launcher, Water Blaster, Bubble Machine, and Winch Unit) that can be purchased separately for the QX 130 - also work with the Ethos FPV! The Ethos FPV is RTF (Ready-To-Fly), so it arrives 100% factory-assembled. Everything needed to fly and take FPV video is included in the box. In addition to the Ethos FPV airframe, camera, and anti-vibration mount, you get a 2.4GHz standard size 4-channel transmitter (with 2 additional channels to control the camera), the 4 ½ inch LCD screen that attaches to the transmitter and receives the FPV video signal, the Anti-Glare Shield, a 1200mAh 2-cell 25C LiPo battery, an AC charger for convenient charging from almost any outlet, a high speed SD card and reader, and even the AA batteries needed to power up the transmitter. With nothing extra to buy, you can begin flying the Ethos FPV and taking quality aerial videos within minutes of opening the box! -
Page 4: Safety Precautions
Safety Precautions Failure to use this product in the intended manner as described in the following instructions can result in damage and/or personal injury. A Radio Controlled (RC) airplane/helicopter/quadcopter is not a toy! If misused it can cause serious bodily harm and damage to property. Keep items that could become entangled in the propeller/rotor blades away from the propeller/rotor blades, including loose clothing, tools, etc. Be especially sure to keep your hands, face and other parts of your body away from the propeller/rotor blades. As the user of this product you are solely and wholly responsible for operating it in a manner that does not endanger yourself and others or result in damage to the product or the property of others. This model is controlled by a radio signal that is subject to possible interference from a variety of sources outside your control. This interference can cause momentary loss of control so it is advisable to always keep a safe distance from objects and people in all directions around your model as this will help to avoid collisions and/or injury. • Never operate your model if the voltage of the batteries in the transmitter is too low. • Always operate your model in an open area away from obstacles, people, vehicles, buildings, etc. •... -
Page 5: Fcc Information
Caution: Changes or modifications not expressly approved by the party responsible for compliance could void the user’s authority to operate the equipment. This product contains a radio transmitter with wireless technology which has been tested and found to be compliant with the applicable regulations governing a radio transmitter in the 2.400GHz to 2.4835GHz frequency range. FCC approval of the 5.8GHz video transmitter has been applied for; check www.Ares-RC.com for the latest information regarding FCC licensing. The associated regulatory agencies of the following countries recognize the noted certifications for this product as authorized for sale and use: USA Contents Item Description Not Available Separately ..Ethos FPV RTF Airframe w/camera AZSZ2508 ......4-Channel 2.4GHz Quadcopter Transmitter, Mode 2 Not Available Separately ..AA Batteries (4pcs) AZSZ2503 ......1200mAh 2-Cell/2S 7.4V 25C LiPo Battery, JST Connector AZSZ2504 ...... -
Page 6: Required To Complete
Required to Complete The Ethos FPV RTF includes everything needed to fly right out of the box. There’s nothing extra to buy or provide! Flight Checklist PLEASE NOTE: This checklist is NOT intended to replace the content included in this instruction manual. Although it can be used as a quick start guide, we strongly suggest reading through this manual completely before proceeding. -
Page 7: Lipo Battery Warnings
Allow the control unit to initialize and arm properly (on a flat/ level surface) Fly the model (take-off from a flat/level surface) Land the model (land on a flat/level surface) Unplug the flight battery from the model Always turn the transmitter off last LiPo Battery Warnings IMPORTANT NOTE: Lithium Polymer batteries are significantly more volatile than the alkaline, NiCd or NiMH batteries also used in RC applications. All instructions and warnings must be followed exactly to prevent property damage and/or personal injury as mishandling of LiPo batteries can result in fire. - Page 8 To charge the LiPo battery you MUST use only the included LiPo balance charger or other dedicated LiPo battery charger. Failure to do so may result in a fire causing property damage and/or personal injury. DO NOT use a NiCd or NiMH charger. If at any time during the charge or discharge process the battery begins to balloon or swell, discontinue charging or discharging immediately. Quickly and safely disconnect the battery, then place it in a safe, open area away from flammable materials to observe for at least 15 minutes. Continuing to charge or discharge a battery that has begun to balloon or swell can result in a fire. A battery that has ballooned or swollen even a small amount must be removed from service completely. Store the battery at room temperature, approximately 68–77° Fahrenheit (F), and in a dry area for best results. When transporting or temporarily storing the battery, the temperature range should be from approximately 40–100°F. Do not store the battery or model in a hot garage, car or direct sunlight whenever possible. If stored in a hot garage or car the battery can be damaged or even catch fire! Do not over-discharge the LiPo battery. Discharging the LiPo battery too low can cause damage to the battery resulting in reduced power,...
-
Page 9: Charging The Lipo Battery
Charging the LiPo Battery You must charge the included 1200mAh 2-Cell/2S 7.4V 25C LiPo Battery (AZSZ2503) using only the included AC LiPo Balance Charger (AZSZ2504) or a suitably compatible LiPo battery charger. Charging the LiPo battery using a non-LiPo battery compatible charger (such as a NiCd or NiMH battery charger), or even a different LiPo battery charger with the incorrect settings, may result in damage to the battery or even fire resulting in property damage and/or personal injury. -
Page 10: Transmitter Details
Transmitter Details FPV Screen Mount Auto Flip Button Dual Rate Button Throttle Trim Elevator Trim Throttle/Rudder Elevator/Aileron Stick Stick Mode 1/ Mode 2 Aileron Trim Switch Rudder Trim Video Camera, Still Camera and Accessory Switches Power Switch The Ethos HD/FPV includes a 4HPQ 4-Channel HP Quadcopter Transmitter equipped with 2.4GHz technology, dual rates, digital trims and a backlit LCD screen. Automatic Flip Mode Button The button located near the top left-hand corner of the transmitter is used to activate the ‘AUTOMATIC FLIP MODE’. Please see the ‘Automatic Flip... - Page 11 see the ‘FPV Camera’ and ‘LED Light System’ sections of this manual for more information regarding the specific functions of these buttons (NOTE: Button ‘D’ is not used to control any functions of the Ethos HD/FPV or any accessories). The unique backlit LCD screen displays a variety of data when the transmitter is powered on. Throttle/Rudder Elevator/Aileron Transmitter Battery Level Mode Indicator Channel Output Throttle Trim Position Elevator Trim Position Rudder Trim Position Aileron Trim Position Battery Power Indicator This indicator shows the approximate amount of AA battery power remaining for the transmitter.
-
Page 12: Dual Rate Button
shows the control rate mode currently selected; ‘100%’ for high rate and ‘60%’ for low rate (please see the ‘Transmitter Dual Rates’ section of this manual for more information). Throttle Channel Trim Position Indicator This indicator shows the approximate throttle channel trim position. The trim should be set to the middle position for all flights. Rudder Channel Trim Position Indicator This indicator shows the approximate rudder channel trim position. The trim position should be adjusted as needed during flight to ensure the nose of the quadcopter does not constantly turn (yaw) left or right when ‘hovering’ and without any rudder channel/control input. Elevator and Aileron Channel Trim Position Indicators These indicators show the approximate elevator and aileron channel trim positions. The trim positions should be adjusted as needed during flight to ensure the quadcopter does not constantly ‘drift’ forward/backward (elevator) or left/right (aileron) when hovering. Dual Rate Button The ‘DUAL RATE’ button is used to the toggle between the ‘High’ (100%) and ‘Low’ (60%) control rates available for the aileron and elevator control channels. Toggle between the high and low rates by pressing the button, after which you should feel a ‘click’ and also hear an audible beep/tone. -
Page 13: Flight Control And Trimming
Flight Control and Trimming DOWN Throttle stick controls the speed of the motors/rotors allowing the model to climb or descend. Move Right Aileron stick controls the right and left lateral movement of the model. Forward Backward Elevator stick controls the forward and backward movement of the model by pitching the nose down or up. -
Page 14: Flight Battery Installation
Rudder stick controls the right and left rotation (yaw) of the model Flight Battery Installation Insert the fully charged flight battery into the battery box with the wires accessable. Battery is held in place by friction fit. IMPORTANT NOTE: Connect the LiPo flight battery to the 5‐in‐1 control unit within 5 seconds of powering on the transmitter. Immediately place the model on a level surface for the Flight Stabilization System (FSS) to initialize/ calibrate properly. -
Page 15: Radio Binding/Linking
Throttle in its lowest position • Model on a solid level surface • LED’s will blink, when they become solid the model is ready to fly Radio Binding/Linking Binding/linking is the process of programming the receiver in the control unit to recognize the Globally Unique Identifier (GUID) code of a single specific transmitter. The Ares Ethos HD/FPV features user-friendly technology that automatically binds/links your receiver to the transmitter by simply turning the transmitter on first then connecting the LiPo flight battery in to power on the receiver/control unit within 5 seconds. Flying the Quadcopter Some basic steps for a successful first flight • Press the Dual Rate button on the upper right corner of the trans mitter to access Low Rate (60%). -
Page 16: Led Light System
to avoid damaging the speed controls of your quadcopter. • If you do not lower the left‐hand/throttle stick to the lowest possible position in the event of a crash it can result in damage to the ESCs of the control unit which may require replacement. Note: Crash damage is not covered under warranty LED Light System The factory-installed LED light system offers improved visibility in low-light... -
Page 17: Fpv Camera Specifications
(AFM) is activated by pressing the ‘AUTO FLIP MODE’ button located on the top left-hand ‘corner’ of the transmitter. You will feel a ‘click’ and also hear continuous audible beeps/tones that indicate you’ve activated AFM. When AFM is activated you can control the timing and direction of the flip with the elevator and aileron controls on the right‐hand stick. ALSO, IT’S VERY IMPORTANT TO NOTE THAT ONCE YOU MOVE THE RIGHT‐HAND STICK MORE THAN APPROXIMATELY 1/2 OF THE AVAILABLE TRAVEL IN ANY DIRECTION THE QUADCOPTER WILL AUTOMATICALLY PERFORM A FULL 360 DEGREE FLIP IN THAT DIRECTION. - Page 18 FPV Screen Specifications: 1 Monitor working voltage DC3.3-5V 2.Monitor power consumption: 620MA ±10% DC3.7V 3. Working temperature: -5℃~55℃ RH95% Max 4. Store temperature: -40℃~85℃ RH95% Max The FPV screen has an internal battery and does not get power from the transmitter. Locate the FPV USB Screen Charging Cable and plug it into a suitable USB 5V power source and the small end to the FPV screen charge port on bottom right corner of screen, charging will begin. A red LED on the USB plug will light solid when the charge is complete. The FPV screen is protected by a low voltage cutoff to prevent damage from accidently leaving the screen powered on.
-
Page 19: Fpv Camera Setup
FPV Camera Setup The Ethos FPV comes with the camera installed and plugged into the 5-in-1 control board. Screw the antenna onto the camera before you attempt to power up. Install the included 4GB memory card into the card slot on the rear of the camera. The side of the card with the exposed contacts will be facing the ground. The... -
Page 20: Camera Control From Tx
IMPORTANT INFORMATION The camera does not have a low voltage cutoff (LVC) and will drain the flight battery to below critical levels, damaging them permanently. ALWAYS unplug both the flight battery and the balance plug after flying to prevent damage. Camera Control from Tx Video recording is controlled from the 2.4GHz transmitter. To start video recording, press the “A” button. To stop recording, press the button again. When recording begins a counter is displayed on the FPV screen to indicate recording has begun. The counter indicates the time that the recorder has “A” Button been running. To take a still start/stops video photo, press the “C” button for recording each photo that you want to take. Each time the button is “C” Button takes a pressed the screen blinks while still photo with each press the photo is being recorded... -
Page 21: Fpv Flying
FPV Flying For FPV flying with your Ethos FPV we recommend that you plug the camera into the balance connector of your fully charged flight battery and turn on the receiver screen before you plug the flight battey to the 5-in-1 board. Turn on the transmitter and immediately plug in the JST connector to the flight controller and set the quad on a solid level surface to initialize. Once the LED’s on the quad are solid you are ready for flight. We recommend that you fly the Ethos FPV completely under direct visual control and use the FPV function to see the environment from the camera’s perspective. This will aid you in framing your video and still photos. IMPORTANT INFORMATION 5.8GHz radio signals (like 2.4GHz signals) are “Line of Sight” transmissions and require a direct unobstructed path between the transmission site and the receiver. 5.8GHz radio does not penetrate through objects like trees and buildings, if you fly behind these types of objects you will lose the video signal and likely lose the 2.4GHz radio signal that controls the flight of your quad, leading to a crash. FPV Range The line of sight range of the FPV camera system varies under different atmospheric conditions. In general a good video link is maintained for up to 250 yards. If the quad is within normal visual range for flying, a video signal should be available. It is not recommended that the FPV signal alone be used for orientation and flight control. -
Page 22: Exploded View Parts List
Exploded View Parts List AZSZ2550 Ethos FPV RTF Quad AZSZ2552 Ethos FPV WOT Quad AZSZ2503 1200mAh 2-Cell/2S 7.4V 25C LiPo Battery, JST: Ethos HD/FPV AZSZ2504 AC Charger w/ Balancer: Ethos HD/FPV AZSZ2506 5-in-1 Control Unit: Ethos HD/FPV AZSZ2508 4-Channel 2.4G Quad Transmitter, Mode 1/2: HD/FPV... -
Page 23: Optional Equipment
Optional Equipment The Ethos HD supports all the fun accessories that are available for the Ethos QX 130 Rocket Launcher Winch Unit AZSH1323 AZSH1326 Bubble Machine Water Blaster AZSH1325 AZSH1324 Warranty and Support 30‐Day Limited Warranty Term Period: We warranty that the Product(s) purchased (the “Product”) will be free from defects in materials and work manship when the product is new (before being used) for the limited warranty term period, 30 days, from the date of purchase by the Purchaser. - Page 24 If you purchased your Product from a HobbyTown Internet site not affiliated with a local store, please consult that site for its support and service policies. You can also find more information at: www.Hobbytown.com or by emailing customerservice@firelandsgroup.com or call 800-205-6773 www.Ares-RC.com © 2014 Rev. 1.1 8/31/15...
Need help?
Do you have a question about the Ethos FPV and is the answer not in the manual?
Questions and answers