
Related Manuals for Episode EA-AMP-COMM-1A-120


Summary of Contents for Episode EA-AMP-COMM-1A-120
- Page 1 COMMERCIAL OWNER’S MANUAL >> AMPLIFIER EA-AMP-COMM-1A-120 100V/70V/50V/4Ω AMPLIFIER...
-
Page 2: Important Safety Instructions
IMPORTANT SAFETY INSTRUCTIONS WARNING: To reduce the risk of fire or electric shock, do not expose this apparatus in or near rain or moisture. Read and follow all instructions and warnings in this manual. Keep for future reference. 1. Do not use this product near water. 2. - Page 3 The Episode EA-AMP-COMM-1A-120 Commercial Amplifier Mixer is a superb choice for a variety of commercial ® applications requiring paging and multi-source background music. It has been designed with advanced mixing features and produces 120W RMS, providing the best value and quality for your commercial audio needs.
-
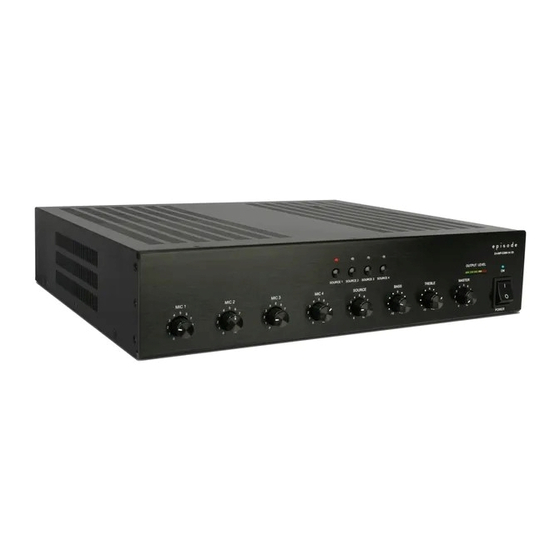
Page 4: Front Panel
FRONT PANEL 1. MIC1/MIC2/MIC3/MIC4 – Microphone Gain Controls 2. SOURCE – Source Gain Control 3. BASS – Adjust Bass Response 4. TREBLE – Adjust Treble Response 5. MASTER – Master Volume Control 6. POWER – Power Switch 7. POWER INDICATOR LED 8. -
Page 5: Rear Panel
14 15 REAR PANEL 10. OPTIONAL 24VDC POWER INPUT 11. BALANCED MIC 1-4 XLR INPUTS 12. MICROPHONE GAIN CONTROLS 13. STEREO SOURCE INPUTS 14. REC LINE OUTPUT - Unbalanced fixed stereo output post tone control 15. AMPLIFIER INPUT SIGNAL 16. JUMPER PLUG - Remove to connect external audio equipment such as an EQ, audio processor, or seperate amplifier. 17. - Page 6 Standard Placement of Amplifier in Cabinet PLACING THE AMPLIFIER ON A SHELF OR OTHER FLAT SURFACE Episode amplifiers are designed to help deliver a great audio experience that makes your music come alive for years to come. However, where you place the amplifier can have a large effect on the performance that you receive and the life of the unit.
-
Page 7: Rack Mount Installation
RACKMOUNT INSTALLATION 1. Remove the amplifier’s four feet from the bottom of the chassis. 2. Attach the included rack-mount ears to the front sides of the amplifier chassis. 3. Securely mount the amplifier into an equipment rack. The amplifier will occupy 2U of rack space. 4. -
Page 8: Specifications
For Technical Support, call 1.866.838.5052 WARRANTY 5-Year Limited Warranty Episode Amplifier Products have a 5-Year Limited Warranty. This warranty includes parts and labor repairs on all ® components found to be defective in material or workmanship under normal conditions of use. This warranty shall not apply to products which have been abused, modified or disassembled.
Need help?
Do you have a question about the EA-AMP-COMM-1A-120 and is the answer not in the manual?
Questions and answers
the out put level in in the red. how to I adjust that back to a good level? There is no audio on the sales floor.
To adjust the output level on the Episode EA-AMP-COMM-1A-120 and restore audio on the sales floor, follow these steps:
1. Locate the Master Volume Control on the front panel.
2. Gradually increase the Master Volume to raise the overall output level.
3. Adjust individual Microphone Gain Controls (MIC1/MIC2/MIC3/MIC4) if using microphones.
4. Adjust the Source Gain to balance background music or paging audio.
5. Check the Power Level Meter to ensure the amplifier is outputting signal.
6. Verify speaker connections and impedance settings (4Ω, 8Ω, or constant voltage options like 100V, 70V, or 50V).
Ensure proper ventilation and that the amplifier is powered on and functioning correctly.
This answer is automatically generated