Table of Contents
Advertisement
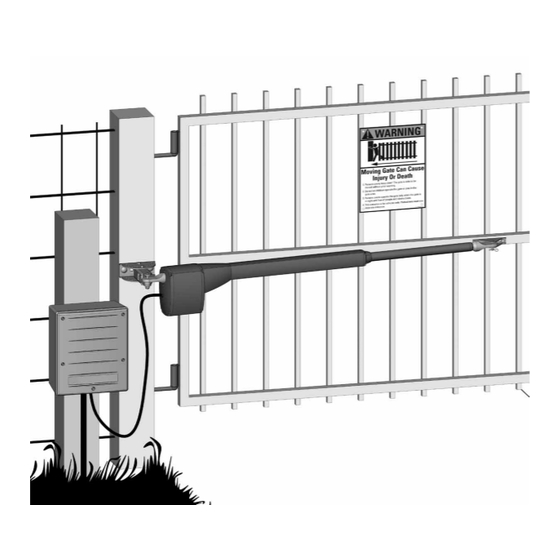
User Manual 500 & 700 Single
500/502 & 700/702 Dual
Polaris 700/702
Polaris 500/502
Warning: Before installing your Polaris
Automatic Gate operator (sometimes also
referred to as the "Product"), read this entire
Installation Manual for information about Product
safety matters and proper use of the Product.
Only use the Product for the purpose of
operating a driveway gate.
Advertisement
Table of Contents

Subscribe to Our Youtube Channel
Related Manuals for Polaris Automatic Gate Operators 500 Single


Summary of Contents for Polaris Automatic Gate Operators 500 Single
- Page 1 User Manual 500 & 700 Single 500/502 & 700/702 Dual Polaris 700/702 Polaris 500/502 Warning: Before installing your Polaris Automatic Gate operator (sometimes also referred to as the “Product”), read this entire Installation Manual for information about Product safety matters and proper use of the Product. Only use the Product for the purpose of operating a driveway gate.
-
Page 2: Table Of Contents
Emergency Disconnect ..................36 Technical Specifications ..................37 Parts List and Illustrations .................. 38 Troubleshooting/Maintenance ................40 List of Accessories ....................42 Warranty ......................43 Polaris Automatic Gate Operators 8617 Paseo Alameda NE Albuquerque, NM 87113 Phone: 877-313-8902 Fax: 800-830-3952 Email: ask@polarisgate.com... - Page 3 WARNING OF RISKS, PURCHASER’S RESPONSIBILITIES, AND ASSUMPTION OF CERTAIN RISKS: The directions for installation and use of the Product must be followed carefully. It is impossible to eliminate all risks inherently associated with use of the Product. The effectiveness of the Polaris Automatic Gate Operator depends on proper installation and the manner of use or application, all of which are beyond the control of Polaris Professional Products or the seller.
-
Page 4: Gate Operator Class Categories
Gate Operator Class Categories Gate operator CLASS CATEGORIES* The Polaris Automatic Gate Operator is intended for use with vehicular swing gates. The operator can be used in Class I and Class II applications. Residential Vehicular Gate Opener–Class I: A vehicular gate opener (or system) intended for use in a home of one-to-four single family dwelling, or a garage or parking area associated therewith. -
Page 5: Warnings And Precautions
Warnings and Precautions General Safety Information Safety overview checklist: WARNING – To reduce the risk of injury or death: • SAVE THESE INSTRUCTIONS The Polaris Automatic Gate Operator is designed to • Use this operator only with swing gates. provide for safe operation. One of the most important •... -
Page 6: Protection Against Entrapment
Protection against Entrapment Important! Study the figure below and keep safety foremost at all times. Entrapment areas for a proper pull-to-open installation Entrapment Area 1 Hinged edge of the gate and the fence post Entrapment Area 2 Between the gate and the gate post Entrapment Area 3 The path of the gate Entrapment Area 4... - Page 7 Warning Signs and Labels Entrapment Alarm Required Safety Precautions for Gates (UL 325; 30.1) Warning signs alert people of automatic In compliance with UL 325 the Polaris gate operation. They are required when Automatic Gate Operator is designed to installing the Polaris Automatic Gate stop and reverse direction within two Operator.
-
Page 8: Installing The Polaris Operator(S)
INSTALLING THE POLARIS 500 & 700 SWING OPERATOR WARNINGS--------------------- 1. Read and follow all instructions. 2. NEVER let children operate the gate or play with the controls. 3. Keep people and objects away from the gate and its immediate areas, both open and closed. 4. -
Page 11: Push-To-Open Gate Operator Mounting
Bushings to be set between bottom side of actuator rod ends and mounting bracket... -
Page 13: Post Mount Brackets
Amazing Gates Post Mount Brackets Pull and Push Arm with Amazing Gates 3 1/2" Posts With the purchase of a Polaris Opener System, you will receive the Amazing Gates Universal Pull brackets and gate attach bracket(s). The Amazing Gates post attachment arm does not require drilling of the post to be installed. You simply set it into the position and bolt it tight. - Page 14 Amazing Gates Post Mount Brackets Pull and Push Arm with Amazing Gates 5" Posts With the purchase of a Polaris Opener System, you will receive the Amazing Gates Universal Pull brackets and gate attach bracket(s). The Amazing Gates post attachment arm does not require drilling of the post to be installed. You simply set it into the position and bolt it tight.
- Page 15 Amazing Gates Post Mount Brackets Pull/Push Arm with customers existing Posts other than Amazing Gates. With the purchase of a Polaris Opener System, you will receive the Amazing Gates Universal Pull and Push brackets and gate attach bracket(s). These brackets can be used with your exiting posts or any non-Amazing Gates posts, to include column mounting.
-
Page 16: Circuit Board Diagram
Board Layout Description LED’s Buttons 1. 18 VAC Power 16. Cycle – used as an input device 2. 24V Converter 17. Set Limit 3. Gate Operator Retracting 18. Learn Code 4. Gate Operator Extending 19. Power Save 5. Obstruction Fuses 6. -
Page 17: Dip Switches
DIP SWITCHES * - Default factory setting Block 1, DIP Switch 1 – Auto Close ON – Auto close feature enabled Block 1 Block 2 OFF* – Auto close feature disable Block 2, DIP Switch 2 – Pull-to-Open or Push-to- NOTE: All DIP Open for Primary Gate Operator Switches are... -
Page 18: Wiring Operator
WIRING OPERATOR NOTE: Before powering, gate operator must be connected to the control box – damage may occur if gate operator is connected directly to a battery or other power source. Step 1 Ensure the control box power switch is in the OFF position. - Page 19 Circuit Board Step 3 The transformer provided is for dry location use only. If used in an outside outlet, the transformer must be enclosed or covered for weather protection. Attach AC power wire to the transformer. NOTE: DO NOT PLUG TRANSFORMER INTO AC POWER UNTIL ALL WIRING IS COMPLETED.
-
Page 20: Wiring The Operator
WIRING THE OPERATOR Applications) LED Descriptions Polaris Automatic Gate Operators come equipped Proper wiring and performance can be verified by with a Power Save feature. The default mode is for all checking the operation of the LED’s located on the LED’s to be operational as described. - Page 21 WIRING THE OPERATOR...
-
Page 22: Pull-To-Open Limit Setting
PULL-TO-OPEN LIMIT SETTING (Open gate to inside of property) Single Gate Installations Step 1 Make sure the gate is in the fully open position. Ensure power switch is in the ON position. Step 2 Verify Block 2, DIP Switch #1 is in OFF position. Press the cycle button on circuit board and the gate will begin to close. - Page 23 PULL-TO-OPEN LIMIT SETTING Dual Gate Installations Step 1 Make sure both gates are in the fully open position. Ensure power switch is in the ON position. Step 2 Verify Block 2, DIP Switch #1 is in ON position. Press the cycle button on the circuit board and the gates will begin to close.
-
Page 24: Push-To-Open Limit Setting
PUSH-TO-OPEN LIMIT SETTING (Open Gate to Outside) Single Gate Installations Step 1 Make sure the gate is in the fully closed position. Ensure power switch is in the ON position. Step 2 Verify Block 2, DIP Switch #1 is in OFF position and Block 2, DIP switch 2 is in the ON position. -
Page 25: Dual Gate Installations
b) Set Block 2, DIP switch #6 to the OFF position. Dual Gate Installations Fig.29 Step 1 Make sure both gates are in the fully closed position. Verify Block 2, DIP Switch #1,2 & 3 are in the ON position, Step 2 Ensure power switch is in the ON position. -
Page 26: Primary/Secondary Gate Movement
PRIMARY/SECONDARY GATE MOVEMENT For dual gate installations the timing of the gates opening and closing can be adjusted. To set a dual gate installation for both gates to open and close simultaneously, set the DIP switches as follows. Block 2, DIP 1 – ON position Block 2, DIP 4 –... -
Page 27: Obstruction Sensitivity Set Up
OBSTRUCTION SENSITIVITY SET UP Figure 31 * Note: Cycle is an open/close input. Exit is a open only input. IMPORTANT: For safety reasons the obstruction setting or stall force on the Polaris Automatic Gate Operator control board comes from the factory set at minimum, (turned all the way counter-clockwise). -
Page 28: Auto Close Timer
Auto Close Timer The amount of time between opening the gate and automatically closing the gate can be adjusted between 0 seconds and 120 seconds. The adjustment is made by turning the POLARIS STRONGLY CLOSE TIMER potentiometer. The default RECOMMENDS THE USE OF A position of the potentiometer is zero seconds. -
Page 29: Transmitter/Receiver
beeps verify LEARN CODE has been cleared. Figure 25 TRANSMITTER/RECEIVER NOTE: All Polaris Automatic Gate Operator transmitters use a standard code set at the factory. It is recommended that this code is re-set DIP Switches for safety and security before programming receiver. - Page 30 * Note: Some accessories may require additional wire and/or hardware and is to be supplied by the installer.
-
Page 31: Accessory Hook Up Diagram
ACCESSORY HOOK UP DIAGRAM Telephone Entry System Accessory Connections Strip Fire Access Control Keyswitch Control Solenoid Lock- #1 see page 30. Magnetic Lock- #2 see page 30 Please refer to Magnetic Lock instruction manual for connection instructions. Connections differ for 12v or 24v connection. - Page 32 ACCESSORY HOOK UP DIAGRAM Wired Keypad Photo Eye Beams External Radio Receiver Victory PB-1200 Photo Eye Beams...
-
Page 33: Exit Wand Hook Up Diagram
EXIT WAND HOOK UP DIAGRAM... -
Page 34: Photo Eyes Hook Up Diagram
PHOTO EYE HOOK UP DIAGRAM NIR Photo Eye The NIR photo-eye has two parts: the EMITTER and the REFLECTOR. The EMITTER has 5 screw terminals labeled by color. Attach the terminals in the emitter to those on the gate operator circuit board as shown below. Use a direct-burial type of control wire like "sprinkler wire"... - Page 35 PHOTO EYE HOOK UP DIAGRAM IRB 4X Photo Eye The IRB 4X photo-eye has two parts: the TRANSMITTER and the RECEIVER. The TRANSMITTER has 2 screw terminals labeled plus and minus. The RECEIVER has 5 terminals, DO NOT use terminal #4. To connect the units to the gate operator circuit board, see the drawing below.
-
Page 36: Emergency Disconnect
EMERGENCY DISCONNECT CAUTION: The gate will move freely and uncontrolled when the gate operator is removed from the gate. ONLY disconnect the gate operator when the control box power switch is OFF and the gate is NOT moving. -
Page 37: Technical Specifications
TECHNICAL SPECIFICATIONS Mechanical Specifications Electrical Specifications Motor: 24 VDC Voltage Ratings: Powered by a 24 v VDC motor Shipping Weight: POLARIS 500: 65 lbs 18 VAC transformer: 18.0 to 22.0 VAC POLARIS 500/502: 88 lbs 12 V Battery: 12.0 to 13.5 VDC 7.2Ah POLARIS 700: 65 lbs Charging Circuit: 12.0 to 14.8 VDC POLARIS 700/702: 90 lbs... -
Page 38: Parts List And Illustrations
PARTS LIST AND ILLUSTRATIONS... - Page 39 PARTS LIST AND ILLUSTRATIONS Secondary Gate Operator 40 ft. cable Polaris 502 Polaris 702 Circuit Board Cabinet Dimensions: 14.5h x 12.5w x 6.5d Control Box Transformer Battery...
-
Page 40: Troubleshooting/Maintenance
TROUBLE SHOOTING The gate(s) will not operate. The gate(s) stops or reverses before reaching 1. Verify power switch is on. the desired position. 2. Verify the STATUS LED is blinking approximately once per second. If not, check 1. Verify the gate frame is not encountering an battery connections and both 4A and 15A fuses. - Page 41 TROUBLE SHOOTING MAINTENANCE The 15 amp fuse is blown. Preventive Maintenance 1. Check wiring from actuator arms to circuit • Using a clean, dry cloth, wipe the gate board for loose or cut connections. operator shaft, and then apply a silicone 2.
-
Page 42: List Of Accessories
LIST OF ACCESSORIES Solar Powered Battery Charger (20-Watt: RSP20) The solar panel charges the 12 volt battery when AC power is not available. One-Button Transmitter. The transmitter works as an input device allowing the user to open or close the gate from a remote location. It has a range up to 100 feet. -
Page 43: Warranty
5) Prepay the freight and insure the defective Product or Product part against shipping damage. Note that defective Products or Product parts shipped freight collect will not be accepted. 6) Ship the carton to: Polaris Gate Operators, 8617 Paseo Alameda NE, Albuquerque, NM 87113. WARRANTY IF REPAIR OR REPLACEMENT IS NEEDED You may obtain additional copies of this manual from our web...
Need help?
Do you have a question about the 500 Single and is the answer not in the manual?
Questions and answers