Marantz PM5005 Owner's Manual
Hide thumbs
Also See for PM5005:
- User manual ,
- Owner's manual (44 pages) ,
- Quick start manual (11 pages)

Related Manuals for Marantz PM5005


Summary of Contents for Marantz PM5005
-
Page 1: Integrated Amplifier
Contents Connections Playback Settings Tips Appendix Integrated Amplifier PM5005 You can print more than one page of a PDF onto a single sheet of paper. Owner’s Manual Remote control Front panel Rear panel Index unit... -
Page 2: Table Of Contents
Easy operation Connecting devices with remote control connectors Part names and functions Performing operations by RC on this unit without visual contact Front panel Remotely connecting Marantz audio devices Rear panel Connecting the power cord Remote control unit Playback Turning the power on... - Page 3 Contents Connections Playback Settings Tips Appendix Settings Tips Setting the Auto Standby mode Tips Turning Auto Standby mode off Troubleshooting Turning Auto Standby mode on Appendix Setting the remote signal receiving function Disabling the remote signal receiving function of the remote Explanation of terms control unit Specifications...
-
Page 4: Accessories
Playback Settings Tips Appendix Thank you for purchasing this Marantz product. To ensure proper operation, please read this owner’s manual carefully before using the product. After reading this manual, be sure to keep it for future reference. Accessories Check that the following parts are supplied with the product. -
Page 5: Inserting The Batteries
Contents Connections Playback Settings Tips Appendix Inserting the batteries NOTE 0 To prevent damage or leakage of battery fluid: 0 Do not use a new battery together with an old one. Remove the rear lid in the direction of the arrow and 0 Do not use two different types of batteries. -
Page 6: Features
Contents Connections Playback Settings Tips Appendix Features High quality sound High performance All-discrete current feedback amplifier Tone control function This unit uses a high-speed current feedback amplifier circuit for its This unit has a tone control function for adjustment of bass (low preamplifier and power amplifier so that signals from the Super Audio frequency) and treble (high frequency) sound to produce your preferred CD player can be amplified with high fidelity. -
Page 7: Easy Operation
Remote control compatible with CD players and network audio players The remote control provided with this unit can control Marantz CD players and network audio players in addition to this unit. (v p. 12) This unit can also switch between three remote control codes. When using three units in the same area, you can set a different remote control code for each unit to control them independently. -
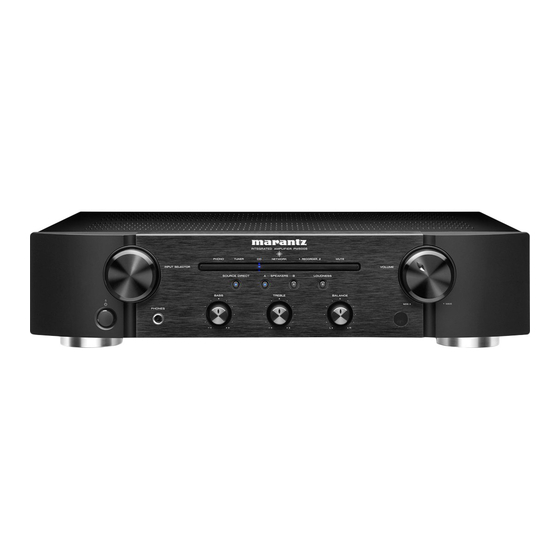
Page 8: Part Names And Functions
Contents Connections Playback Settings Tips Appendix Part names and functions Front panel Q0 Q1 Q2 A Power operation button (X) B Power indicator This turns the power on/off. (v p. 25) This is lit as follows according to the power status: Power on : Off Standby : Red Power off : Off... - Page 9 Contents Connections Playback Settings Tips Appendix H BASS control knob This setting adjusts the volume level for the bass. (v p. 26) I SOURCE DIRECT button/indicator This turns SOURCE DIRECT mode on/off. (v p. 27) J TREBLE control knob This setting adjusts the volume level for the treble. (v p. 26) K Speaker switching buttons/indicators (SPEAKERS A/B) Q0 Q1 Q 2 These select the speaker for audio output.
-
Page 10: Rear Panel
E CD input connectors J Remote control input/output connectors (REMOTE CONTROL) Used to connect a CD player. (v p. 20) Used to connect to a Marantz audio device that is compatible with the remote control function. (v p. 22) Remote control... -
Page 11: Remote Control Unit
Contents Connections Playback Settings Tips Appendix Remote control unit o Amplifier operations A Input source select buttons This selects the input source. (v p. 26) B SOURCE DIRECT button This turns SOURCE DIRECT mode on/off. (v p. 27) C MUTE button (:) This mutes the output audio. -
Page 12: Cd Player Operations
Appendix o CD player operations The supplied remote control can be used to control a Marantz CD player in addition to this unit. To operate a Marantz CD player, press the REMOTE MODE CD button to switch the remote control to the CD player operation mode. - Page 13 Contents Connections Playback Settings Tips Appendix N Pause button (3) O Play button (1) P Playback mode switching button (MODE) Q ENTER button R SETUP button S CLEAR button T REPEAT A-B button U REPEAT button (L) The amplifier can be operated with the amplifier operation buttons even when the remote control operation mode is set to CD.
-
Page 14: Network Audio Player Operations
Network audio player operations The remote control provided with this unit can control a network audio player in addition to this unit. To operate a Marantz network audio player, press the REMOTE MODE NET button to switch the remote control to the network audio player operation mode. - Page 15 Contents Connections Playback Settings Tips Appendix M Pause button (3) N Play button (1) O Playback mode switching button (MODE) P ENTER button Q SETUP button R CLEAR button S Search button (SEARCH) T REPEAT button (L) The amplifier can be operated with the amplifier operation buttons even when the remote control mode is NET.
-
Page 16: Connecting Speakers
Contents Connections Connections Playback Settings Tips Appendix o Contents o Cables used for connections Provide necessary cables according to the devices you want to Connecting speakers connect. Connecting a playback device Connecting a recording device Speaker cable Connecting devices with remote control connectors Connecting the power cord NOTE Audio cable... -
Page 17: Connecting Speakers
Contents Connections Playback Settings Tips Appendix Connecting speakers o Connecting the speaker cables NOTE 0 Disconnect this unit’s power plug from the power outlet before connecting the Carefully check the left (L) and right (R) channels and + (red) and – (black) speakers. -
Page 18: Speaker A/B Connection
Contents Connections Playback Settings Tips Appendix Speaker A/B connection This unit is equipped with two sets of speaker terminals (SPEAKER A and SPEAKER B). One set of speakers can be connected to each set of terminals, and a total of two sets of speakers can be connected. The same signal is output from the SPEAKERS A and SPEAKERS B terminals. -
Page 19: Bi-Wiring Connection
Contents Connections Playback Settings Tips Appendix Bi-wiring connection This connection limits the effects of signal interference between the high range speakers (tweeters) and low range speakers (woofers), allowing you to enjoy high quality playback. When bi-wiring with bi-wireable speakers, connect the mid and high range terminals to SPEAKERS A (or SPEAKERS B), the low range terminals to SPEAKERS B (or SPEAKERS A). -
Page 20: Connecting A Playback Device
Contents Connections Playback Settings Tips Appendix Connecting a playback device You can connect turntables, tuners, CD players and network audio players to this unit. This unit is compatible with turntables equipped with a moving magnet (MM) phono cartridge. When you connect to a turntable with a low output moving coil (MC) cartridge, use a commercially available MC head amp or a step-up transformer. -
Page 21: Connecting A Recording Device
Contents Connections Playback Settings Tips Appendix Connecting a recording device Recording Device (Device 2) Recording Device (Device 1) AUDIO IN AUDIO OUT AUDIO IN AUDIO OUT NOTE Never insert the short-circuiting pin plug into the recording output connectors (RECORDER). Doing so could result in damage. Remote control Front panel Rear panel... -
Page 22: Connecting Devices With Remote Control Connectors
You can connect an external IR receiver to the REMOTE CONTROL You can transmit remote control signals simply by connecting a Marantz connectors to perform operations on this unit with the supplied remote audio device to the REMOTE CONTROL IN/OUT connectors using the control unit without visual contact. -
Page 23: Connecting The Power Cord
Contents Connections Playback Settings Tips Appendix Connecting the power cord Wait until all connections have been completed before connecting the power cord. To household power outlet (AC 230 V, 50/60 Hz) Power cord (supplied) Remote control Front panel Rear panel Index unit... -
Page 24: Turning The Power On
Contents Connections Playback Playback Settings Tips Appendix o Contents Turning the power on Selecting the speakers for audio output Selecting the input source Adjusting the volume Turning off the sound temporarily (Muting) Adjusting the tone Playing CDs Recording Remote control Front panel Rear panel Index... -
Page 25: Turning The Power Off
Contents Connections Playback Settings Tips Appendix Turning the power on AMP POWER Input source Press X on this unit to turn the power on. select buttons Input indicator for the selected source lights. 0 Press AMP POWER X to turn on power from standby mode. SOURCE 0 You can turn the INPUT SELECTOR when the unit is in standby mode to turn on DIRECT... -
Page 26: Turning Off The Sound Temporarily
Contents Connections Playback Settings Tips Appendix Selecting the speakers for audio output Adjusting the volume Press SPEAKERS A/B to select the speaker system to Press VOLUME df to adjust the volume. be used for playback. The indicator of the selected speakers lights. You can also adjust the master volume by turning VOLUME on the main unit. - Page 27 Contents Connections Playback Settings Tips Appendix o Playback in source direct mode Playing CDs The signal does not pass through the tone adjustment circuitry (BASS, This section uses playback from a CD as an example. TREBLE and BALANCE), resulting in playback of a higher sound quality.
- Page 28 Contents Connections Playback Settings Tips Appendix Recording Audio signals input into this unit can be output to an external recording device. When recording audio from a playback device connected to this unit, audio can be recorded with the playback device still connected to this unit.
- Page 29 Contents Connections Playback Settings Settings Tips Appendix o Contents Setting the Auto Standby mode Setting the remote signal receiving function Setting remote control codes Remote control Front panel Rear panel Index unit...
-
Page 30: Setting The Auto Standby Mode
Contents Connections Playback Settings Tips Appendix Setting the Auto Standby mode You can set the unit to automatically switch to standby mode if the unit is Turning Auto Standby mode off not operated for 30 minutes when there is no audio input (Auto Standby mode). - Page 31 Contents Connections Playback Settings Tips Appendix Setting the remote signal receiving function When you connect a IR receiver (sold separately) to the REMOTE Disabling the remote signal receiving CONTROL IN connector of this unit, use the following procedure to function of the remote control unit disable the remote signal receiving function of this unit.
-
Page 32: Setting Remote Control Codes
Contents Connections Playback Settings Tips Appendix Setting remote control codes Remote control codes are set between this unit and the supplied remote control. You can select one of the three types of remote control codes, and REMOTE the remote control can be used to control the unit when the same remote control code is used. - Page 33 Contents Connections Playback Settings Tips Appendix Setting remote control codes for the Setting remote control codes for this remote control unit o To set the remote control codes to AMP2 Point the remote control for which the remote control code was set at this unit, and press REMOTE MODE CD and ENTER.
-
Page 34: Troubleshooting
No sound comes out volume Desired sound does not come out I want to operate a Marantz CD player or network audio player using Sound is interrupted or noise occurs the remote control of this unit I want to use more than one unit in one location... - Page 35 I want to hear music that is close to the original sound quality at low volume Turn the LOUDNESS mode on. (v p. 27) I want to operate a Marantz CD player or network audio player using the remote control of this unit Switch the remote control operating mode. (v p. 12, 14) Also refer to the CD player or network audio player instruction manuals.
-
Page 36: Appendix
Contents Connections Playback Settings Tips Appendix Troubleshooting 1. Are the connections correct? 2. Is the set being operated as described in the owner’s manual? 3. Are the other devices operating properly? If this unit does not operate properly, check the corresponding symptoms in this section. If none of the symptoms are applicable, consult your dealer as it could be due to a fault in this unit. -
Page 37: Appendix
Contents Connections Playback Settings Tips Appendix o Operations cannot be performed through the remote control unit Symptom Cause / Solution Page Operations cannot be Batteries are worn out. Replace with new batteries. performed through the Operate the remote control unit within a distance of about 7 m from this unit and at an angle of within 30°. remote control unit. -
Page 38: Appendix
Contents Connections Playback Settings Tips Appendix o No sound comes out Symptom Cause / Solution Page No sound comes out of Check the connections for all devices. speakers. Insert connection cables all the way in. - Check that input connectors and output connectors are not reversely connected. -... -
Page 39: Appendix
Contents Connections Playback Settings Tips Appendix o Sound is interrupted or noise occurs Symptom Cause / Solution Page When playing a record, the Adjust to a proper needle pressure. - sound is distorted. Check the tip of the needle. - Replace the cartridge. -
Page 40: Explanation Of Terms
Contents Connections Playback Settings Tips Appendix Appendix Explanation of terms Speaker impedance This is an AC resistance value, indicated in Ω (Ohms). Greater power can be obtained when this value is smaller. Source direct Playback with higher fidelity to the source becomes possible, as input audio signals are output by bypassing the audio quality-control circuits (BASS/TREBLE/BALANCE). -
Page 41: Specifications
Contents Connections Playback Settings Tips Appendix Specifications RMS Power output (40 Hz – 20 kHz simultaneous drive of both 40 W x 2 (8 Ω/ohms load) channels) : 55 W x 2 (4 Ω/ohms load) Total harmonic distortion (40 Hz – 20 kHz simultaneous drive of both 0.01 % channels, 8 Ω/ohms load) : Output band width (8 Ω/ohms load, 0.06 %) :... - Page 42 Contents Connections Playback Settings Tips Appendix o Dimensions (Unit : mm) o Weight : 6.7 kg Remote control Front panel Rear panel Index unit...
-
Page 43: Remote Control
Contents Connections Playback Settings Tips Appendix Index LOUDNESS mode ......... 27 Adjusting the tone .......... 26 Protection circuit ..........40 Adjusting the volume ........26 Auto Standby mode ........30 Remote control ..........22 Remote control codes settings ....... 33 BALANCE ............ - Page 44 D&M Holdings Inc. 3520 10332 00AM...
Need help?
Do you have a question about the PM5005 and is the answer not in the manual?
Questions and answers