Table of Contents
Advertisement
Quick Links
Advertisement
Table of Contents

Related Manuals for 2Wire 2710HGV-TNZ


Summary of Contents for 2Wire 2710HGV-TNZ
- Page 2 Notice to Users ©2008 2Wire, Inc. All rights reserved. This manual in whole or in part, may not be reproduced, translated, or reduced to any machine-readable form without prior written approval. 2WIRE PROVIDES NO WARRANTY WITH REGARD TO THIS MANUAL, THE SOFTWARE, OR OTHER INFORMATION...
-
Page 3: Table Of Contents
Contents Getting Started Meeting Web Browser Requirements ...................... 5 Navigating the User Interface ........................7 Setting up System Information Setting up Your Password ........................10 Configuring the Time Zone ........................13 Overriding Automatic Date and Time Configuration ................15 Setting up Event Notifications ....................... 16 Configuring Wireless Network Setting up your Wireless Network ...................... - Page 4 Configuring LAN Devices Configuring DHCP ..........................63 Allocating IP Addresses ........................66 Configuring Ethernet Ports ........................70 Configuring Broadband Connection Configuring DSL and ATM Settings ....................... 74 Adjusting the Upstream Rate ........................ 76 Configuring the Connection Type ......................76 Configuring the PPP Authentication and Settings .................. 77 Modifying Broadband IP ........................
-
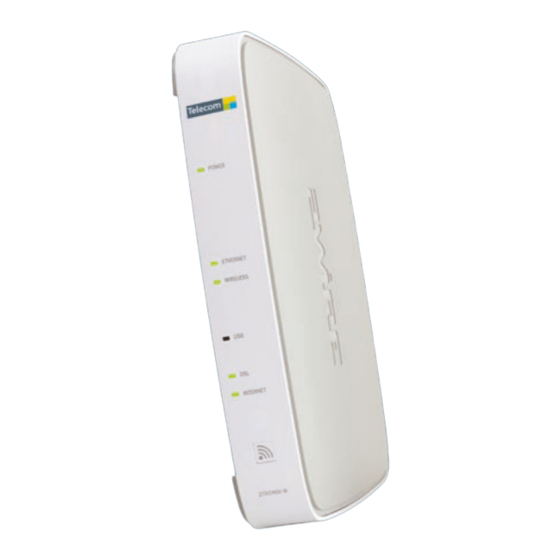
Page 5: Getting Started
Getting Started Figure 1 shows your gateway model and the status indicators; Table 1 describes their functions. Figure 1: 2Wire Gateway Model 2710HGV-W Gateway Indicators Description Table 1: Indicators Description Power The POWER indicator turns red when the power is first applied, and changes to green within two minutes of power application. - Page 6 Wireless • Solid green indicates that there is wireless activity associated to a specific access point. • Flickering green indicates that there is inbound activity. The flickering of the light is synchronized to the actual data traffic. This indicator lights green when a computer is connected to the USB-PC port.
-
Page 7: Navigating The User Interface
Navigating the User Interface Figure 2 shows the page when you enter http://gateway.2Wire.net as the URL into a compatible browser on a computer connected to the gateway (refer to Meeting Web Browser Requirements page 2). This page contains six panes. The following section describes each pane that is indicated by the numbered red arrow. - Page 8 1. The tab pane of the user interface contains the following four tabs that are arranged horizontally. Clicking any of these tabs displays a page that enables you to access associated information. Home: The Home tab provides the most relevant information about your broadband service at a glance.
-
Page 9: Setting Up System Information
Setting up System Information After your gateway is properly connected and the first time you access the gateway user interface, it is a good idea to set up the basic system information, such as password, date and time, and so forth. This section provides instructions to: •... -
Page 10: Setting Up Your Password
(for example, when you try to change the broadband connection settings). To set up a password: 1. Open a Web browser and enter http://gateway.2Wire.net in the address line; the Home page opens (Figure... - Page 11 2. Click Settings; the settings page opens displaying the system information and more sub-tabs (Figure — Or — Click System Password from the Top Networking Features pane; the Administration Password page opens (Figure Figure 5: Settings Page Note: The above page is for reference only and is not fully displayed here. 3.
- Page 12 4. Select the checkbox. Enable Password Protection Note: Make sure to select this checkbox or your password will not save. Your Telecom gateway is preconfigured with a default “Administrator” password. The custom password setup on the gateway is admin 5. Select the password option: When Use Default System password is selected, no further action is required, go to Step When Create or Edit a Custom Password is selected, continue with the next step.
-
Page 13: Configuring The Time Zone
Configuring the Time Zone The 2Wire gateway sets the time automatically using time servers on the Internet. It retrieves date and time information in Greenwich Mean Time (GMT). Your local time is set using the Time Zone setting you configured when you set up your system. - Page 14 2. Click Settings; the Settings page opens displaying the system information (Figure Figure 9: Settings Page Note: The above page is for reference only and is not fully displayed here. 3. Click Date & Time; a page similar to the following opens (Figure 10).
-
Page 15: Overriding Automatic Date And Time Configuration
Overriding Automatic Date and Time Configuration Typically, the 2Wire gateway sets the date and time automatically using time servers on the Internet. You can override these settings and manually set them. To manually change the date and time settings: 1. Open a Web browser and enter http://gateway.2Wire.net in the address line; the Home page opens. -
Page 16: Setting Up Event Notifications
You will be redirected to a Web browser where you are notified of the service conditions and provided possible solutions to correct the conditions. To receive event notification: 1. Open a Web browser and enter http://gateway.2Wire.net in the address line; the Home page opens. 2. Click Settings; the Settings page opens displaying the system information (Figure 13). - Page 17 3. Click Event Notifications; the following page opens (Figure 14). Figure 14: Service Notification and Repair Wizard Page 4. Select the events you want to be notified. 5. Click Save.
-
Page 18: Configuring Wireless Network
The default is TNZ-XXXX, where XXXX represents the last four digits of the serial number on the gateway (for example, TNZ-3061). 1. Open a Web browser and enter http://gateway.2Wire.net to access the 2Wire gateway user interface. 2. Click on the Home page;... - Page 19 4. The default wireless network name on Telecom supplied Gateways is TNZ-xxxx where xxxx is the last four digits of the Gateway serial number. You may wish to specify an alternative name which can easily be done by entering the preferred name for your wireless network in the Network Name (SSID) field.
-
Page 20: Securing Your Wireless Network
Note: Telecom Gateways use the default encryption key option when wireless networking is enabled. 1. Open a Web browser and enter http://gateway.2Wire.net to access the gateway user interface. 2. Click on the Home page; the Wireless Access Point List and Unique Settings page opens. - Page 21 4. Select an authentication setting from the Authentication Type drop-down list: WEP-Open. The Wireless Encryption Protocol (WEP) is an older security protocol that allows any wireless clients within the radio range to access your network without an encryption key. This setting provides the least level of security. For security reasons, do not select this setting unless there is compatibility issue with an older wireless client.
-
Page 22: Allowing Devices With Mac Address Filtering
Note: This method is less secure than using the encryption key. To disable MAC address filtering to allow all devices: 1. Open a Web browser and enter http://gateway.2Wire.net to access the gateway user interface. 2. Click on the Home page; the Wireless Access Point List and Unique Settings page opens. - Page 23 4. Click Edit Blocked/Allowed Device List; the Wireless MAC Filtering page opens (Figure 17). Figure 17: Wireless MAC Filtering page Note: Make sure that the Enable checkbox is not selected. 5. Enter the MAC address automatically or manually. To enter the address automatically, click Rescan For Devices; the MAC addresses of the allowed devices populated in the Allowed Devices pane as shown below.
-
Page 24: Allowing Individual Devices
Allowing all Devices. To allow individual devices: 1. Open a Web browser and enter http://gateway.2Wire.net to access the gateway user interface. 2. Click on the Home page; the Wireless Access Point List and Unique Settings page opens. 3. Scroll down to the MAC Filtering pane. -
Page 25: Blocking Devices With Mac Address Filtering
5. Select the device you want to allow from the Blocked Devices pane. Note: To select multiple addresses, hold down the [Shift] or [Ctrl] keys while making your selections. Using the [Shift] key lets you make your selections in a contiguous order while the [Ctrl] key selects the groups in a random order. -
Page 26: Blocking All Devices
Individual Devices. To enable MAC filtering to block all devices: 1. Open a Web browser and enter http://gateway.2Wire.net to access the gateway user interface. 2. Click on the Home page; the Wireless Access Point List and Unique Settings page opens. - Page 27 5. Select the Enable checkbox to block all devices. 6. Click Save; a dialog box opens confirming that the configuration is changed. The MAC addresses on the Allowed Devices pane now appear on the Blocked Devices pane (Figure 20). For example Note: Make sure to click Save to keep the transaction persistent;...
-
Page 28: Blocking Individual Devices
Blocking all Devices. To block individual devices: 1. Open a Web browser and enter http://gateway.2Wire.net to access the gateway user interface. 2. Click on the Home page; the Wireless Access Point List and Unique Settings page opens. 3. Scroll down to the MAC Filtering pane. - Page 29 5. Select the Enable checkbox to block all devices. 6. Click Save; a dialog box opens confirming that the configuration is changed. The MAC addresses on the Allowed Devices pane now appear on the Blocked Devices pane. Note: Make sure to click to keep the transaction persistent;...
-
Page 30: Customize Private Wireless Settings
1. Open a Web browser and enter http://gateway.2Wire.net to access the gateway user interface. 2. Click on the Home page; the Wireless Access Point List and Unique Settings page opens. -
Page 31: Configuring Wi-Fi Protected Setup
Configuring Wi-Fi Protected Setup Certain gateway models support Wi-Fi Protected Setup (WPS), which is a standard for easy and secure establishment of a wireless home network. Using WPS simplifies the process of connecting any home device to the wireless network. As an access point (AP), the gateway issues and revokes credentials to a network. -
Page 32: Configuring Subscribed Services
Configuring Subscribed Services If you have not subscribed to any additional services, you will not see or have access to these links. This section provides instructions to: • Set up Access control on page 33 • Configure Content screening on page 36 •... -
Page 33: Setting Up Access Control
Note: The service link will not appear on your screen if you have not subscribed to the service. To configure time-of-day access: 1. Open a Web browser and enter http://gateway.2Wire.net to access the gateway user interface. 2. Click on the Quick Service Links page; the Access Control Summary page opens. - Page 34 Figure 25: Time of Day Access Schedule Page 5. Select the device you want to schedule. (The device you selected is indicated by “You have chosen…”). 6. Select the type of the access you allow on the device. − If you select Full access, click Save. −...
- Page 35 8. Click Save; a message appears informing the configuration status. 9. Click Summary; the Access Control page opens displaying the current configuration (Figure 26), for example, Figure 26: Access Control Page Note: To change restricted access to full access, select Full access and click Save. You do not need to deselect the access type or days and time.
-
Page 36: Configuring Content Screening
37 Assigning a Computer to a Group To assign a computer to a group: 1. Open a Web browser and enter http://gateway.2Wire.net to access the gateway user interface. 2. Click on the Quick Service Links page. — Or —... -
Page 37: Setting Restrictions On Groups
Figure 28: Content Screening Page 4. Select from the drop-down list to assign the computer to either the “Level 1” or “Level 2” group. 5. Click Save; a message appears informing you the configuration status. Setting Restrictions on Groups There are two ways to restrict the type of programs each group can access: by category or by Web sites. -
Page 38: Specifying Content Categories
By default, each group is blocked to view different a category of programs, for example, the Level 1 group has access only to the Level 1’s sites category. To unblock or block content categories: 1. Open a Web browser and enter http://gateway.2Wire.net to access the gateway user interface. 2. Click on the Quick Service Links page. - Page 39 4. Scroll down to the Customize Content Screening Groups pane (Figure 30). Figure 30: Customize Content Screening Groups Pane 5. Select or deselect the checkbox to block or unblock the category. 6. Click Save.
-
Page 40: Specifying Web Sites
Specifying Web Sites 1. Open a Web browser and enter http://gateway.2Wire.net to access the gateway user interface. 2. Click on the Quick Service Links page. — Or — Click Services. Select Access Control The Access Control page opens displaying a list of connected devices and any access restrictions for... - Page 41 4. Scroll down to the Block or Allow Access to Specific Sites pane (Figure 32). Figure 32: Block or Allow Access to Specific Sites Pane 5. Enter the site IP address or name in the field for the intended group, for example, Site URL Yahoo.com.
-
Page 42: Configuring Web Remote Access
Internet. You can access shared files on PCs, manage services, view cameras, or remotely administer your system from anywhere. To set up remote access: 1. Open a Web browser and enter http://gateway.2Wire.net to access the gateway user interface. 2. Click on the Quick Service Links page. - Page 43 3. Select the Remote Access checkbox to enable the remote access feature 4. Select the Access shared files checkbox if you want to enable the shared files feature. 5. Click Edit Domain Name to enter your domain name that you will need to enter. Note: You will need to enter this domain name into a Web browser when you access your system remotely.
-
Page 44: Accessing Your Local Network Using Web Remote Access
Accessing Your Local Network Using Web Remote Access To access your home network: 1. Open the browser and type your personal domain name into the address line (for example, username.dyndns.org) — Or — If you do not have or are not using a personal domain name through your ISP/ free Dynamic DNS provider you can access your Network by entering the IP address currently assigned to you by your ISP. - Page 45 Click on 2701HGV-W Gateway to access the modem interface menu where you can make any changes to the configuration just the same as if you are connected locally. Note: 2Wire recommends that you do not change broadband settings while connecting remotely. Doing so may cause you to temporarily lose your connection to the remote...
-
Page 46: Accessing Your Local Computer Files From A Remote Location
For more information on enabling your operating system for file sharing, see the 2Wire support Web site or review the online help system by clicking the Help link on the 2Wire gateway home page. - Page 47 Figure 38: Access Shares 3. Click the file directory; a page similar to the following opens (Figure 39). Figure 39: Access Shared Files Page Note: Depending on the local operating system configuration, you can add, retrieve, and delete files as well as creating directories from this page. 4.
-
Page 48: Ending Your Remote Access Session
Ending Your Remote Access Session To end your Remote Access session, return to the Remote Access Center page and click End Session... -
Page 49: Configuring Firewall
Configuring Firewall The gateway includes default firewall settings that block unwanted access from the Internet; it is recommended that you leave the default settings in place. If necessary, you can allow Internet traffic or users through the firewall to your LAN devices, applications, and servers. This section provides instructions to: •... -
Page 50: Hosting An Application
(refer to Defining a New Application Profile on page 54.) To host an application: 1. Open a Web browser and enter http://gateway.2Wire.net to access the gateway user interface. 2. Click on the Home page; the Firewall Status page opens (Figure 40). - Page 51 3. Select Applications, Pinholes and DMZ; a page similar to the following opens showing the computers that are connected to the gateway and the application list (Figure Figure 41: Applications, Pinholes and DMZ Page...
- Page 52 4. Select Applications, Pinholes and DMZ; a page opens showing hosted applications. Note: If the computer you want to select is unlisted because it is powered off and the “hide inactive devices” option is enabled; you still can select it as long as it is on the same network and you know its IP address.
-
Page 53: Removing Hosted Applications
Removing Hosted Applications 1. Open a Web browser and enter http://gateway.2Wire.net to access the gateway user interface. 2. Click on the Home page; the Firewall Status page opens , displaying the current hosted application settings (Figure 42). Figure 42: 2Wire Gateway Home Page... - Page 54 5. Scroll to the Edit firewall settings for this computer pane (Figure 43). Figure 43: 2Wire Gateway Home Page 6. Under the section Filter Applications by: select All applications to view all port-forwarding rules for the selected PC. 7. Select the application(s) you want to remove from the Hosted Applications panel, click...
-
Page 55: Defining A New Application Profile
To add a new application profile: 1. Open a Web browser and enter http://gateway.2Wire.net to access the gateway user interface. 2. Click on the Home page; the Firewall Status page opens, displaying the current hosted... - Page 56 5. Scroll down and click Add a new user-defined application; the Firewall Application Profile Definition page opens (Figure 45). Figure 45: Firewall Application Profile Definition Page 6. Enter the application profile name in the field. Application Profile Name Notes: For easy identification, use the name of the application you are using. Clicking returns to the Allow device application traffic to pass through Back...
- Page 57 Notes: If only one port is required, enter the port number in the field. From − In the field, optionally enter a value for the amount of time that Protocol Timeout (seconds) can pass before the application “times out.” When leaving the field blank, the system uses the default values (86400 seconds for the TCP protocol;...
-
Page 58: Adding Multiple Definitions To A Profile
If you require both TCP & UDP, and/or another TCP range repeat steps 7 & 8 to add additional ports to the new Application profile. For example, Figure 47: Page with a multiple port range profile 9. When you have completed adding all ports to your Application profile click on Back to return to Applications, Pinholes and DMZ where you can select the new profile. -
Page 59: Allowing All Applications (Dmzplus)
Internet traffic is directed to this computer. 1. Open a Web browser and enter http://gateway.2Wire.net to access the gateway user interface. 2. Click on the Home page; the Firewall Status page opens. - Page 60 Figure 48: Applications, Pinholes and DMZ Page 4. Select the computer that you want to allow all applications. 5. Select Allow all applications (DMZplus mode). 6. Click Save...
-
Page 61: Stopping Dmzplus
8. Restart the computer. When the computer restarts, it receives a special IP address from the system and all unassigned TCP and UDP ports are forwarded to it. Stopping DMZplus 1. Open a Web browser and enter http://gateway.2Wire.net to access the gateway user interface. 2. Click on the Home page; the Firewall Status page opens. -
Page 62: Configuring Lan Devices
Configuring LAN Devices This section provides instructions to: • Configuring DHCP on page 63 • Allocating IP addresses on page 66 • Configuring Ethernet ports on page 70 Note: Configure these settings only if you are very familiar with computer networking technologies... -
Page 63: Configuring Dhcp
IP addresses. To configure the default DHCP information used as a local server: 1. Open a Web browser and enter http://gateway.2Wire.net in the address line; the Home page opens (Figure 49). - Page 64 2. Click Settings; the System Information page opens (Figure Figure 50: Settings Page 3. Click LAN; a page similar to the following opens, displaying the private network information and LAN devices connected to your network (Figure 51). Figure 51: LAN Status Page...
- Page 65 4. Click Private Network; the DHCP Configuration page opens (Figure 52). Figure 52: DHCP Configuration Page 5. Select if you want to set up a range for the DHCP address IP pool. Configure manually...
-
Page 66: Allocating Ip Addresses
6. Enter information in the following fields: Router Address: This is the IP address of your gateway used for all communication on your local devices. Subnet Mask: This is the subnet mask used for all communication on your local devices (the default is 255.255.255.0). - Page 67 1. Open a Web browser and enter http://gateway.2Wire.net in the address line; the Home page opens (Figure Figure 53: 2Wire Gateway Home Page 2. Click Settings; the System Information page opens (Figure Figure 54: System Information Page...
- Page 68 3. Click LAN; a page similar to the following opens, displaying the private network information and LAN devices connected to your network (Figure 55). Figure 55: LAN Status Page Click IP Address Allocation; a page similar to the following opens, displaying the devices in your network (Figure Figure 56: NAT Mapping and Device IP Allocation page...
- Page 69 5. Go to the intended device and select the following to override the default DHCP settings: Select the address or address pool from which you want to select an IP address from the WAN IP Mapping drop-down list. Select the specific address or address type to assign from the Address Assignment drop- down list.
-
Page 70: Configuring Ethernet Ports
You can change to a different mode When you have a device that requires a unique setting, To configure Ethernet port settings: 1. Open a Web browser and enter http://gateway.2Wire.net in the address line; the Home page opens (Figure... - Page 71 2. Click Settings; the System Information page opens (Figure Figure 58: System Information Page 3. Click LAN; a page similar to the following opens, displaying the private network information and LAN devices connected to your network (Figure 59). Figure 59: LAN Status Page...
- Page 72 4. Click Wired Interfaces; the Ethernet Switch page opens (Figure 60). Figure 60: Ethernet Switch Page 5. Select the Ethernet Networking checkbox to enable the switch setting. 6. Select one of the following values from the drop-down lists to the match the intended Ethernet port. Auto-detect 100BaseTX Full-Duplex 100BaseTX Auto...
-
Page 73: Configuring Broadband Connection
Configuring Broadband Connection Your Telecom Business gateway is already configured with DSL and Internet connection settings to provide internet connectivity “out of the box” and does not require further configuration changes unless specific Business services such as a Static IP address or port-forwarding functionality etc is required. -
Page 74: Configuring Dsl And Atm Settings
All information you need to configure this setting is provided by your service provider. To configure DSL or ATM settings: 1. Open a Web browser and access the gateway user interface by entering http://gateway.2wire.net. 2. Click the Summary Status page opens (Figure 61). - Page 75 3. Click Link Configuration; a page similar to the following opens (Figure 62). Figure 62: Link Configuration Page 4. Select the DSL line from the DSL Line Selection drop-down list. Automatic Line 1 (inner pair) Line 2 (outer pair) 5. Enter the VPI and VCI you want the gateway to use in connecting to the ISP. 6.
-
Page 76: Adjusting The Upstream Rate
The connection type identifies the method by which the gateway connects to the ISP. To configure the connection type: 1. Open a Web browser and access the gateway user interface by entering http://gateway.2wire.net. 2. Click the Summary Status page opens (Figure 63). -
Page 77: Configuring The Ppp Authentication And Settings
Configuring the PPP Authentication and Settings The PPPoE or PPPoA connection type requires authentication to be connected. To configure the PPP authentication settings: 1. Open a Web browser and access the gateway user interface by entering http://gateway.2wire.net. 2. Click the Summary Status page opens (Figure 64). -
Page 78: Modifying Broadband Ip
Note: This feature is NOT currently supported on the Telecom Broadband Network By default, the gateway automatically obtains its broadband IP address via DHCP. To manually modify the broadband IP: 1. Open a Web browser and access the gateway user interface by entering http://gateway.2wire.net. - Page 79 2. Click ; the Summary Status page opens (Figure 65). Figure 65: Broadband Summary Status Page 3. Click Link Configuration; the Link Configuration page opens. 4. Scroll down to the Broadband IP Network pane (Figure 66). Figure 66: Broadband IP Network Pane 5.
-
Page 80: Adding New Dns Names
Adding New DNS Names By default, the gateway automatically obtains its DNS server addresses via DHCP. To manually configure your DNS settings: 1. Open a Web browser and access the gateway user interface by entering http://gateway.2wire.net. 2. Click the Summary Status page opens (Figure 67). - Page 81 5. Click the Manually specify your DNS information radio button. 6. Enter the following information: In the Primary Server field, enter the IP address of the primary DNS server that the gateway is to use for DNS name resolution. In the Secondary Server field, enter the IP address of the secondary DNS server that the gateway is to use for DNS name resolution.
-
Page 82: Changing To The Bridging Mode
When routing is disabled, the NAT and the DHCP server are also disabled. To change the 2Wire gateway to the bridging mode: 1. Open a Web browser and access the gateway user interface by entering http://gateway.2wire.net. 2. Click ; the Summary Status page opens (Figure 70). -
Page 83: Regulatory Information
Equipment Repairs Do not, under any circumstances, attempt any service, adjustments, or repairs on this equipment. Instead, contact your local 2Wire distributor or service provider for assistance. Failure to comply may void the product warranty. Location – Environmental Considerations Do not plug the power pack into an outdoor outlet or operate the terminal outdoors. It is not waterproof or dustproof, and is for indoor use only. -
Page 84: Declaration Of Conformity
If trouble is experienced with this equipment, please contact 2Wire, or your local 2Wire distributor or service center in the U.S.A. for repair and/or warrant information. If the trouble is causing harm to... -
Page 85: Rf Exposure Information
the telephone network, the telephone company may request you to remove this equipment from the network until the problem is resolved. No repairs can be done by a customer on this equipment. It is recommended that the customer install an AC surge arrestor in the AC outlet to which this device is connected. This is to avoid damage to the equipment caused by local lightning strikes and other electrical surges.
Need help?
Do you have a question about the 2710HGV-TNZ and is the answer not in the manual?
Questions and answers