Table of Contents
Advertisement
Advertisement
Table of Contents

Related Manuals for Lifescan One Touch Basic Plus Diabetes Monitoring System


Summary of Contents for Lifescan One Touch Basic Plus Diabetes Monitoring System
- Page 1 Complete Diabetes Monitoring System Owner’s Booklet For diabetes and life.
- Page 2 (diet, exercise, and medication) to help you gain better control of your diabetes. If you have any questions, please feel free to call your authorized LifeScan representative. Thank you for choosing the ONE TOUCH BASIC Plus Diabetes Monitoring System.
- Page 3 Diabetes Monitoring ONE TOUCH BASIC Plus ™ ™ System is intended for in vitro diagnostic use for quantitative determination of glucose in whole blood as an aid in monitoring effectiveness of diabetes management in the home and in clinical settings. It is not intended for use in the diagnosis of diabetes or for neonatal testing (newborns 0 –4 weeks old).
- Page 4 CAUTION: Before using any product to test your blood glucose, read all instructions and practice the test. Do all quality control checks as directed and consult with a diabetes healthcare professional. These recommendations apply to all blood glucose monitoring systems and are supported by the American Association of Diabetes Educators, the American Diabetes Association, the U.S.
-
Page 5: Table Of Contents
Infection Control The Complete ONE TOUCH Diabetes Monitoring System ONE TOUCH BASIC Plus ™ ™ Blood Glucose Meter ONE TOUCH Test Strips ™ Setting Meter Code Checking the System — Checking with the Check Strip — Checking with Control Solution Detailed Test Procedure —... - Page 6 USING THE METER MEMORY SETTING METER OPTIONS — How to Test Your Blood Special Messages Checking the Amount of Blood on the Test Strip Entering the Memory Mode Recalling Test Results Entering and Using the Set-Up Mode Clock (Time and Date) —...
- Page 7 SOLVING PROBLEMS TAKING CARE OF YOUR METER SPECIFICATIONS WARRANTY Test Procedure Messages Error Messages Doing a Daily Check Cleaning the Meter Replacing the Batteries Three-Year Warranty...
-
Page 8: Precautions And Limitations
PRECAUTIONS AND LIMITATIONS The following information will be useful to you and your healthcare professional when using the ONE TOUCH BASIC ™ to monitor your blood glucose level. If you experience symptoms that are not consistent with your blood glucose test results AND you believe you have followed all instructions described in the owner’s booklet, contact your healthcare... -
Page 9: Infection Control
Extremes in hematocrit (the amount of red blood cells in the blood) can affect test results. Very high hemat- ocrits (above 60%) and very low hematocrits (below 25%) can cause false results. Abnormally high levels of Vitamin C or other reducing substances will cause false low blood glucose results. -
Page 10: Getting Started
Plus System products. ™ Attempting to substitute other products may affect the accuracy of your test results and limit the ability of LifeScan to help you solve problems that may arise. Your ONE TOUCH BASIC Plus System includes everything you Plus ™... - Page 11 ONE TOUCH BASIC Plus Meter ™ ™ has a number of settings you can change, including the language, time and date, display formats, and the unit of measure. For a description of these options and how to set them, see pages 37-45.
-
Page 12: One Touch Basic Plus
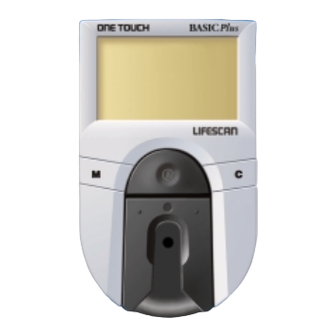
ONE TOUCH BASIC ™ Blood Glucose Meter Study this diagram and become familiar with all the parts of your ONE TOUCH BASIC Plus Meter. ™ ™ M BUTTON The ONE TOUCH BASIC Plus Meter automatically stores your test results. Use the M button to recall the information stored in your meter’s memory and to review... -
Page 14: One Touch
ONE TOUCH Test Strips ™ The ONE TOUCH BASIC ™ Diabetes Monitoring System measures the amount of blood glucose in whole blood. When blood is applied to a ONE TOUCH Test Strip, certain compounds on the test strip react with the blood to form a blue color. -
Page 15: Important Test Strip Information
Do not use bleach (or products containing bleach) near the test strips. For reliable results, use only ONE TOUCH Test Strips made by LifeScan. *For detailed information on ONE TOUCH Test Strips, refer to the ONE TOUCH Test Strip insert. -
Page 16: Before Testing
BEFORE TESTING Setting Meter Code Code numbers are used to enable your meter to provide consistent measurements. For this reason, it is important that the code is set correctly. You must code the meter before using it for the first time and then every time you change to another vial of ONE TOUCH Test Strips. - Page 17 Step 1: Press the On/Off Button. When turning meter on, all display symbols will appear. The last test result will then appear on the display for a moment. (If using the meter for the first time, the message code-- will appear on the display.) If you have already coded the meter, your current test strip code followed by the message check code will...
-
Page 18: Checking The System
Step 3: Code the Meter. While the meter displays code--, or after the word insert is displayed, press and release the C button; the code number will appear. Continue pressing the C button until the number on the display matches the code number on the test strip vial. -
Page 19: Checking With The Check Strip
Checking with the Check Strip A purple and white check strip is included in the carrying case of your ONE TOUCH BASIC ™ System. Before doing a check strip test, make sure the test strip holder, test area, and check strip are clean, dry, and lint-free. - Page 20 How to do a check strip test: Step 1: Press the On/Off Button. Insert Side 1 of the Check Strip. When insert code 10 (Example) strip appears, slide the notched end of the check strip into the test strip holder with Side 1 (purple side) facing up.
- Page 21 For assistance, call your authorized LifeScan representative. To clean and maintain the check strip: Make sure both sides of the check strip are clean.
-
Page 22: Checking With Control Solution
Do not scratch the check strip. Do not leave the check strip in sunlight. If you lose or damage the check strip, call your authorized LifeScan representative. Checking with Control Solution ONE TOUCH Normal Control ™ Solution contains a known amount... - Page 23 Do a control solution test: For practice, before testing your blood with the ONE TOUCH BASIC Plus Meter for the first ™ time When you begin using a new vial of test strips At least once a week Whenever you suspect that the meter or test strips are not working properly When your blood glucose test...
- Page 24 IMPORTANT CONTROL SOLUTION TEST INFORMATION Use only ONE TOUCH Check the expiration date of the control solution. Do not use if expired. Record the discard date on the control solution vial. Discard the vial three months after first opening. The ONE TOUCH is for ONE TOUCH Normal Control Solution only.
- Page 25 How to do a control solution test: Step 1: Press On/Off Button. Insert Test Strip. The code number that appears on the meter display should match the code number on the test strip vial. When insert code10 (Example) s t r i p a p p e a r s , slide a (Example) ONE TOUCH...
- Page 26 Step 2: Apply Control Solution. Shake the control solution vial well Plus before using. If there are any bubbles on the top of the vial, wipe them off with a clean tissue. Remove the cap and apply a drop of control solution to the middle of the test spot, covering it completely.
- Page 27 Do not use the system to test your blood until you get a test result that falls within the expected range. If you are unable to resolve the problem, call your authorized LifeScan representative. Expired or contaminated control...
-
Page 28: Detailed Test Procedure
Detailed Test Procedure Choose a clean, dry work surface. Make sure you have all the items needed to test: ONE TOUCH BASIC ™ ONE TOUCH Test Strips ™ Penlet Plus Adjustable Blood ™ Sampler Sterile lancet Release Button Deep-Puncture Setting (Largest Bump) Shallow-Puncture Setting (Smallest Bump) Plus Meter ™... -
Page 29: Getting A Drop Of Blood
Getting a Drop of Blood CAUTION: To reduce the chance of infection: Never share a lancet with another person. Always use a new, sterile LifeScan Lancet. Lancets are for single use only. The Penlet Plus Sampler should ™ be used by only one person. - Page 30 While the lancet is in the Penlet Plus Sampler, twist off the ™ protective disk. Make two full turns to ensure that the lancet separates from the protective disk. Replace the Penlet Plus Cap. Turn ™ the cap clockwise until it is snug but not overly tight.
- Page 31 Step 2: Cock the Penlet Sampler. Slide the ejection/cocking control backward until it clicks. If it does not click, the Penlet Plus Sampler may have been cocked when the lancet was inserted. Plus Step 3: Wash Your Hands. ™ Use warm, soapy water. Rinse and dry hands thoroughly.
- Page 32 Step 4: Lance Your Finger. Choose a spot on the side of a different finger each time you test. Repeated punctures in the same spot may cause soreness and calluses. Hold the Penlet Sampler firmly against the side of your finger. Press the release button.
- Page 33 Optional: To replace the protective disk on the lancet, place the disk on a hard surface and push the exposed tip into the protective disk. Always use caution when removing the lancet. Point the lancet down and away from you. Push forward on the ejection/cocking control and eject the lancet directly into a container for sharp objects.
-
Page 34: How To Test Your Blood
How to Test Your Blood Step 1: Press On/Off Button. Make Sure Code Number Displayed on Meter Matches Code Number on Test Strip Vial. Insert Test Strip. Make sure the test strip holder is properly in place. (See page 63.) Turn your meter on. - Page 35 Remove a test strip from the vial. Replace the vial cap immedi- ately. Do not touch the test spot on the test strip. The test spot should be white or ivory-colored, with no tears or wrinkles. With the meter display showing (Example) slide the test strip into Test...
- Page 36 Step 2: Apply Blood Sample. With the test strip in the meter and on the display, apply a drop of blood to the test spot. Be sure that you: Touch only the tip of the drop of blood to the test spot.
- Page 37 Step 3: Accurate Results in 45 Seconds. The meter then counts down from 45 to 0 seconds, beeps (if the Beep option is set to ), and displays your result. Remove the test strip only after the result is displayed. Blood glucose test results are auto- matically stored in your meter’s memory with the time and date...
-
Page 38: Special Messages
Special Messages The meter displays results from 0 to 600 mg/dL (33.3 mmol/L). If your blood glucose test result is 60 mg/dL (3.3 mmol/L) or below, your meter will beep in a low tone (if the Beep option is set to ) and display a special message: (Example) -
Page 39: Checking The Amount Of Blood On The Test Strip
Test results below 60 mg/dL (3.3 mmol/L) mean low blood glucose (hypoglycemia). Test results greater than 240 mg/dL (13.3 mmol/L) mean high blood glucose (hyperglycemia). If you get results below 60 mg/dL (3.3 mmol/L) or above 240 mg/dL (13.3 mmol/L), and do not have symptoms, first repeat the test. - Page 40 If the following message appears on the display, your drop of blood was too small, or smeared, or the test strip was not pushed all the way into the test strip holder. Repeat the test with a new test strip and enough blood to cover the entire test spot.
-
Page 41: Using The Meter Memory
Look at the back of the test strip. You should see a full, dark circle. If there are any white patches or streaks, you may have smeared the blood or the drop was too small. In either case, you may have a false low result. -
Page 42: Entering The Memory Mode
Entering the Memory Mode Turn the meter on by pressing the on/off button. You can access the meter’s memory and recall test results at any time before or after performing a test by pressing the M button. The word memory with the memory symbol will appear briefly. -
Page 43: Recalling Test Results
Recalling Test Results Pressing the M button allows you to see each blood glucose, check strip, and control solution test stored in memory. The records will appear in order from the most recent to the oldest, up to the full 75-record capacity of the memory. -
Page 44: Basic Plus
SETTING METER OPTIONS You do not have to enter the set-up mode to test. However, you can customize the various option settings of your ONE TOUCH ™ Meter to best meet your needs. This is done in the set-up mode. Option settings (for example) that you can customize include: Clock (Time and Date):... - Page 45 Use the M button to scroll through the options or move within an option. If you want to change an option setting, use the C button. Note: You can exit the set-up mode at any time by pressing the on/off button. If after two minutes you have not made a selection, the meter will turn itself off automatically.
-
Page 46: Clock (Time And Date)
Clock (Time and Date) The ONE TOUCH BASIC ™ Meter has an internal clock that will record the time and date of each test you perform. Your meter has been set to automatically record tests both when the Clock option is set to and when it is set to You may need to change the time setting in your meter to have the... -
Page 47: Setting The Time
If you do not want to display the time and date, press the C button to turn the Clock option to Note: The meter records the time and date of each test even when the Clock option is set to They can once again be seen by turning the Clock option to Setting the Time... -
Page 48: Beep Prompts
Press the M button and the day will flash. Press the C button to change the day. Pressing the M button again will display the new date setting. You may now turn the meter off or press the M button to move to the next option. -
Page 49: Language
Language The ONE TOUCH BASIC ™ Meter can display messages in 17 languages: English [engl. ] , Spanish [espan. ] , French [franc. ] , Italian [italia], Hungarian [magyar], Dutch [neder. ] , Norwegian [norsk], Polish [polski], Portuguese [port. ] , Russian [pycck. ] , Finnish [suomi], Swedish [svens. -
Page 50: Time Format
Time Format The meter can be set to display the time in either a 12-hour (AM/PM) format or a 24-hour format. To change the time format, enter the set-up mode (see page 37). Use the M button to choose the Time Format option. -
Page 51: Decimal Separator
Unit of Measure The meter is set to display test results in milligrams per deciliter (mg/dL). You have the option to change to millimoles per liter (mmol/L). To change the unit of measure, enter the set-up mode (see page 37). Use the M button to choose the Unit of Measure option. -
Page 52: Exiting The Set-Up Mode
To change the decimal separator, enter the set-up mode (see page 37) and select mmol/L as the unit of measure. Use the M button to choose the Decimal Separator option. Make your selection using the C button. You may now press the M button to review or change any of the options you have chosen or press the on/off button to turn the meter off. -
Page 53: Test Procedure Messages
SOLVING PROBLEMS The messages that appear on your ONE TOUCH display guide you through the testing procedure, alert you to problems as they occur, and give you information about test results stored in the meter’s memory. This section provides you with a complete listing of the display messages, what they mean, and what to do if there is a problem. - Page 54 MESSAGE check code insert c o d e 1 0 (Example) strip wait apply sample 45 ..0 APPEARS WHEN The meter is turned on. This is a reminder that prior to testing you should verify that the code displayed on the meter matches the code on the test strip vial.
- Page 55 MESSAGE (Example) (Example) (Example) insert s i d e 2 APPEARS WHEN A blood test has been completed. This indicates a blood glucose result when the meter is set for mg/dL. A blood test has been completed. This indicates a blood glucose result when the meter is set for mmol/L.
- Page 56 MESSAGE (Example) alternating with (Example) alternating with (Example) APPEARS WHEN The check strip test result falls into the acceptable range. The check strip range is printed on the back of your meter. Your blood glucose test result is low, 60 mg/dL (3.3 mmol/L) or below, possibly indicating hypo- glycemia.
-
Page 57: Error Messages
In most cases, problems are easy to fix. If you have trouble, call your authorized LifeScan representative. MESSAGE PROBLEM Some parts of the dis- play are not working. - Page 58 MESSAGE battry PROBLEM When this symbol appears and stays on the screen, it means the batteries are getting low. This symbol will remain on the display while the meter is on until the batteries are replaced. When this symbol is flashing, the batteries are too low.
- Page 59 MESSAGE clean test area remove strip PROBLEM 1. There is dirt, blood, or lint on the test area. 2. Your hand or an object covered the test area while the meter was turned on. 3. The meter was used in very bright light.
- Page 60 MESSAGE (Example) e r r o r 1 retest e r r o r 2 retest PROBLEM If the word contrl appears after a blood test, your blood sample was too small, smeared, or another drop was added after the test began. The sample was applied before the words apply sample appeared.
- Page 61 WHAT TO DO 4. Repeat the test with a new test strip. 5. Move the meter away from the light source. Repeat the test with a new test strip. 6. Repeat the check strip test. 7. Call your authorized LifeScan representative.
- Page 62 MESSAGE error3 retest enough blood retest PROBLEM The test strip was removed during a test or the test strip was inserted with blood or control solution already applied. 1. The blood or control solution sample was too small or smeared. 2.
- Page 63 WHAT TO DO 3. Repeat the test. Keep the meter test area clear. 1. Call your authorized LifeScan representative. 2. Repeat the test with a new test strip; try not to move the meter. 3. Repeat the test with a...
- Page 64 MESSAGE (Example) r e d o A retest PROBLEM The check strip test result is outside the acceptable range (printed on the back of the meter.) The last check strip test was outside the acceptable range and an acceptable repeat test was not performed.
- Page 65 You should also check all of your meter option settings to be sure they are correct. (If this continues to happen, there may be a problem with your meter. Call your authorized LifeScan representative.
-
Page 66: Taking Care Of Your Meter
TAKING CARE OF YOUR METER Your ONE TOUCH BASIC ™ Meter is easy to maintain. These tips will help you keep it in good operating condition: CAUTION: Do not get water or other liquids inside the meter. Never immerse the meter or hold it under running water or other liquids. -
Page 67: Doing A Daily Check
Doing a Daily Check Look through the small hole in the test strip holder to make sure there is no lint, dirt, or blood blocking it. If there is anything blocking the hole, or if the test area has dirt, lint, or blood on it, remove the test strip holder and clean the test area by following the instructions in the next... - Page 68 Step 1: Remove the Test Strip Holder from the Meter. Hold the meter and place your thumbs on the two raised dots on the test strip holder. Press down on the raised dots and slide the test strip holder toward you. Remove the test strip holder to expose the test area.
- Page 69 Step 3: Clean the Test Area. CAUTION: Do not get water inside the meter. Do not immerse meter in water. The following cleaning agents will damage the meter. DO NOT USE: Alcohol Cleansers with ammonia or phenol Glass cleaners Abrasive cleansers Check the clear, protective coating over the test area to make sure it is not scratched or damaged.
- Page 70 Step 4: Replace the Test Strip Holder. Hook the bottom of the test strip holder onto the square notch on the meter. Press down on the raised dots of the test strip holder until it snaps firmly into place. Press forward on the base of the test strip holder to be sure it is properly in place.
-
Page 71: Replacing The Batteries
Replacing the Batteries The ONE TOUCH BASIC ™ Meter comes with batteries already installed. When the batteries need to be replaced, use two AAA, 1.5-volt alkaline batteries. The batteries should last about 18 months when testing up to two (2) times a day. - Page 72 To replace the batteries: 1. Make sure the meter is turned off before you remove the batteries. 2. Turn the meter over so that the front of the meter is resting in the palm of your hand. (Back of Meter) 3.
- Page 73 Remove the batteries and reinsert them as illustrated. References 1. LifeScan data on file. 2. LifeScan data on file. 3. Kahn, R., and Weir, G.: Joslin’s Diabetes Mellitus, 13th ed. Philadelphia: Lea and Febiger (1994), 489.
-
Page 74: Specifications
116.2 grams (4.1 ounces) with batteries. Operating Temperatures: (59–95°F). Operating Humidity Range: relative humidity (noncondensing). Memory: Up to 75 results with time and date. Data Port: RS-232 serial communica- tions with special LifeScan cable for interface with a personal computer. 25–60%. 15–35°C 0–90%... -
Page 75: Three-Year Warranty
ONE TOUCH BASIC Plus Meter when used with any test strip other than ONE TOUCH Test Strips from LifeScan, or when the ONE TOUCH BASIC Plus Meter or ONE TOUCH Test Strips are modified in any way. - Page 76 Before you return your meter, or any product, first call your authorized LifeScan representative. This warranty is in lieu of all other warranties, express or implied, including any implied warranty of merchantability or fitness for a particular purpose.
- Page 77 The enclosed LifeScan Blood Glucose Meter, as an electromedical device, has been thoroughly tested and found to comply with the 2000 essential requirements of the ElectroMagnetic Compatibility Directive (EMC, 89/336/EEC), 2000.
- Page 78 For further information on LifeScan products, please call your authorized LifeScan representative. 060-196-01 © LifeScan, Inc. 2000 U.S. and foreign patents; IFD/OB/OTBP Milpitas, California 95035, U.S.A. other patents pending. Rev.: 01/2000...
Need help?
Do you have a question about the One Touch Basic Plus Diabetes Monitoring System and is the answer not in the manual?
Questions and answers