
Related Manuals for Saeco NEXTAGE CAP010


Summary of Contents for Saeco NEXTAGE CAP010
- Page 1 Automatic Machine for Espresso Coffee and Hot Beverages WARNING: This instruction manual is intended exclusively for specialized personnel.
- Page 2 Automatic Machine for Espresso Coffee and Hot Beverages WARNING: This instruction manual is intended exclusively for specialized personnel.
-
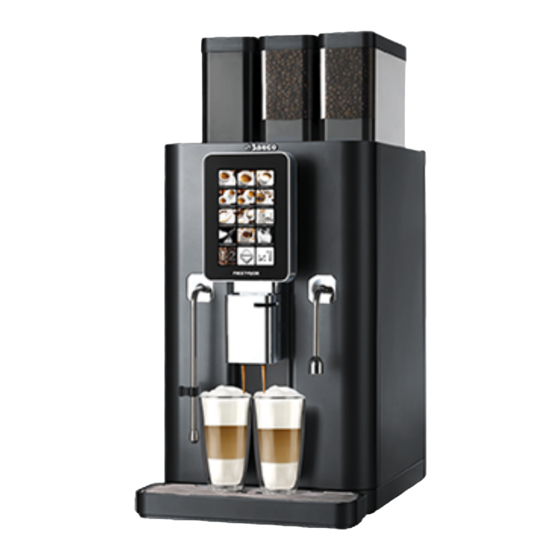
Page 3: Main Parts
English MAIN PARTS Nextage Main Parts Left hand side panel Steam wand Back panel Drip Tray Instant product container Coffee grinder/right dosing unit group Left coffee bean hopper Coffee grinder/left dosing unit group Right coffee bean hopper Mixer Right hand side panel Milk crema adjusting device Pre-ground coffee door Dispenser cover... -
Page 4: Table Of Contents
English CONTENTS MAIN PARTS 1 INTRODUCTION TO THE MANUAL 1.1 INTRODUCTION 1.2 SYMBOLS USED 2 INFORMATION ABOUT THE MACHINE 2.1 NOTES FOR THE USER 2.2 INTENDED USE OF THE APPLIANCE 2.3 APPLIANCE IDENTIFICATION 2.4 TECHNICAL DATA 3 SAFETY 3.1 INTRODUCTION 3.2 GENERAL SAFETY REGULATIONS 3.3 OPERATORS' REQUIREMENTS 3.4 SAFETY DEVICES... -
Page 5: Introduction To The Manual
For any particular need contact the Distributor or your Country Importer (if any) or the Constructor. All the rights of this brochure are reserved to SAECO Vending S.p.A.. Any copy or even partial divulgation, not expressively authorized in writing, are strongly... -
Page 6: Information About The Machine
English INFORMATION ABOUT THE MACHINE Notes for the user Any other use is to be considered improper and therefore dangerous. The appliance must be installed in a properly lighted, Do not place any product inside the machine which sheltered and dry location and on a working surface able may be dangerous as a result of unsuitable to withstand its weight. -
Page 7: Technical Data
English The following data can be found on the plate: • name of Manufacturer; • marks of compliance; • model; • serial number; • year and month of manufacture; • supply voltage (V); • supply frequency (Hz); • electrical power consumption (W). •... -
Page 8: Safety
• read the instructions contained in this publication and in amendments) and the CE marking Directive 93/68/EEC, the enclosed documents carefully; SAECO VENDING has arranged for a NextAge technical file at its premises, thus transposing the following standards during the designing phase: •... -
Page 9: Operators' Requirements
English Operators' requirements Two operators with different skills are required in order to guarantee the appliance’s safety: User Person in charge of using and attending the machine. The user is allowed to: Operate the appliance, adjust the operating parameters, stop the appliance, refill the appliance with coffee and instant products, empty the liquid collection tray and the coffee grounds drawer, clean the outside of the appliance. -
Page 10: Handling And Storage
English HANDLING AND STORAGE Unloading and handling Unloading from the transport vehicle and handling operations of the appliance must be carried out by qualified personnel only and using suitable equipment. The appliance must always be kept in upright position. Avoid: •... -
Page 11: Installation
English INSTALLATION Warning Unpacking and positioning The appliance cannot be installed in external areas. On receipt of the appliance, make sure that it has not Avoid installing it in areas where the temperature is suffered any damage during transport or that the packaging lower than +1°C or higher than 25°C and in has not been unduly opened with consequent stealing of particularly humid or dusty places and it should not be... - Page 12 English The appliance is supplied with an “ACCESSORY BOX” Check that the surface where the appliance shall be that contains the following items: positioned is steady. Make a 100 mm Ø hole on the surface (hole A in the figure). •...
-
Page 13: Connection To Water Mains
English Connect the water filter (C) to the water network (D). Connection to water mains Before connecting the water softener to the machine, wash the machine until the water is clear. Before connecting the appliance to water network, please read and follow the applicable regulations in force in your country. -
Page 14: Connection To The Electric Network
English Power cord type H07RNF sec. 3x2.5 mm² Connection to the electric Neutral network Phase The Maintenance Technician, who is responsible for Ground the installation of the machine, must ensure that: Depending on the current regulations of the Country where the machine operates, the cable connecting the •... -
Page 15: Connecting The Usb Port
English Insert the rear spoiler as shown in the figure. Slide the control panel upwards. Now the control panel is not attached to the machine any more and should be removed as shown in the figure. Connecting the USB Port The USB port can be used to connect the machine to the AUTHORISED SERVICE CENTRES' appliances in order to carry out checks and programming operations. - Page 16 English Turn the control panel as shown in the figure. Remove the cap from the inner side of the control panel and connect to the USB port Q. USB port...
-
Page 17: Description Of Controls
English DESCRIPTION OF CONTROLS Commands 6.1.2 Control panel The appliance has the following controls: The control panel is sensitive to the touch, i.e. it combines • Power button the functions of a display with those of a keypad. • Control panel The display areas which are sensitive to the touch change according to the current machine phase, e.g. -
Page 18: Supply And Starting Up
English SUPPLY AND STARTING UP Container Configuration The machine will detect that the door is open and will disable the coffee grinders/dosing units under the coffee bean hoppers. A "heart" icon will be displayed on the pictures of the coffee-based beverages; this means that pre-ground coffee is currently being used. -
Page 19: Instant Product Supply
English Instant product supply Cream adjustment Open the door. Cream quantity is adjusted through lever. Press the retainer FC in order to unlock the external By turning the lever clockwise, there will be a greater cover. quantity of cream. By turning the lever anti-clockwise, there will be a smaller quantity of cream. -
Page 20: Coffee Grinding Calibration
English • By turning the lever upward, the temperature will grow. Press the "Customer menu" button. • By turning the lever downward, the temperature will lower. Coffee grinding calibration Whatever the coffee blend is, a very fine grinding (notch on low values) increases the density, the cream quantity and the brewing time of the beverage. -
Page 21: First Start-Up Of The Machine
English Press the "Coffee grinder" writing. Press "Back" to return to the previous menu. To exit the maintenance menu and return to the beverage selection screen, press the bottom left arrow and wait for a few seconds. From this screen you can select which one of the two coffee grinders you want to set. - Page 22 English Open the door and switch on the machine by means of the power button. Close the door. The following screen is displayed on the control panel. At the end of the warm-up phase the machine carries out the "Machine ready" cycle. At this point the icons of the beverages will be enabled.
-
Page 23: Cleaning The Parts In Contact With Foodstuffs
English During the "Machine ready" cycle the machine will dispense hot water and steam, so make sure you do not put your hands under the jets. Cleaning the parts in contact with foodstuffs Clean all the parts of the VM which are in contact with foodstuffs. -
Page 24: Maintenance Menu
English MAINTENANCE MENU This section contains instructions on how to set and Press the "Maintenance" writing. change the maintenance parameters of the appliance. It is therefore necessary to read it carefully, and intervene only when the correct sequence of operations to be performed is fully understood. Maintenance menu The structure of the maintenance menu is indicated in section “Structure of the Maintenance Menu”. - Page 25 English 8.1.2 Structure of the maintenance menu ITEM NO. MENU ITEM MAINTENANCE 1.1. Cleaning 1.1.1. Coffee Group 01:01:02 Dispensing spout/mixer 01:01:03 Milk circuit 1.2. Coffee grinder 1.2.1. Coffee grinder 1/2 1.2.1.1. Finer 1.2.1.2. Coarser 8.1.3 Description of messages in the maintenance menu DISPLAY Description This menu allows some maintenance and cleaning operations to be performed on some...
-
Page 26: Operation And Use
English OPERATION AND USE Read carefully this brochure until you get a good • The selected beverage is enabled. If not, the beverage icon understanding of the machine, before starting to will be disabled, and a message describing the cause of operate it. -
Page 27: Left Coffee Bean Hopper
English Selecting the Coffee Bean Hopper This control allows the user to select which coffee bean hopper he/she would like to use to brew the coffee bean-based beverage. This selection is available only if the machine is equipped with 2 coffee bean hoppers. This selection is available only if the recipe of the selected beverage does not specify the coffee bean hopper to use. -
Page 28: Display Messages
English • On the left bottom side, a button to stop the beverage Temperature sensor alarm brewing. Consequence: All the beverages for which the coffee phase is required are disabled. • On the right bottom side, a button to stop the current Message upon touching: "Temperature sensor alarm". -
Page 29: Machine Switching-Off
English Message upon touching: No message. Brew group present Consequence: If the brew group is not present (value = 0), all the beverages for which the coffee phase is required are disabled. Message upon touching: "Insert brew group". Coffee grounds drawer full alarm Consequence: When this alarm is released, all the beverages for which the coffee phase is required are disabled. -
Page 30: Cleaning And Maintenance
English CLEANING AND MAINTENANCE Before performing any maintenance and/or cleaning 10.2 Cleaning and scheduled operations, turn off the appliance by switching the switches maintenance to the “OFF” position. Disconnect the appliance from the power supply by removing the plug from the socket and All components must be rinsed with warm water only, wait for the appliance to cool down. -
Page 31: Control Panel
English 10.2.1 Maintenance schedule COMPONENT TO BE MAINTENANCE CLEANED Control panel See section "Control Panel Cleaning". Steam wand See section "Steam Wand Cleaning". See sections "Dispenser/Mixer Automatic Cleaning" and "Dispenser Dispenser Manual Cleaning". Coffee Group See section "Cleaning the Coffee Brew Group". Milk circuit See section "Milk Circuit Cleaning". - Page 32 English 10.2.2 Control Panel Cleaning Press the "Maintenance" writing. The control panel cleaning must only be performed with the power button set to "0" or the door open. Clean the control panel only with a damp cloth or with detergents that are suitable for food contact. 10.2.3 Steam Wand Cleaning Perform this cleaning operation each time after using the steam wand.
- Page 33 English Press on the "Dispenser/Mixer" writing. 10.2.5 Dispenser Manual Cleaning Every time the CAPPUCCINATORE is used, it must be cleaned in order to avoid the solidification of residues. All the removable parts must be washed and rinsed in running water. In order to clean the dispenser manually, its various parts must be removed and washed separately.
- Page 34 English • Slide the temperature adjusting lever D4 on the left (only Press the "Maintenance" writing. for versions with Cappuccinatore). • Slide the Cappuccinatore body cover D8 upwards (only for versions with Cappuccinatore). • Slide the dispensing spout body cover D12 upwards. Wash all the components with lukewarm water.
- Page 35 English Press on the "Brew group" writing. Open the pre-ground coffee door. Insert the tablet into the duct and press on the "Start" writing. The machine starts the brew group automatic cleaning cycle. Under the button corresponding to the selected cleaning type, a progress bar indicates the cleaning cycle progress status.
- Page 36 English • Remove the brew group by holding it from the special To exit the maintenance menu and return to the beverage handle. selection screen, press the bottom left arrow and wait for a few seconds. • Wash abundantly with warm water. Do not use detergents.
- Page 37 English Press the "Maintenance" writing. Press on the "Milk circuit" writing. Press on the "Cleaning" writing. A pop-up window is displayed, indicating that the milk suction hose must be immersed in the detergent solution. If the machine has not reached the operating temperature, the cleaning buttons are not active.
- Page 38 English Immerse the milk suction hose in the detergent solution 10.2.10 Instant Product Mixer Cleaning and then press Start. The machine starts the milk circuit automatic cleaning cycle. Under the button corresponding to the selected cleaning Open the door. type, a progress bar indicates the cleaning cycle progress Disconnect the wand from the mixer body.
- Page 39 English Turn the ring nut clockwise and remove the mixer body. Turn the flange housing cover clockwise and then remove it. Wash all components with lukewarm water and pay particular attention not to damage the fan. Assemble the components in reverse order and connect the dispensing hose correctly.
- Page 40 English • Remove the external cover from the instant product container. • Lift the retainer FE and pull the rear level LP in a way to close the coffee bean hopper partition, then disengage the hopper from the upper surface of the machine. •...
-
Page 41: Non-Scheduled Maintenance
English 10.2.12 Hot Water Wand Cleaning Clean the wand with a non-abrasive damp cloth. If the wand is clogged, its end can be unscrewed and the aerator can be immersed in a solution containing a descaling agent. 10.3 Non-scheduled maintenance Unscheduled maintenance includes every repairing or part replacing. -
Page 42: Troubleshooting
English TROUBLESHOOTING Here is a list of the possible machine troubles. When the symbol "*" appears in the "Solution" box, it means that the operation must be performed by a Maintenance Technician. Trouble Cause SOLUTION The machine does not start No voltage Check: - that the plug is connected... -
Page 43: Storage Disposal
English STORAGE DISPOSAL 12.1 Change of location Should the machine be positioned in another site it is necessary to carry out the following operations: • unplug the machine; • carry out the general cleaning of the machine as indicated in chapter “Cleaning and Maintenance"; •... -
Page 44: Instructions For End-Of-Life Disposal Treatment
English INSTRUCTIONS FOR END-OF-LIFE DISPOSAL TREATMENT INFORMATION FOR THE USER This product complies with EU Directive 2002/96/EC. The symbol on the product or on its packaging indicates that this product may not be treated as household waste. Instead it shall be handed over to the applicable collection point for the recycling of electrical and electronic equipment.
Need help?
Do you have a question about the NEXTAGE CAP010 and is the answer not in the manual?
Questions and answers