Powerhouse PH2100PRi Quick Start Manual
Hide thumbs
Also See for PH2100PRi:
- Shop manual (69 pages) ,
- Owner's manual (50 pages) ,
- Operating instructions manual (47 pages)
Table of Contents
Advertisement
Quick Links
QuickStart Guide
Thank you
For joining the
PoWerhoUSe FAMiLY
Please review this Quick Start Guide to begin using your generator.
To fully understand and safely operate this product, please review the
warnings and complete detailed instructions in the Owner's Manual.
Please refer to the Owner's Manual
13
when you see this icon for important
details and additional information.
Use outdoors only
ProDUCeS CArbon MonoxiDe —
CAn CAUSe DeAth or SerioUS injUrY
Avoid water
KeeP AWAY FroM rAin, SnoW
AnD other Wet ConDitionS
Flammable
KeeP AWAY FroM SMoKing MAteriALS,
SPArKS, & SoUrCeS oF CoMbUStion When reFUeLing
In emergency
PUSh the engine SWitCh to OFF PoSition
to StoP engine – With or WithoUt A LoAD.
Keep level
ALWAYS oPerAte
on A LeveL SUrFACe
High altitudes /
Extreme temperatures
reFer to the oWner'S MAnUAL For SPeCiFiC reCoMMenDAtionS
Battery safety
reFer to the oWner'S MAnUAL For
MAintenAnCe AnD SAFetY reCoMMenDAtionS
®
www.powerhouse-products.com
Rev. 2012-08-01
Advertisement
Table of Contents

Related Manuals for Powerhouse PH2100PRi


Summary of Contents for Powerhouse PH2100PRi
-
Page 1: High Altitudes
QuickStart Guide Thank you For joining the PoWerhoUSe FAMiLY Please review this Quick Start Guide to begin using your generator. To fully understand and safely operate this product, please review the warnings and complete detailed instructions in the Owner’s Manual. -
Page 2: Battery Charger
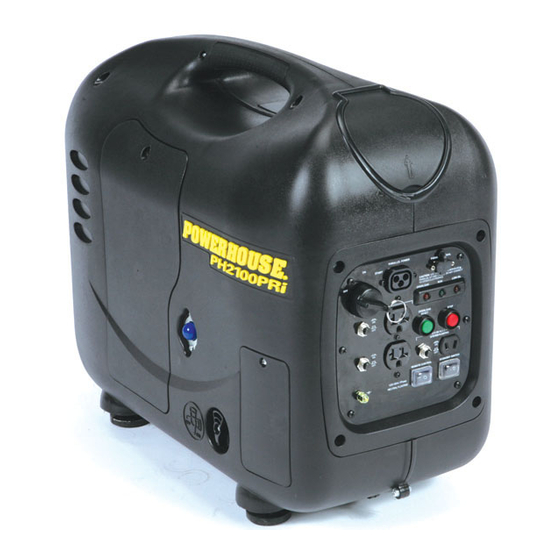
If you have a problem with this generator, do not return it to the store where you purchased it. For warranty support call 877-544-4449, 8am to 6pm ET, or email us at warranty@powerhouse-products.com. ©Copyright DTS Manufacturing / The Coast Distribution System, Inc. 2012... - Page 3 Gas cap Spark plug access door access door Starter grip Control panel Maintenance door Battery access door Fuel valve Primer bulb Parallel receptacle Parallel data port Overload light (red) Ignition switch Run light (green) Low oil alarm light (red) 120 V duplex receptacle Overload reset button (green) 120 V circuit breaker Stop button (red)
- Page 4 Initial setup Connect battery Remove charger battery DC receptacle access door Charge the battery for 3 hours or until fully charged HOURS Locate battery Remove maintenance door wiring harness Connect battery Remove dipstick wiring harness main wiring harness Replace battery access door Add 15.6 oz.
- Page 5 Initial setup (continued) Replace dipstick Replace maintenance door gasoline Use gasoline with an octane rating of 87 or higher...
- Page 6 Operation Turn Disconnect to start appliances Open For additional fuel valve starting options refer to pages 16-18 of the owner’s manual Connect Pump primer bulb appliances 15 to 20 times (initial startup only) Turn remote switch For remote system in- structions, refer to page 18 of the owner’s manual...
- Page 7 Shutdown Disconnect Turn remote appliances switch Turn Close economy fuel valve switch Turn In emergency push and hold the STOP button until the engine is off...
Need help?
Do you have a question about the PH2100PRi and is the answer not in the manual?
Questions and answers
When checking oil level do I screw the cap in all the way on a ph2100pri