Napoleon Park Avenue GD82NT Installation And Operation Instructions Manual
Natural gas
propane
Hide thumbs
Also See for Park Avenue GD82NT:
- Installation and operation instructions manual (34 pages) ,
- Installation and operation instructions manual (34 pages)
Table of Contents
Advertisement
INSTALLER: THESE INSTRUCTIONS MUST BE CONVEYED TO AND REMAIN WITH THE HOMEOWNER.
CERTIFIED UNDER CANADIAN AND AMERICAN NATIONAL STANDARDS: CSA 2.33, ANSI Z21.88 FOR VENTED GAS FIREPLACE HEATERS.
GD82NT
NATURAL GAS
GD82PT
PROPANE
Certified for Canadian and United States using ANSI/CSA Methods.
SAFETY INFORMATION
WARNING: If the information in these instructions
are not followed exactly, a fire or explosion may
result causing property damage, personal injury or
loss of life.
- Do not store or use gasoline or other flammable
vapors and liquids in the vicinity of this or any other
appliance.
- WHAT TO DO IF YOU SMELL GAS:
● Do not try to light any appliance.
● Do not touch any electrical switch; do not use
any phone in your building.
● Immediately call your gas supplier from a
neighbour's phone. Follow the gas supplier's
instructions.
● If you cannot reach your gas supplier, call the
fire department.
- Installation and service must be performed by a
qualified installer, service agency or the supplier.
Wolf Steel Ltd., 24 Napoleon Rd., Barrie, ON L4M 4Y8 Canada • (705)721-1212 • fax(705)722-6031
$10.00
OPERATION INSTRUCTIONS
www.napoleonfireplaces.com • ask@napoleon.on.ca
INSTALLATION
1
AND
W415-0536 / D / 05.18.07
W415-0536 / D / 05.18.07
Advertisement
Table of Contents

Related Manuals for Napoleon Park Avenue GD82NT


Summary of Contents for Napoleon Park Avenue GD82NT
-
Page 1: Operation Instructions
- Installation and service must be performed by a qualified installer, service agency or the supplier. Wolf Steel Ltd., 24 Napoleon Rd., Barrie, ON L4M 4Y8 Canada • (705)721-1212 • fax(705)722-6031 www.napoleonfireplaces.com • ask@napoleon.on.ca W415-0536 / D / 05.18.07 $10.00... -
Page 2: Table Of Contents
TABLE of CONTENTS PG2-5 INTRODUCTION BLOWER REPLACEMENT Warranty Night Light™ Replacement Dimensions General Instructions DECORATIVE BRICK PANEL General Information INSTALLATION Care of Glass & Plated Parts VENTING AFK / WI FACE KIT Vent lengths INSTALLATION Venting Specifi cations Air Terminal Locations REMOTE AND VALVE ACCESS Burner Assembly Removal 10-15... - Page 3 After the fi rst year, NAPOLEON® will not be responsible for installation, labour or any other costs or expenses related to the reinstallation of a warranted part, and such expenses are not covered by this warranty.
-
Page 4: General Instructions
FIGURE 1 58" 46" " " 4" DIA. 7" DIA. " 21" 5" " 2" " " 14" 24" 28" 28" fireplace framing - 0” to stand-offs (top, rear and GENERAL INSTRUCTIONS sides) THIS GAS FIREPLACE SHOULD BE INSTALLED AND SER- fi... -
Page 5: Care Of Glass & Plated Parts
Do not use abrasive cleaners to clean plated parts. Buff lightly with a clean dry cloth. The glass is 3/16” ceramic glass avail- able from your Napoleon® / Wolf Steel Ltd. dealer. DO NOT SUBSTITUTE MATERIALS. Clean the glass after the fi rst 10 hours of operation with a recommended gas fi... - Page 6 DEFINITIONS ELBOW VENT LENGTH VALUES for the following symbols used in the venting calculations feet inches and examples are: 1° 0.03 > - greater than 15° 0.45 > - equal to or greater than 30° 11.0 < - less than 45°...
- Page 7 TOP EXIT / HORIZONTAL TERMINATION = 6 ft when (H ) > (V = 3 ft Simple venting confi guration (only one 90° elbow) = 5 ft = 3 + 5 = 8 ft = .03(two 90° elbows - 90°) = .03(180° - 90°) = 2.7 ft FIGURE 6 = 8 + 2.7 = 10.7 ft = 10.7 + 6 =16.7...
- Page 8 TOP EXIT VERTICAL TERMINATION REQUIRED VERTICAL when (H ) < (V RISE IN FEET See graph to determine the required vertical rise HORIZONTAL VENT RUN PLUS OFFSET IN for the required FEET horizontal run H The shaded area within the lines represents ac- ceptable values for H and V For vent confi...
- Page 9 FIGURE 12 W415-0536 / D / 05.18.07...
-
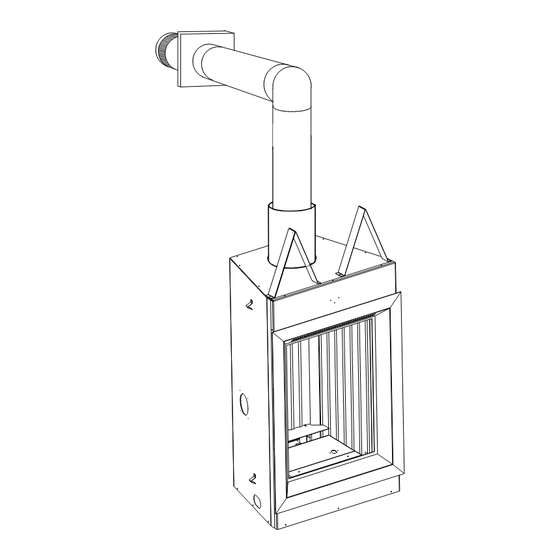
Page 10: Wall & Ceiling Protection
12” x 11”. are available from your IMPORTANT: For optimum performance, The stove pipe Napoleon® dealer. See should rise ¼” per foot of run. Accessories to order the 1. Assemble the shield to the spacer as shown, using the specifi... -
Page 11: Using Flexible Vent Components
USING FLEXIBLE VENT COMPONENTS Use only approved aluminum flexible liner kits For safe and proper operation of the fi replace, follow the marked: venting instructions exactly. All inner exhaust and outer intake vent pipe joists may be sealed using either Red RTV high temp silicone seal- ant or Black high temp Mill Pac with the exception of the “Wolf Steel Approved Venting”... -
Page 12: Fireplace Vent Connection
FIREPLACE VENT CONNECTION 1. Install the 4” diameter aluminium fl exible liner to the fi replace. Secure with 3 screws and fl at washers. Seal the joint and screw holes using the high temperature sealant FIGURE 20 (W573-0007 not provided). 2. -
Page 13: Gas Installation
VERTICAL VENTING INSTALLATION GAS INSTALLATION 1. Move the fi replace into position. Proceed once the vent installation is complete. Note : All gas connections must be contained within 2. Fasten the roof support to the roof using the screws the fi replace when complete. provided. -
Page 14: Framing
CLEARANCE TO COMBUSTIBLES FRAMING MAINTAIN THESE MINIMUM CLEARANCES TO COM- It is best to frame your fi replace after it is positioned and the BUSTIBLES: vent system is installed. Use 2x4’s and frame to local build- Fireplace framing - 0” to stand-offs (top, rear & sides) ing codes. -
Page 15: Electrical Connection
MANTLE CLEARANCES Combustible mantle clearance can vary according to the man- FIRESTOP tle depth. Use the graph to SPACER 2" help evaluate the clearance STUD 1" GAP FROM INSULATION SLEEVE needed. 2" GAP FROM VENTING INSULATION 2" 6" FIGURE 32 SLEEVE 5"... -
Page 16: Finishing
Decorative brick panels must be installed before the logs. See installation instructions supplied with the panel kit. LOG PLACEMENT PHAZER logs, exclusive to Napoleon® Fireplaces, provide 4. Place log #4 with the a unique and realistic glowing effect that is different in every charred branch facing installation. -
Page 17: Blower Replacement
BLOWER REPLACEMENT 3. Remove the glass door, logs, rear log supports, brick The Napoleon® PARK AVENUE™ comes equipped with a panels, air defl ector, burner assy, panel support, panel sup- heat circulating blower. The blower is pre-wired and is con- port bracket. -
Page 18: Decorative Brick Panel Installation
DECORATIVE BRICK PANEL INSTALLATION 1. Carefully remove the glass door and all logs. (Refer to Rest the bottom edge of the rear panel on top the installation manual) of the rear portion of the air defl ector at the back of the fi... -
Page 19: Afk / Wi Face Kit Installation
AFK / WI FACE KIT INSTALLATION 1. Attach screw and spacer as illustrated in Fig. 46 to the bottom of both sides of the front housing. SCREW & SPACER FIGURE 46 2. Attach the face plate bracket provided to the top edge of the front housing using 2 #8 - 1/2”... -
Page 20: Remote And Valve Access
REMOTE, RECEIVER AND VALVE ACCESS BURNER ASSEMBLY REMOVAL 1a. Rectangular Front Removal Pull on the top of the optional front away from the fi replace until the male portion of the latch disengages. Tilt forward slightly and lift from the 2 shoulder screws near the bottom. 1b. -
Page 21: Operation / Maintenance
OPERATION / MAINTENANCE desired fl ame height. Six fl ame levels are included, from 1 TIME OUT (minimum) to 6 (maximum). An acoustic signal from the If the appliance is turned on and the Receiver does not receive Receiver confi rms the reception of the command. any command for 24 hours, it automatically turns the appliance and the Remote Control off. - Page 22 5. FAN SPEED SETTING CHILD SAFETY LOCK-OUT This function controls the speed of the hot air circulating fan. This function is to deactivate con- To change the fan speed, use the UP and Down button until trol button. The function is active the cursor (small triangle) is left of the fan icon.
- Page 23 ADDRESS SETTING PROCEDURE Use the UP and DOWN key on the transmitter until the cursor (small triangle) is left of the clock icon. From time 0:00 press the LEFT key ten times. The display will show then the trans- mitter address. Press the LEFT key to exit this function. The transmitter address is required to be equal to the Receiver.
- Page 24 FIGURE 64 W415-0536 / D / 05.18.07...
-
Page 25: Operating Instructions
OPERATING INSTRUCTIONS slight odour for a few hours. This is caused by dust particles in When lit for the fi rst time, the fi replace will emit a slight odour the heat exchanger burning off. Open a window to suffi ciently for a few hours. -
Page 26: Pilot Burner Adjustment
If ignition takes longer, consult your 1. In order to properly clean the burner and pilot assem- Napoleon® dealer / distributor. bly, remove the logs to expose both assemblies. 7. Check that the gasketing on the sides, top and bot- 2. -
Page 27: Replacements
ERIAL UMBER OF FIREPLACE ability of replacement parts. Normally all parts can be ordered 2. I NSTALLATION DATE OF FIREPLACE through your Napoleon® dealer or distributor. 3. P UMBER When ordering replacement parts always give the following 4. D ESCRIPTION OF PART information: 5. - Page 28 0:00 FEATURE SELECT ON/OFF W415-0536 / D / 05.18.07...
-
Page 29: Trouble Shooting Guide
TROUBLE SHOOTING GUIDE EFORE ATTEMPTING TO TROUBLESHOOT PURGE YOUR UNIT AND INITIALLY LIGHT THE PILOT AND THE MAIN BURNER WITH THE GLASS DOOR OPEN SYMPTOM PROBLEM TEST SOLUTION Main burner fl ame Blockage in vent. - remove blockage. In really cold conditions, ice buildup may occur on is a blue, lazy, the terminal and should be removed as required. - Page 30 SYMPTOM PROBLEM TEST SOLUTION - connect a jumper wire across the wall switch terminals; if main burner Themostat or switch is de- Pilot burning; no lights, replace switch / thermostat. fective. gas to main burner; gas knob is on ‘HI’; Wall switch wiring is defec- - disconnect switch wires &connect a jumper wire across terminals wall switch / ther-...
- Page 31 W415-0536 / D / 05.18.07...
- Page 32 NOTES W415-0536 / D / 05.18.07...
- Page 33 NOTES W415-0536 / D / 05.18.07...
Need help?
Do you have a question about the Park Avenue GD82NT and is the answer not in the manual?
Questions and answers