Table of Contents
Advertisement
Quick Links
Download this manual
See also:
User Manual
Advertisement
Table of Contents

Subscribe to Our Youtube Channel
Related Manuals for ACTi KCM-5211


Summary of Contents for ACTi KCM-5211
- Page 1 KCM-5211 18x Zoom H.264 4-Megapixel IP D/N PoE Box Camera (DC 12V / PoE) Ver. 2014/10/15...
-
Page 2: Table Of Contents
KCM-5211 Hardware Manual Table of Contents Precautions Safety Instructions ................4 Introduction Package Contents ................6 Physical Description ................ 7 Basic Connections ................. 10 Serial Port Connection ..............11 Accessing the Camera Configure the IP Address ............... 13 Access the Camera ................. 17... -
Page 3: Precautions
KCM-5211 Hardware Manual Precautions Read these instructions You should read all the safety and operating instructions before using this product. Heed all warnings You must adhere to all the warnings on the product and in the instruction manual. Failure to follow the safety instruction given may directly endanger people, cause damage to the system or to other equipment. -
Page 4: Safety Instructions
KCM-5211 Hardware Manual Safety Instructions Don’t use the power supply with other voltages This device is likely to be damaged or damage other equipments / personnel, if you use a power supply with different voltage than the one included with this device. All warranty of this product will be voided in the situations above. - Page 5 KCM-5211 Hardware Manual operation. Safety Check Upon completion of any service or repairs to this video product, ask the service technician to perform safety checks to determine if the video product is in proper operating condition. www.acti.com...
-
Page 6: Introduction
KCM-5211 Hardware Manual Introduction Package Contents KCM-5211 Product CD Terminal Blocks for Power, DI/O and Serial Port Accessories Warranty Card *For the mounting block, please attach the flat side towards the front of camera. There are two types of mounting blocks, and this device uses the black version. -
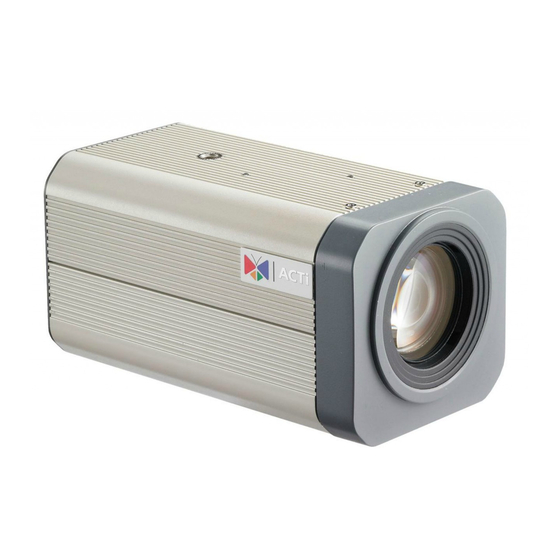
Page 7: Physical Description
KCM-5211 Hardware Manual Physical Description 1) Digital Input / Output Used in applications like motion detection, event triggering, time lapse recording, alarm notifications, etc., the I/O terminal connector provides the interface to: • 2 Transistor Outputs - For connecting external devices such as relays and LEDs. - Page 8 KCM-5211 Hardware Manual 3.3V FUSE 1A DC TO DC CONVERTER POWER INPUT EARTH GND DC POWER RELAY DEVICE DIODE CAMERA 2) Serial Port This port connects to serial devices via RS-485 or RS-422 protocols. Use the supplied serial port terminal block to connect the wires from the camera to the serial device.
- Page 9 KCM-5211 Hardware Manual Restore to Default Power On Complete On (3s) Off (about 15s) Off (10~15s) Stay On About 20 Seconds 5) Audio Input / Output The IP device supports audio input and output with earphone jack 6) Micro SDHC Card Slot...
-
Page 10: Basic Connections
KCM-5211 Hardware Manual Basic Connections Follow the procedures below to connect the IP device to the respective apparatuses. If you have a PoE(Power over Ethernet) supported switch or injector: 1) Connect your IP Box Camera to the Switch / Injector by CAT5 or CAT6 cables with RJ45 connector. -
Page 11: Serial Port Connection
CAUTION: Incorrect wiring may cause damage to the connected devices. DISCLAIMER: ACTi will not be responsible for any damage caused by improper wiring. 2. Connect a ground wire to one of the GND terminal pins of your camera (via Power or DI/O terminals) to complete the connection. - Page 12 KCM-5211 Hardware Manual For more information on connecting PT scanners, please refer to the Knowledge Base article: Pan and Tilt Scanner for ACTi Zoom Cameras (http://www.acti.com/support/KnowledgeBase/outside/detail.asp?KB_ID=KB20110120001) available on the website. www.acti.com...
-
Page 13: Accessing The Camera
KCM-5211 Hardware Manual Accessing the Camera Configure the IP Address In order to be able to communicate with the camera from your PC, both the camera and the PC have to be within the same network segment. In most cases, it means that they both should have very similar IP addresses, where only the last number of the IP address is different from each other. - Page 14 The IP Utility can be downloaded for free from http://www.acti.com/IP_Utility When you launch IP Utility, the list of connected cameras in the network will be shown. See sample illustration below: You can quickly notice the camera model in the list.
- Page 15 KCM-5211 Hardware Manual Use the default IP address of the camera If there is no DHCP server in the given network, the user may have to manually assign the IP addresses to both the PC and the camera to make sure they are in the same network segment.
- Page 16 KCM-5211 Hardware Manual Manually adjust the IP addresses of multiple cameras If there are more than one camera to be used in the same local area network and there is no DHCP server to assign unique IP addresses to each of them, all of the cameras would then have the initial IP address of 192.168.0.100, which is not a proper situation for network...
-
Page 17: Access The Camera
Microsoft Internet Explorer on the PC to access the camera. Note: Only Microsoft Internet Explorer is supported by the camera at the time of writing this documentation. Please refer to our website (www.acti.com) for future upgrades. Internet Explorer supports the following functionalities:... - Page 18 KCM-5211 Hardware Manual Upon successful connection to the camera, the user interface called Web Configurator would appear together with the login page. The HTTP port number was not added behind the IP address since the default HTTP port of the camera is 80, which can be omitted from the address for convenience.
Need help?
Do you have a question about the KCM-5211 and is the answer not in the manual?
Questions and answers