
Related Manuals for LG LVC-C500


Summary of Contents for LG LVC-C500
-
Page 1: Operating Instructions
Operating Instructions LVC-C500 LVC-C503 LVC-C510 LVC-C513 LVC-C530 LVC-C533 LVC-C553 Before installing and using the camera, please read these instructions thorough- ly and retain them for later reference. - Page 2 Warning To prevent fire or shock hazard,do not expose the unit to rain or moisture. CAUTION To avoid electrical shock,do not open the cabinet. Refer servicing to quali- RISK OF ELECTRIC SHOCK fied personnel only. DO NOT OPEN Wiring methods shall be in accordance with the National Electric Code, ANSI/NFPA 70.
-
Page 3: Table Of Contents
Exview/HAD/CCD (Charge Coupled Device) • High magnitude of zoom lens with optical X 27, Digital X 54 (LVC-C503/C513/C533/C553), Digital X 324 (LVC-C500/C510/C530) • Auto Focus / Auto White balance • Auto exposure with DC Iris control • Day & Night function •... -
Page 4: Cautions For Safe Operation
Cautions for Safe Operation Power Supply This camera must always be operated a 12V DC power supply. Handling of the unit Be careful not to spill water or other liquids on the unit, or to get combustible or metallic material inside the body. -
Page 5: Operating Controls And Their Functions
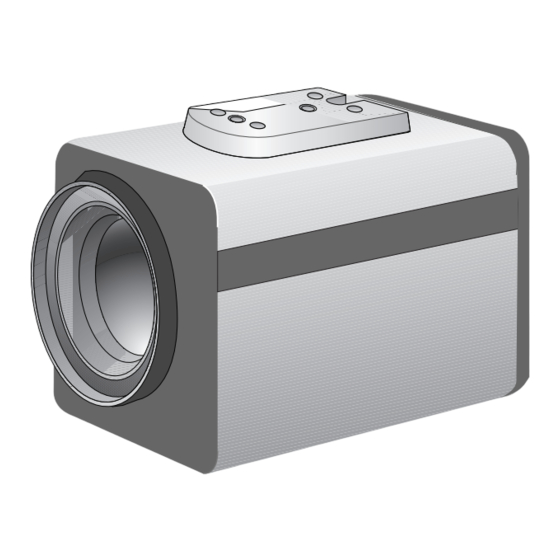
Operating Controls and Their Functions 1. Tripod adapter Model: LVC-C500, LVC-C503, This adapter can also be attached on the bottom of the camera. LVC-C510, LVC-C513 2. Lens mount cap 3. TELE Key When push the TELE KEY, picture is telephoto 4. -
Page 6: Power In / Control / External Key(A/D In)
Power In / Control Model: LVC-C500, LVC-C503, LVC-C510, LVC-C513 You can adjust focus and zoom by a pin terminal on the back side of the camera. * is the color of the cable. (If it is offered) Adjust voltage from 1 pin and 2 pin... -
Page 7: External Key (A/D In)
External Key (A/D IN) Model: LVC-C500, LVC-C503, LVC-C510, LVC-C513 Schematic diagram of wired remote-control... - Page 8 Operating Controls and Their Functions 1. Tripod adapter Model: LVC-C530, LVC-C533 This adapter can also be attached on the bottom of the camera. 2. Lens mount cap 3. TELE Key When push the TELE KEY, picture is telephoto 4. WIDE Key When push the WIDE KEY, picture is wide angle 5.
- Page 9 Power In / Control Model: LVC-C530, LVC-C533 You can adjust focus and zoom by a pin terminal on the back side of the camera. * is the color of the cable.(If it is offered)
- Page 10 Power In / Control Model: LVC-C530, LVC-C533...
- Page 11 External Key (A/D IN) Schematic diagram of wired Model: LVC-C530, LVC-C533 remote-control...
- Page 12 Operating Controls and Their Functions 1. Tripod adapter Model: LVC-C553 This adapter can also be attached on the bottom of the camera. 2. Lens mount cap 3. TELE Key When push the TELE KEY, picture is telephoto 4. WIDE Key When push the WIDE KEY, picture is wide angle 5.
- Page 13 Connections Model: LVC-C553 Power Connection 1. Remove the insulation on the power cable as illustrated. 2. Attach the terminal tips. 3. Connect to the 12V DC UL Listed, Class 2 Power Supply only on the camera. Connection the monitor 1. To VIDEO OUT 2.
- Page 14 Control Remote Control Lines are connected to RJ-45 socket as Model: LVC-C553 shown below. In case of RS-485 INTERFACE (Basic) CONTROL In case of Zoom/Focus DC control Interface(option) ZOOM COMMON PIN 8 PIN 1 FOCUS CONTROL OUT Controller ZOOM(+Tele, -Wide) FOCUS(+Near, -Far) Receiver/Controller Voltage Range...
-
Page 15: Menu Descriptions
MENU DESCRIPTIONS Using TELE, WIDE, F. NEAR, F. FAR button TELE and WIDE are used for UP and DOWN. • FOCUS+ and FOCUS- are used for INCREASE and DECREASE the data. •... -
Page 16: Camera Id
CAMERA ID 1. CAMERA ID To connect a large number of camera , It can be assigned to identification number to each camera for camera control easily. (OFF, 0 - 255: total numbers of ID are 256) • It only can be set this function using ID commend. To transfer ID Code of camera , In first byte at PC control. -
Page 17: Focus Mode Set
FOCUS MODE SET 2. Focus Set: 2-1. Focus Mode Set This function is for focus mode setting A) Set up “FOCUS SET” in main menu using Tele/Wide key. Select the “FOCUS MODE” in submenu using Tele/Wide key. And then set the mode (Auto, Push auto, or Manual) using Focus key. - Page 18 A) Select the “ZOOM END” in submenu using Tele/Wide key. B) Set the Zoom end mode using Focus key. LVC-C503/C513/C533/C553: from (Zoom Start + 1) to X54 LVC-C500/C510: from (Zoom Start + 1) to X324 2-5. ZOOM SPEED Set This function is for selection of zoom speed.
-
Page 19: Focus Mode Set
FOCUS MODE SET 2-7. INITIAL SET If initial mode set to ON, All FOCUS SET function is changed to the factory setting. A) Select the “INITIAL SET” in submenu using Tele/Wide key. B) Set the initial set mode to ON or OFF using Focus key. 2-8. -
Page 20: Awb Set
AWB SET (Auto White Balance) 3. AWB SET 3-1. WB Mode Set This function is for changing the WB mode. A) Set up “AWB SET” in main menu using Tele/Wide key. WBC MODE AUTO RED ADJUST NOT USE B) Select the “WB MODE” in submenu using Tele/Wide key. BLUE ADJUST NOT USE C) Set the mode Auto, Push auto , Manual, Outdoor, Indoor using... - Page 21 AWB SET (Auto White Balance) 3-3. BLUE ADJUST Set This function is available for Manual WB mode. This mode is the adjustment of user option for special color. WBC MODE AUTO RED ADJUST NOT USE A) Select the “BLUE ADJUST” in submenu using Tele/Wide key. BLUE ADJUST NOT USE B) Adjust the level from (0-255 MANUAL) using Focus key.
-
Page 22: Ae Set
B) Select the “AE MODE” in submenu using Tele/Wide key. C) Set the mode auto, IRIS MAN, SLOW MAN, SHUTTER MAN, Auto using Focus key Note: SLOW MAN option is not available for LVC-C500, LVC-C510, and LVC-C530. 4-2. IRIS ADJUST Set This function is available for IRIS MAN mode. - Page 23 Note: WDR option is not available the back light compensation is enable. When the back light condition disappears in that area, BLC is disable automatically. for LVC-C500, LVC-C510, and If do not want this mode, set to OFF LVC-C530. 4-6. E SENSITIVE This function is available for SLOW mode / AUTO mode.
- Page 24 AE SET (Auto Exposure) 4-7. FLICKERLESS Set This function is available for AUTO mode. A) Select the “FLICKERLESS” in submenu using Tele/Wide key. B) Set the mode OFF, ON using Focus key. * FLICKERLESS: Use for removing the flicker of picture ON: Remove the flicker (In case of PAL System: Shutter Speed 1/120 sec).
-
Page 25: Ae Level
AE LEVEL (Auto Exposure) 5-1. BLC LEVEL Set This function is for change to BLC LEVEL. A) Select the “BLC LEVEL” in submenu using Tele/Wide key. B) Adjust the level from 0 to 255 using Focus key. 5-2. WDR LEVEL SET This function is for change to WDR LEVEL. -
Page 26: Special Set
SPECIAL SET 6. SPECIAL SET 6-1. User Title Set This function is for custom title on screen display. A) Set “SPECIAL SET” in main menu using Tele/Wide key. B) Select the “USER TITLE” in submenu using Tele/Wide key. C) Set the position of title and set data using Tele/Wide, Focus key. -
Page 27: Special Set
SPECIAL SET 6-5. D EFFECT Set This function is to scroll to mirror relevanced function. A) Select the “D EFFECT” in submenu using Tele/Wide key. B) Set the mode, none, mirror, v-flip, rotation using Focus key. 6-6. INITIAL SET If initial mode set to ON, All SPECIAL functions are changed to the factory setting A) Select the “INITIAL SET”... -
Page 28: Motion Det
A) Select the “DAY/NIGHT” in submenu using Tele/Wide key. B) Select a mode using Focus key (AUTO, DAY, NIGHT). Note: This function is fixed to "DAY" for model LVC-C500/C503. 7-4. INITIAL SET If initial mode set to ON, All MOTION functions are changed to the factory setting A) Select the “INITIAL SET”... -
Page 29: F Osd Set
F OSD DISP (Function On Screen Display) 8. F OSD DISP 8-1. FUNCTION Set A) Set “F OSD” in main menu using Tele/Wide key. B) Select the mode what you want in submenu using Tele/Wide key. C) Set the display mode of OSD ON, OFF using Tele/Wide, FOCUS key. -
Page 30: P Masking
P MASKING (Privacy Masking) 9. P MASKING 9-1.AREA SEL P MASKING This function is to selecting to privacy masking area. AREA SEL NONE A) Set “P MASKING” in main menu using Tele/Wide key. MASKING B) Select the “AREA SEL” in submenu using Tele/Wide key. P MODE SET MOVE PT SEL NONE... - Page 31 P MASKING (Privacy Masking) 9-5. MOVE PT CNT This function is available to move selected point in the P MASKING MOVE PT SEL. AREA SEL NONE A) When MOVE PT SEL is selected ALL* : Available to move MASKING area. P MODE SET MOVE PT SEL NONE...
- Page 32 P MASKING (Privacy Masking) 9-9. INITIAL SET : A) Select the “INITIAL SET” in submenu using Tele/Wide P MASKING Command, AREA SEL NONE B) Set the initial set mode to ON or OFF using Focus key. MASKING P MODE SET 9-10.
-
Page 33: On-Screen Display
On Screen Display FUNCTION Some of these functions will 1. Focus Mode be displayed every time the camera is operated and then disappeared after 5 seconds. 2. Back Light 3. Shutter Speed 4. STAND-BY 5. CAMERA ID * Shutter Speed 1/120 - 1/50000: NTSC * Shutter Speed 1/125 - 1/50000: PAL OSD Format Description... -
Page 34: On-Screen Display
Push Auto White Balance: Turn this mode ON, the white trace automatically. Turn this mode OFF, preserve the white of final auto tracing action (Manual). 7. ZOOM Display DX 54 Digital Zoom mode (LVC-C503/C513/C533/553) DX 324 Digital Zoom mode (LVC-C500/C510/C530) X 27 Optical Zoom mode... -
Page 35: Specifications
X 27 Zoom (F 1.5 (W), F 3.8 (T) f= 3.25 ~ 88.0 mm), Video AF Digital Zoom Ratio X 2: Basic (OFF at WDR mode) X 12: Basic (LVC-C500, LVC-C510, LVC-C530) Minimum illumination Normal Mode : 1 Lux (F 1.5, Normal Shutter) - Page 36 Power requirement DC 12V Video output Composite Output 75Ω Terminated / Y,C Separated Power consumption 5.4W: LVC-C503, LVC-C513, LVC-C533, LVC-C553 5.1W: LVC-C500, LVC-C510, LVC-C530 operating temperature 0°C - 45°C Operating Humidity 0% RH - 60% RH Storage temperature -20°C - 60°C, 0% RH - 85% RH Dimensions 57mm(W) X 62.4mm(H) X 98.5mm(D)
- Page 37 LVC-C500 LVC-C503 LVC-C510 LVC-C513 LVC-C530 LVC-C533 LVC-C553 在您使用此摄像机之前,请完整阅读此操 作指南以供参考。...
- Page 38 为了防止电击事故,请不要将该产品暴露在雨中或潮湿的环境中。 为了避免电击的危险,请不要打开机壳,如需维修,请联系专业维 电击危险请勿打开 修人员。 接线方法应该符合美国国家电气规程 ANSI/NFPA 70 之规定 : 为了减少电击的危险 请勿拆下前 盖 或后盖 内部没有任何用户可以维修 本产品经测试符合 FCC 第 15 部分有关 A 类数字设备的限制条件 的零部件 这些限制条件是为提供合理的保护措施 防止在商业环境中安装设 备时产生有害干扰而制定的 本产品会产生 使用和辐射无线电频 如需维修 请联系专业维修人员 率能量 如未正确安装和使用 可能对无线电通讯造成有害干扰 在住宅环境中使用此产品会产生有害干扰 在此情况下用户需要自 行采取措施消除此干扰 • 终端用户使用的此产品的电缆入口中提供了合适的导管引入装置 此符号用于警示用户,产品外壳存在 剔除装置或密封套 未绝缘的危险电压,会产生对人身造 •...
- Page 39 此电动变焦彩色摄像机是为监视系统专门设计的。 • 高分辨率 高灵敏度的 1/4 英寸 Exview/HAD/CCD 电荷耦合装置 • 高倍数变焦镜头 光学变焦 X 27 数码变焦 X 54 (LVC-C503/C513/C533/C553), 数码变焦 X 324 (LVC-C500/C510/C530) • 自动对焦 / 自动白平衡 • DC 光圈控制自动曝光 • 白天 & 黑夜功能 • DSS 数字慢速快门 : 可选 • WDR 宽动态范围 : 可选...
- Page 40 此摄像机必须始终使用 12V DC 电源 请注意不要将水或其它液体溅到摄像机内部 也不 要让可燃性物品或金属物品掉入摄像机内 如果摄 像机内部有杂质 则可能会导致摄像机故障或引发 火灾或电击 不要长时间观看过于明亮的物体 如灯具 避免在 以下环境中使用或存放此设备 • 过热或过冷的地方 工作温度 0 ° C-45 ° C) • 潮湿或有灰尘的地方 • 有雨的地方 • 有强烈振动的地方 • 靠近有强电磁辐射的地方 如收音机或电视发射 机附近 • 使用吹风机将表面的灰尘或脏物吹掉 • 请使用软布清洁机身 如果太脏 请使用带有少 量中性清洁剂的软布清洁 然后擦干 •...
- Page 41 : LVC-C500, LVC-C503, 此转接器还可以安装到摄像机的底部 LVC-C510, LVC-C513 3. TELE 当按 TELE KEY 时 图像为远距拍摄 4. WIDE 当按 WIDE KEY 时 图像为广角拍摄 在手动操作时 将焦距拉近 在手动操作时 将焦距拉远 如果您要设置不同的功能 可按此键 S-Video 连接到监视器的 S-Video 输入接口 JACK • 连接到外部电压控制器 • 您可以通过此接口为摄像机供电 (DC12V) 连接到监视器的视频输入接口 DIN JACK...
- Page 42 : LVC-C500, LVC-C503, LVC-C510, LVC-C513 您可以通过摄像机背面的针形端子调节焦距和变焦。 变焦 & 焦距 DC 控制 A/D KEY 1 输入 共地变焦 & 对焦 通用地 电源输入 12V * 为电缆颜色。 (如果提供) 调节管脚 1 和管脚 2 的电压...
- Page 43 (A/D IN) : LVC-C500, LVC-C503, LVC-C510, LVC-C513 线控示意图...
- Page 44 : LVC-C530, LVC-C533 此转接器还可以安装到摄像机的底部 3. TELE 当按 TELE KEY 时 图像为远距拍摄 4. WIDE 当按 WIDE KEY 时 图像为广角拍摄 在手动操作时 将焦距拉近 在手动操作时 将焦距拉远 如果您要设置不同的功能 可按此键 连接到监视器的 S-Video 输入接口 • 连接到外部电压控制器 • 您可以通过此接口为摄像机供电 (DC12V) 连接到监视器的视频输入接口 S-Video JACK DIN JACK...
- Page 45 : LVC-C530, LVC-C533 您可以通过摄像机背面的针形端子调节焦距和变焦。 用于 RS-232C 发送端口 用于 RS-232C 接收端口 变焦 & 焦距 DC 控制 通用地 遥控输入 用于运动检测脉冲输出 电源输入 12V A/D KEY 1 输入 A/D KEY 2 输入 A/D KEY 3 输入 * 为电缆颜色。 (如果提供)...
- Page 46 : LVC-C530, LVC-C533 • RS232S • & •...
- Page 47 (A/D IN) 线控示意图 : LVC-C530, LVC-C533 镜像...
- Page 48 : LVC-C553 此转接器还可以安装到摄像机的底部 3. TELE 当按 TELE KEY 时 图像为远距拍摄 4. WIDE 当按 WIDE KEY 时 图像为广角拍摄 如果您要设置不同的功能 可按此键 (RJ45) 连接 RS-422 接口 在手动操作时 将焦距拉远 在手动操作时 将焦距拉近 9. DC 12V 连接到 DC 12V 外部电源 使用此键切换白天 & 黑夜模式 连接到监视器的视频输入接口...
- Page 49 : LVC-C553 1. 如图所示去掉电源线外面的绝缘层 2. 装上端子头 3. 连接 12V DC UL Listed Class 2 电源到摄像机 1. 到 VIDEO OUT 2. 到监视器上的视频输入...
- Page 50 遥控线连接到下面的 RJ-45 插孔 : LVC-C553 对于 RS-485 接口 基本 CONTROL 对于变焦/对焦 DC 控制接口 可选 PIN 8 PIN 1 控制输出 控制器 接收器/控制器 电压范围 Vcom + (+5~15V) Vcom - (+5~15V)
- Page 51 TELE WIDE F. NEAR F. FAR TELE 远摄 和 WIDE 广角 用于 UP 拉近 和 DOWN 拉远 • FOCUS+ 拉长焦距 和 FOCUS- 拉近减少 用于 INCREASE 增加 和 • DECREASE 减少 数据...
- Page 52 当连接多台摄像机时 可以为每台摄像机指定一个识别 码 这样就可以更容易的对每台摄像机进行控制 (OFF, 0 - 255 ID 总数为 256) 只能使用推荐的 ID 来设置此功能 • 要发送摄像机的 ID 代码 使用 PC 控制的第一个字节 设置摄像机的 ID 编号 然后 ID 编号将连续显示...
- Page 53 2-1. A)使用 Tele/Wide 键在主菜单中设置 FOCUS SET 使用 Tele/Wide 键选择子菜单中的 FOCUS MODE 使用对焦键设置模式 Auto(自动) Push auto(强制自动) Manual (手动)) 2-2. A) 使用 Tele/Wide 键选择子菜单中的 FOCUS DIST B) 使用对焦键在 1cm 到 5M 之间设置对焦距离模式 (1cm, 10cm, 50cm, 1M, 3M, 5M) 2-3. A) 使用 Tele/Wide 键选择子菜单中的 ZOOM START B) 使用对焦键在...
- Page 54 2-4. A) 使用 Tele/Wide 键选择子菜单中的 ZOOM END B) 使用对焦键设置变焦结束模式 LVC-C503/C513/C533/C553:从 变焦开始 + 1 到 X54 LVC-C500/C510:从 变焦开始 + 1 到 X324 2-5. A) 使用 Tele/Wide 键选择子菜单中的 ZOOM SPEED B) 使用对焦键设置变焦速度 Slow 低 2-6. A) 使用 Tele/Wide 命令选择子菜单中的 ZTRK B) 将变焦跟踪模式设置为 Auto 自动 或 Manual 手动...
-
Page 55: Focus Set
2-7. FOCUS SET A) 使用 Tele/Wide 键选择子菜单中的 ININTIAL SET B) 使用对焦键将初始模式设为 ON 或 OFF 2-8. A) 使用 Tele/Wide 键选择子菜单中的 RETURN B) 使用对焦键设置返回模式... - Page 56 3-1. A) 使用 Tele/Wide 键在主菜单中设置 AWB SET WBC MODE AUTO RED ADJUST NOT USE B) 使用 Tele/Wide 键选择子菜单中的 WB MODE BLUE ADJUST NOT USE C) 使用对焦键设置模式 Auto(自动) Push auto(强制自动) INITIAL SET RETURN Manual(手动) Outdoor(室外) Indoor(室内) *WBC MODE: 1) AUTO 白平衡范围 2500 °K ~ 9500 °K 2) PUSH AUTO 将...
- Page 57 3-3. Manual WB WBC MODE AUTO A) 使用 Tele/Wide 键选择子菜单中的 BLUE ADJUST RED ADJUST NOT USE B) 使用对焦键调节值大小 0-255 MANUAL BLUE ADJUST NOT USE INITIAL SET 3-4. PUSH AUTO RETURN PUSH AUTO WB 3-5. A) 使用 Tele/Wide 键选择子菜单中的 ININTIAL SET B) 使用对焦键将初始模式设为...
- Page 58 4-1. A) 使用 Tele/Wide 键在主菜单中设置 AE SET B) 使用 Tele/Wide 键选择子菜单中的 AE MODE C) 使用对焦键设置模式为 IRIS MAN SLOW MAN SHUTTER MAN 注意 SLOW MAN 选项不适用于 LVC-C500 LVC-C510 和 LVC-C530 4-2. IRIS MAN A) 使用 Tele/Wide 键选择子菜单中的 IRIS ADJUST B) 使用对焦键在 0 到 255 中调整设置...
- Page 59 4-4. AUTO ( A) 使用 Tele/Wide 键选择子菜单中的 BRIGHTNESS B) 使用对焦键在 0 到 255 中调整设置 4-5. A) 使用 Tele/Wide 键选择子菜单中的 BACKLIGHT B) 使用对焦键设置模式为 OFF ON 或 ATUO, WDR * WDR 宽动态范围 W当区域 1 区域 2 区域 3 或区域 4 中的背光满足条件时 可使用背光补偿 当此区域中的背光条件消失时 BLC 自动 注意...
- Page 60 4-7. AUTO ( A) 使用 Tele/Wide 键选择子菜单中的 FLICKERLESS B) 使用对焦键设置模式为 OFF ON FLICKERLESS ON 开 去除闪烁 对于 PAL 制式 快门速度 1/120 秒 4-8. AUTO A) 使用 Tele/Wide 键选择子菜单中的 SHUTTER B) • 使用对焦键设置模式为 NORMAL, 1/120 - 1/50000 • 使用对焦键设置模式为 NORMAL, 1/125 - 1/50000 4-9.
-
Page 61: Blc Level
5-1. A) 使用 Tele/Wide 键选择子菜单中的 BLC LEVEL B) 使用对焦键在 0 到 255 之间设置 5-2. A) 使用 Tele/Wide 键选择子菜单中的 WDR LEVEL B) 使用对焦键在 0 到 15 之间设置 5-3. A) 使用 Tele/Wide 键选择子菜单中的 INITIAL SET B) 使用对焦键将初始模式设为 ON 或 OFF 5-4. A) 使用 Tele/Wide 键选择子菜单中的 RETURN B) 使用对焦键设置返回模式... - Page 62 6-1. A) 使用 Tele/Wide 键在主菜单中设置 SPECIAL SET B) 使用 Tele/Wide 键选择子菜单中的 USER TITLE C) 使用 Tele / Wide 和对焦键设置标题位置和数据 6-2. A) 使用 Tele/Wide 键选择子菜单中的 SHARPNESS B) 使用对焦键在 0 到 225 之间设置 6-3. A) 使用 Tele/Wide 键选择子菜单中的 COLOR B) 使用对焦键设置模式为 ON OFF 6-4.
- Page 63 6-5. D A) 使用 Tele/Wide 键选择子菜单中的 D EFFECT B) 使用对焦键设置 mode none mirror v-flip rotation 6-6. SPECIAL A) 使用 Tele/Wide 键选择子菜单中的 ININTIAL SET B) 使用对焦键将初始模式设为 ON 或 OFF 6-7. A) 使用 Tele/Wide 键选择子菜单中的 RETURN B) 使用对焦键设置返回模式...
- Page 64 B) 使用对焦键在 0 到 21 之间设置 7-3. DETECTION A) 使用 Tele/Wide 键选择子菜单中的 DAY/NIGHT B) 使用对焦键选择一种模式 (AUTO, DAY, NIGHT) 注意 在 LVC-C500/C503 型号中 此功能固定为 DAY 7-4. A) 使用 Tele/Wide 键选择子菜单中的 ININTIAL SET B) 使用对焦键将初始模式设为 ON 或 OFF 7-5. A) 使用 Tele/Wide 键选择子菜单中的 RETURN B) 使用对焦键设置返回模式...
- Page 65 F OSD 8. F OSD 8-1. A) 使用 Tele/Wide 键在主菜单中设置 F OSD B) 使用 Tele/Wide 键在子菜单中选择您所需的模式 C) 使用 Tele / Wide 键和 FOCUS 键设置 OSD ON OFF 的显示 模式 *INITIAL SET RETURN...
- Page 66 P MASKING 9-1. P MASKING 此功能用于选择保密掩盖区域 AREA SEL NONE A) 使用 Tele/Wide 键在主菜单中设置 P MASKING MASKING B) 使用 Tele/Wide 键选择子菜单中的 AREA SEL P MODE SET MOVE PT SEL NONE C) 使用对焦键在区域 1 到区域 8 中选择区域 MOVE PT CNT 9-2. PM SET END 此功能用于...
- Page 67 P MASKING 9-5. MOVE PT CNT 此功能可移动 MOVE PT SEL 中的选定点 P MASKING A) 当 MOVE PT SEL 选择为 ALL* 时 可移动区域 AREA SEL NONE B) 当 MOVE PT SEL 选择为 LEFT* 或 RIGHT* 时 改变区域 MASKING 大小 P MODE SET 9-6.
- Page 68 P MASKING 9-9. A) 使用 Tele/Wide 键选择子菜单中的 INITIAL SET P MASKING B) 使用对焦键将初始模式设为 ON 或 OFF AREA SEL NONE 9-10. MASKING P MODE SET MOVE PT SEL NONE MOVE PT CNT A) 使用 Tele/Wide 键选择子菜单中的 RETURN PM SET END INI COLOR I COLOR 1 B) 使用对焦键设置返回模式...
- Page 69 (OSD) 以下某些功能在操作摄像机时 1. 对焦模式 会在屏幕上显示 5 秒钟后消 失 2. 背光 3. 快门速度 4. 待机 5. 摄像机 ID * 快门速度 1/120 - 1/50000 * 快门速度 1/125 - 1/50000 无显示 自动模式 ☞ 手动 / 强制自动模式 无显示 背光关闭 背光补偿开 / 自动背光补偿模式 “BL”显示 无显示 普通快门...
- Page 70 (OSD) 6. 白平衡控 自动白平衡 制模式 室内白平衡预设 (3200°K) 室外白平衡预设 (5100°K) 手动白平衡调整 在手动模式下可使用 HUE 控制 (0 ~ 255) 强制自动白平衡 此模式打开时 白平衡自动调整 此模式关闭时 保留最后自动追踪的白平衡 手动 7. 变焦显示 数码变焦模式 (LVC-C503/C513/C533/553) DX 54 数码变焦模式 (LVC-C500/C510/C530) DX 324 光学变焦模式 X 27...
- Page 71 大约 .520 TV Line X 27 变焦 (F 1.5 (W), F 3.8 (T) f= 3.25 ~ 88.0 mm), Video AF X 2: 基本 (WDR 模式下 OFF) X 12: 基本 (LVC-C500, LVC-C510, LVC-C530) 普通模式 : 1 Lux (F 1.5, 普通快门) 电子快门速度模式 : (1/3 0.01 Lux (X20 场积累...
- Page 72 英语 (OSD) DC 12V 复合输出75Ω 电阻 / Y,C 独立 5.4W: LVC-C503, LVC-C513, LVC-C533, LVC-C553 5.1W: LVC-C500, LVC-C510, LVC-C530 0°C - 45°C 0% RH - 60% RH -20°C - 60°C, 0% RH - 85% RH 57mm(W) X 62.4mm(H) X 98.5mm(D) 500g...
Need help?
Do you have a question about the LVC-C500 and is the answer not in the manual?
Questions and answers