Kramer VS-44DT User Manual
4x4 hdmi/hdbt matrix switcher
Hide thumbs
Also See for VS-44DT:
- User manual (71 pages) ,
- Quick start manual (4 pages) ,
- Quick start manual (2 pages)
Table of Contents
Advertisement
Quick Links
Download this manual
See also:
User Manual
Advertisement
Table of Contents

Related Manuals for Kramer VS-44DT


Summary of Contents for Kramer VS-44DT
- Page 1 USER MANUAL MODEL: VS-44DT 4x4 HDMI/HDBT Matrix Switcher P/N: 2900-300470 Rev 3 www.kramerAV.com...
-
Page 2: Table Of Contents
Defining the VS-44DT 4x4 HDMI/HDBT Matrix Switcher Mounting VS-44DT Connecting the VS-44DT Connecting the VS-44DT to a Serial Controller Connecting the VS-44DT to a Serial Data Source/Acceptor Connecting to the VS-44DT via Ethernet Wiring the RJ 45 Connectors Operating the VS-44DT... -
Page 3: Introduction
Kramer Electronics Ltd. Introduction Welcome to Kramer Electronics! Since 1981, Kramer Electronics has been providing a world of unique, creative, and affordable solutions to the vast range of problems that confront the video, audio, presentation, and broadcasting professional on a daily basis. In recent years, we... -
Page 4: Overview
European Advanced Recycling Network (EARN) and will cover any costs of treatment, recycling and recovery of waste Kramer Electronics branded equipment on arrival at the EARN facility. For details of Kramer’s recycling arrangements in your particular country go to our recycling pages at www.kramerav.com/support/recycling/. - Page 5 Automatic output shutdown if no input signal is detected after a configurable idle period. • An LCD display for easy configuration and operation. • Support for Kramer Protocol 3000. • A lock button to prevent unwanted tampering with the settings. •...
-
Page 6: Defining The Vs-44Dt 4X4 Hdmi/Hdbt Matrix Switcher
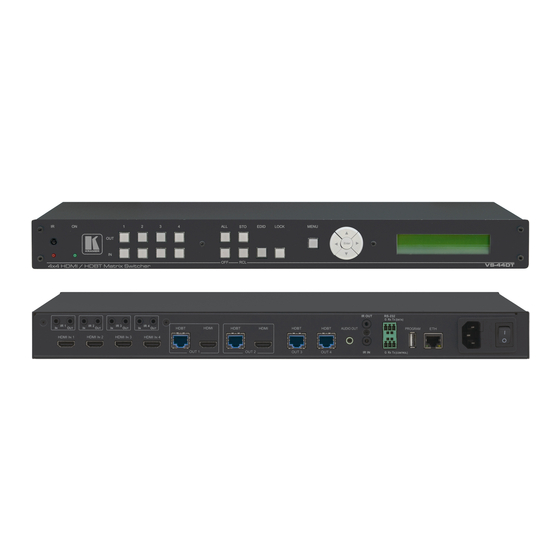
Kramer Electronics Ltd. Defining the VS-44DT 4x4 HDMI/HDBT Matrix Switcher This section defines the VS-44DT. Figure 1: VS-44DT 4x4 HDMI/HDBT Matrix Switcher Front Panel Feature Function 1 IR LED Lights yellow when receiving an IR signal 2 IR Sensor IR receiver for remote control... - Page 7 Kramer Electronics Ltd. Figure 2: VS-44DT 4x4 HDMI/HDBT Matrix Switcher Rear Panel Feature Function IR 1 IN 3.5mm Mini Jack Connect to an IR sensor. Receives IR commands and sends them over HDBT OUT 1 OUT 3.5mm Mini Jack Connect to the first IR emitter. Transmits IR commands that are...
-
Page 8: Mounting Vs-44Dt
Kramer Electronics Ltd. Mounting VS-44DT This section provides instructions for mounting VS-44DT. Before installing, verify that the environment is within the recommended range: • Operation temperature – 0 to 40C (32 to 104F). • Storage temperature – -40 to +70C (-40 to +158F). -
Page 9: Connecting The Vs-44Dt
Kramer Electronics Ltd. Connecting the VS-44DT Always switch off the power to each device before connecting it to your VS-44DT. After connecting your VS-44DT, connect its power and then switch on the power to each device. Figure 3: Connecting the VS-44DT 4x4 HDMI/HDBT Matrix Switcher... -
Page 10: Connecting The Vs-44Dt To A Serial Controller
Kramer Electronics Ltd. Connecting the VS-44DT to a Serial Controller You can connect the VS-44DT via an RS-232 connection to a serial controller, for example, a To connect the VS-44DT via RS-232 to a serial controller: • Connect the RS-232 CONTROL 3-pin terminal block on the rear of the... - Page 11 6. Select Use the following IP Address for static IP addressing and fill in the details as shown in Figure For TCP/IPv4 you can use any IP address in the range 192.168.1.1 to 192.168.1.255 (excluding 192.168.1.39) that is provided by your IT department. VS-44DT – Connecting the VS-44DT...
-
Page 12: Wiring The Rj 45 Connectors
For HDBT cables, it is recommended that the cable ground shielding be connected/soldered to the connector shield. EIA /TIA 568B Wire Color Orange / White Orange Green / White Blue Blue / White Green Brown / White Brown VS-44DT – Connecting the VS-44DT... -
Page 13: Operating The Vs-44Dt
To switch one input to all outputs, (for example, Input 2 to all outputs): 1. Press All. The All button lights red. 2. Press In 2. The Input 2 button lights and Input 2 is switched to all outputs. VS-44DT – Operating the VS-44DT... -
Page 14: Storing And Recalling Preset Configurations
The default out-of-the-box EDID is 4K@30Hz. If no image appears on the monitor, it could be that the monitor cannot handle the 4K resolution. Copy the EDID from the monitor to the appropriate input of the VS-44DT. VS-44DT – Operating the VS-44DT... -
Page 15: Disconnecting One Or All Outputs
4. Use the left (◄) and right (►) arrows on the keypad to select Yes. 5. Press Enter. After a few seconds the standby readout is displayed and the device is reset to factory default. VS-44DT – Operating the VS-44DT... -
Page 16: Locking And Unlocking The Front Panel
The button lights, the Locked message is displayed briefly, and the front panel buttons are locked. Pressing any button causes the Locked message to display briefly and the Lock button to flash To unlock the front panel: Press and hold the Lock button. VS-44DT – Operating the VS-44DT... -
Page 17: Configuring The Vs-44Dt
The RS-232 Status sub-menu turns the RS-232 DATA serial communication routing on and off. The current state is displayed when entering the RS-232 ROUTING menu, for example: ON To port-04. Parameter Description To Port: Turns the RS-232 routing to each port (1 to 4) ON or OFF VS-44DT – Configuring the VS-44DT... - Page 18 Displays the firmware version. Reset to Default Parameter Description RESET TO DEFAULT Resets the device to default factory parameters (NO or YES) Update Firmware Sub-menu Parameter Description UPDATE FIRMWARE: Updates the firmware (NO or YES) VS-44DT – Configuring the VS-44DT...
-
Page 19: Selecting Dhcp
7. Using the up (▲) or down (▼) button, select the required digit. 8. Repeat steps 6 and 7 until the required address is displayed. 9. Press Enter. The change is saved. Resetting the VS-44DT to Factory Default Configuration To reset the VS-44DT to factory default parameters: 1. - Page 20 3. Press Enter. The NO and YES options are displayed. 4. Using the left (◄) or right (►) button, select YES. 5. Press Enter. The device is reset to factory default parameters and automatically reboots. VS-44DT – Configuring the VS-44DT...
-
Page 21: Operating The Vs-44Dt Remotely Using The Web Pages
1. Open your Internet browser. 2. Type the IP address of the device in the Address bar of your browser. For example, the default IP address: The Switching page appears. VS-44DT – Operating the VS-44DT Remotely Using the Web Pages... -
Page 22: Switching Page
The model name, FW version, and IP address appear in the lower left side of the main page. The lower part of the screen lets you save the settings and upload a saved setting. Figure 7: Switching Page VS-44DT – Operating the VS-44DT Remotely Using the Web Pages... - Page 23 Change the name of the input as you want it to appear in the web page (click to save the name). • Enable/Disable HDCP. Click the exit icon ( ) to exit the window. VS-44DT – Operating the VS-44DT Remotely Using the Web Pages...
- Page 24 Switching Mode on page 28). • Set IR Output to enable an output device to be operated remotely through this device. Click the exit icon ( ) to exit the window. VS-44DT – Operating the VS-44DT Remotely Using the Web Pages...
-
Page 25: Device Settings Page
Perform firmware upgrade. • Reset the device to its factory default settings. • Turn DHCP on and off. • View and edit the current IP settings. Figure 11: Device Settings Page VS-44DT – Operating the VS-44DT Remotely Using the Web Pages... - Page 26 The new firmware is installed. Do not interrupt the procedure or the device may be rendered inoperable. 4. Wait until the device reboots automatically at the end of the procedure. VS-44DT – Operating the VS-44DT Remotely Using the Web Pages...
-
Page 27: Edid Page
1. Select the source you want to read from (Default EDID in this example). The source details appear on the EDID page. 2. Select the input/s to which you want to copy the EDID to. VS-44DT – Operating the VS-44DT Remotely Using the Web Pages... - Page 28 Kramer Electronics Ltd. Figure 13: Copying the EDID 3. Click COPY. The COPY EDID RESULTS lists the actions taken. Figure 14: EDID Copied VS-44DT – Operating the VS-44DT Remotely Using the Web Pages...
-
Page 29: Rs-232 Routing Page
Figure 15: RS-232 Routing Page Audio Settings Page The Audio Settings page enables you to set the volume of the audio output or mute it. Figure 16: Audio Settings Page VS-44DT – Operating the VS-44DT Remotely Using the Web Pages... -
Page 30: Advanced Page
The output maintains a 5V signal (resulting in a blank screen until the designated input signal is restored). • The output signal stops (resulting in the display potentially entering standby mode). VS-44DT – Operating the VS-44DT Remotely Using the Web Pages... - Page 31 1. Output 2 is mapped to Input HDMI 2 and Auto-switching is set to ON (via Switching Page on page 20). 2. Priorities are set based on Figure 3. All 4 HDMI inputs are active. VS-44DT – Operating the VS-44DT Remotely Using the Web Pages...
- Page 32 Output 2 automatically switches to Input 3. 4. Input 1 gets reconnected. Output 2 automatically switches to Input 1. 5. Input 4 gets disconnected and reconnected. Output 2 automatically switches to Input 4. VS-44DT – Operating the VS-44DT Remotely Using the Web Pages...
- Page 33 How many seconds to delay an auto-switch after the active input cable is unplugged. ▪ How many seconds to maintain a 5V signal after detecting no AV input signal (used when Auto-Switching mode is set to Manual). VS-44DT – Operating the VS-44DT Remotely Using the Web Pages...
-
Page 34: Authentication Page
If authentication is enabled, enter a valid user name (default = Admin) and password (default = Admin) and click on the arrow. About Page The About page displays the device firmware revision and the Kramer company details. Figure 22: About Page VS-44DT – Operating the VS-44DT Remotely Using the Web Pages... -
Page 35: Updating The Firmware
6. After a few seconds a removable drive is displayed in your Windows Explorer. Release the OFF button. 7. Copy the firmware file from your PC to the new removable drive. 8. After the file has been transferred, power-cycle the VS-44DT. As soon as the VS-44DT is ready for operation, the upgrade process is complete. -
Page 36: Technical Specifications
3.3kg (7.27lbs) approx. Shipping Weight: 4.1kg (9.04lbs) approx. Included Accessories: Rack ears, 4 IR receiver cables, 4 IR emitter cables; remote control transmitter Specifications are subject to change without notice, go to our web site at www.kramerav.com VS-44DT – Technical Specifications... -
Page 37: Default Ip Parameters
Menu-> RESET TO DEFAULT-> Change the option to YES and press Enter (to complete the reset process you need to turn the power off and then on again). Web Page: Go to the Device Settings page and click FACTORY RESET Protocol 3000: #factory<cr> command VS-44DT – Technical Specifications... -
Page 38: Protocol 3000
You can enter commands directly using terminal communication software (e.g., Hercules) by connecting a PC to the serial or Ethernet port on the VS-44DT. To enter CR press the Enter key (LF is also sent but is ignored by the command parser). -
Page 39: Understanding Protocol 3000
Kramer Electronics Ltd. on page • Protocol 3000 commands available for the VS-44DT, see Protocol 3000 Commands on page Understanding Protocol 3000 Protocol 3000 commands are structured according to the following: • Command – A sequence of ASCII letters (A-Z, a-z and -). A command and its parameters must be separated by at least one space. -
Page 40: Extended Protocol 3000
CR LF Extended Protocol 3000 In addition to the standard Protocol 3000 syntax, newer Kramer products use extended syntax to improve user experience and provide easier deployment and configuration. For products with many ports and of different types, the extended syntax describes commands and their parameters in a more intuitive, user-friendly format. - Page 41 <<direction_type>.<port_type>.<index>>.<signal_type>. <channel_index> Examples: IN.HDMI.1.VIDEO.1 (refers to video channel 1 of HDMI input port 1) OUT.HDBT.1.AUDIO.1 (refers to audio channel 1 of HDBaseT output port 1) Extended Signal Types The string representation is non-case sensitive. VS-44DT – Protocol 3000...
- Page 42 Brackets ‘[‘ and ‘]’ are reserved Protocol 3000 characters that define a list of parameters as in [a,b,c,d]. Example: to route video input 3 to outputs 1,4,6,7: ROUTE 1,[1,4,6,7],3<cr> Example illustrating brackets and commas: #SIGNALS-LIST? ~01@SIGNALS-LIST [IN.SDI.1.VIDEO.1,IN.SDI.2.VIDEO.1,IN.SDI.3.VIDEO.1,IN.SDI.4.VIDEO.1,IN.SDI.5.VIDEO.1,IN.SDI.6.VIDEO.1,IN.SD I.7.VIDEO.1,IN.SDI.8.VIDEO.1,OUT.SDI.1.VIDEO.1,OUT.SDI.2.VIDEO.1,OUT.SDI.3.VIDEO.1,OUT.SDI.4.VIDEO.1,OUT.SDI .5.VIDEO.1,OUT.SDI.6.VIDEO.1,OUT.SDI.7.VIDEO.1,OUT.SDI.8.VIDEO.1] VS-44DT – Protocol 3000...
-
Page 43: Protocol 3000 Commands
EDID Handling Commands (see EDID Handling Commands on page 51) • Audio Commands (see Audio Commands on page 54) • Switching Commands (see Switching Commands on page 57) • Communication Commands (see Communication Commands on page VS-44DT – Protocol 3000... -
Page 44: Kramer Protocol 3000 Commands
Lock the port MACH-NUM Set machine number Functions Permission Transparency Set: End User Public Get: Description Syntax Set: Protocol handshaking Get: Response ~nn@SPOKCR LF Notes Validates the Protocol 3000 connection and gets the machine number K-Config Example “#”,0x0D VS-44DT – Protocol 3000... - Page 45 1. Multi-line: ~nn@Device available protocol 3000 commands:CR LFcommand,SP command...CR LF 2. Multi-line: ~nn@HELPSPcommand:CR LFdescriptionCR LFUSAGE:usageCR LF Parameters COMMAND_NAME – name of a specific command Notes To get help for a specific command use: HELPSPCOMMAND_NAMECR LF K-Config Example “#HELP”,0x0D VS-44DT – Protocol 3000...
- Page 46 To avoid locking the port due to a USB bug in Windows, disconnect USB connections immediately after running this command. If the port was locked, disconnect and reconnect the cable to reopen the port. K-Config Example “#RESET”,0x0D VS-44DT – Protocol 3000...
- Page 47 Parameters layer 1 - Video 2 - Audio 3 - Data 4 - IR output_id – 1….num of system outputs mode 0 - manual 1 - priority switch 2 - last connected switch Response Triggers Notes VS-44DT – Protocol 3000...
- Page 48 After every change in output HPD status from Off to On (1) After every change in output HPD status form Off to On and all parameters (new EDID, etc.) are stable and valid (2) K-Config Example Get the output HPD status of HDMI Out: “#DISPLAY? 1”,0x0D VS-44DT – Protocol 3000...
- Page 49 After execution, a response is sent to the com port from which the Get was received A response is sent after every change in input signal status from On to Off or from Off to On K-Config Example Get the input signal status of HDMI In: “#SIGNAL? 1”,0x0D VS-44DT – Protocol 3000...
- Page 50 – 1 – Video, 2 – Audio, 3 – Data, 4 – IR PRIORITY1 – priority of first input PRIORITYn – priority of input n Response Triggers Notes WP-577VH – layer parameter is not used VS-44DT – Protocol 3000...
- Page 51 Set: Lock front panel #LOCK-FP? Get: Get front panel lock state Response ~nn@LOCK-FPSPlock_modeSPOKCR LF Parameters lock_mode – unlock the front panel buttons (Off)=0, lock the front panel buttons (On)=1 K-Config Example Unlock front panel: “#LOCK-FP 0”,0x0D VS-44DT – Protocol 3000...
- Page 52 – disable video on output=0, enable video on output=1 Notes The timeout must not exceed 60000 seconds. The timeout for video and audio signal loss events must not be less than 5 seconds. K-Config Example Enable video on OUT 1: “#VMUTE 1,1”,0x0D VS-44DT – Protocol 3000...
- Page 53 Kramer Electronics Ltd. EDID Handling Commands Additional EDID data functions can be performed via the VS-44DT web pages or a compatible EDID management application, such as Kramer EDID Designer (see www.kramerav.com/product/VS-44DT). Command Description CPEDID Copy EDID data from the output to the input EEPROM...
- Page 54 – EDID data size. For Set, size of data to be sent from device, for Get, 0 means no EDID support Response Triggers Notes For Get, size=0 means EDID is not supported For old devices that do not support this command, ~nn@ERR 002CR LF is received VS-44DT – Protocol 3000...
- Page 55 If the unit received data that is not a correct packet, it sends the corresponding error and returns to the regular protocol mode. See Protocol Packet reference in see Packet Protocol Structure on page 61. VS-44DT – Protocol 3000...
- Page 56 Response ~nn@AUD-LVLSPstage,channel,volumeCR LF Parameters stage – 0 = Input, 1 = Output channel – output number = 1 volume – volume level -0 to 100 ++ increase current value -- decrease current value Response Triggers Notes VS-44DT – Protocol 3000...
- Page 57 Get: End User Public Description Syntax #MUTESPchannel,mute_modeCR Set: Set audio mute #MUTE?SPchannelCR Get: Get audio mute Response ~nn@MUTESPchannel,mute_modeCR Parameters channel –OUT=1 mute_mode – mute mode off=0, mute mode on=1 K-Config Example Mute the audio: “#MUTE 1,1”,0x0D VS-44DT – Protocol 3000...
- Page 58 Get simple audio volume Response ~nn@VOLUMESPP1,P2CR LF Parameters P1 – Out channel: OUT 1=1, OUT 2=2, OUT 3=3, OUT 4=4 P2 – Volume: 0~100 K-Config Example Set the OUT 2 audio volume to 50: “#VOLUME 2,50”,0x0D VS-44DT – Protocol 3000...
- Page 59 Audio: OUT 1=1, OUT 2=2, OUT 3=3, OUT 4=4 Data: OUT 1=1, OUT 2=2, OUT 3=3, OUT 4=4 Notes This command replaces all other routing commands. K-Config Example Route the video from IN 2 to all the outputs: “#ROUTE 1,*,2”,0x0D VS-44DT – Protocol 3000...
- Page 60 It is recommended to use the command #SIGNALS-LIST? to get the list of all signal IDs available in the system and which can be used in this command Video 1 is the default port in this command and is implied even if not written: Examples ##X-ROUTE OUT.HDMI.1.VIDEO.1,IN.HDMI.2.VIDEO.1 VS-44DT – Protocol 3000...
- Page 61 NAME command. You can also get an assigned IP by direct connection to USB or RS-232 protocol port if available Consult your network administrator for correct settings K-Config Example Enable DHCP mode, if available: “#NET-DHCP 1”,0x0D VS-44DT – Protocol 3000...
- Page 62 Functions Permission Transparency Set: NET-MAC? Get: End User Public Description Syntax Set: #NET-MAC?CR Get: Get MAC address Response ~nn@NET-MACSPmac_addressCR LF Parameters mac_address – unique MAC address. Format: XX-XX-XX-XX-XX-XX where X is hex digit K-Config Example “#NET-MAC?”,0x0D VS-44DT – Protocol 3000...
-
Page 63: Packet Protocol Structure
Packet ID (1, 2, 3…) (2 bytes in length) ▪ Length (data length + 2 for CRC) - (2 bytes in length) ▪ Data (data length -2 bytes) ▪ CRC - 2 bytes 05… Packet ID Length Data 5. Response: VS-44DT – Protocol 3000... - Page 64 Where NNNN is the received packet ID in ASCII hex digits. Calculating the CRC The polynomial for the 16-bit CRC is: CRC-CCITT: 0x1021 = x Initial value: 0000 Final XOR Value: 0 For a code example, see: http://sanity-free.org/133/crc_16_ccitt_in_csharp.html CRC example: Data = “123456789” Result => 0x31C3 VS-44DT – Protocol 3000...
- Page 65 Electronics products, this product must be insured during shipment, with the insurance and shipping charges prepaid by you. If this product is returned uninsured, you assume all risks of loss or damage during shipment. Kramer Electronics will not be responsible for any costs related to the removal or re- installation of this product from or into any installation.
- Page 66 SAFETY WARNING Disconnect the unit from the power supply before opening and servicing For the latest information on our products and a list of Kramer distributors, visit our Web site where updates to this user manual may be found. We welcome your questions, comments, and feedback.
Need help?
Do you have a question about the VS-44DT and is the answer not in the manual?
Questions and answers