
Related Manuals for Kramer VS-88DVI


Summary of Contents for Kramer VS-88DVI
- Page 1 K R A ME R E LE CT R O N IC S L T D . USER MANUAL MODEL: VS-88DVI 8x8 DVI Matrix Switcher P/N: 2900-000592 Rev 3...
-
Page 3: Table Of Contents
Protocol 2000 Syntax Instruction Codes Figures Figure 1: VS-88DVI 8x8 DVI Matrix Switcher Front Panel Figure 2: VS-88DVI 8x8 DVI Matrix Switcher Rear Panel Figure 3: Connecting the VS-88DVI 8x8 DVI Matrix Switcher Figure 4: SELECTOR Buttons Figure 5: Crossed Cable RS-232 Connection... -
Page 4: Introduction
Scan Converters and Scalers; GROUP 8: Cables and Connectors; GROUP 9: Room Connectivity; GROUP 10: Accessories and Rack Adapters and GROUP 11: Sierra Products. Congratulations on purchasing your Kramer VS-88DVI 8x8 DVI Matrix Switcher, which is ideal for the following typical applications: •... -
Page 5: Getting Started
Avoid interference from neighboring electrical appliances that may adversely influence signal quality • Position your Kramer VS-88DVI away from moisture, excessive sunlight and dust This equipment is to be used only inside a building. It may only be connected to other equipment that is installed inside a building. -
Page 6: Safety Instructions
Kramer Electronics has made arrangements with the European Advanced Recycling Network (EARN) and will cover any costs of treatment, recycling and recovery of waste Kramer Electronics branded equipment on arrival at the EARN facility. For details of Kramer’s recycling arrangements in your particular country go to our recycling pages at http://www.kramerelectronics.com/support/recycling/. -
Page 7: Overview
• A 100−240V AC worldwide power supply • A standard 19” rack mount size, 2U with rack “ears” included Control the VS-88DVI using the front panel buttons, or remotely via: • RS-232 serial commands • The Kramer infrared remote control transmitter •... -
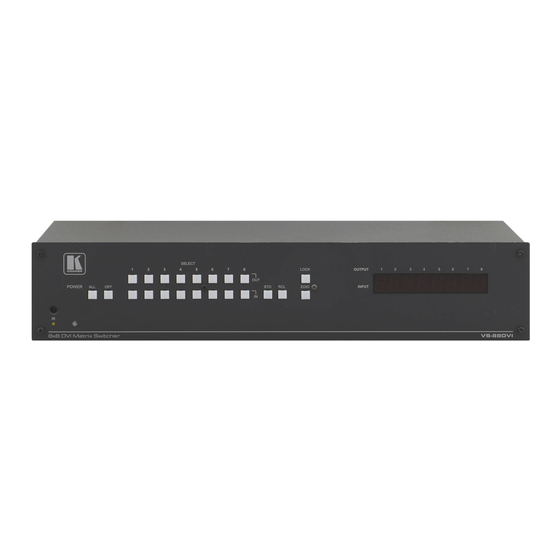
Page 8: Figure 1: Vs-88Dvi 8X8 Dvi Matrix Switcher Front Panel
Figure 1: VS-88DVI 8x8 DVI Matrix Switcher Front Panel Feature Function IR Receiver LED The yellow LED is illuminated when receiving signals from the infrared remote control transmitter POWER LED Illuminates green when receiving power ALL Button Use ALL to select all outputs (see Section 6.1) -
Page 9: Figure 2: Vs-88Dvi 8X8 Dvi Matrix Switcher Rear Panel
Figure 2: VS-88DVI 8x8 DVI Matrix Switcher Rear Panel Feature Function OUT DVI Connectors Connect to the DVI acceptors (from 1 to 8) IN DVI Connectors Connect to the DVI sources (from 1 to 8) RS-232 9-pin D-sub Port Connects to the PC or the RS-232 Remote Controller... -
Page 10: Using The Ir Transmitter
This distance can be extended to up to 60 meters when used with three extension cables (Model: C-A35M/A35F-50). Before using the external IR receiver, be sure to arrange for your Kramer dealer to insert the internal IR connection cable (P/N: 505-70434010-S) with the 3.5mm connector that fits into the REMOTE IR opening on the rear panel. -
Page 11: Installing In A Rack
Installing in a Rack This section provides instructions for rack mounting the unit. VS-88DVI - Installing in a Rack... -
Page 12: Connecting The Vs-88Dvi
Connecting the VS-88DVI Always switch off the power to each device before connecting it to your VS-88DVI. After connecting your VS-88DVI, connect its power and then switch on the power to each device. To connect the VS-88DVI, as the example in... -
Page 13: Figure 3: Connecting The Vs-88Dvi 8X8 Dvi Matrix Switcher
Figure 3: Connecting the VS-88DVI 8x8 DVI Matrix Switcher VS-88DVI - Connecting the VS-88DVI... -
Page 14: Operating The Vs-88Dvi
You can use the STO and RCL buttons to store up to 16 setups and then recall them, as Figure 4 illustrates: IN 1 is used for setup # 1 and OUT 1 is used for setup # 9. VS-88DVI - Operating the VS-88DVI... -
Page 15: Figure 4: Selector Buttons
1. Press the RCL button. The RCL button flashes. 2. Press the relevant OUT or IN button that stored the setup. In this example, press OUT 5. 3. Press the LOCK button to recall the stored setup. VS-88DVI - Operating the VS-88DVI... -
Page 16: Acquiring The Edid
Acquiring an EDID from a Single Connected Output To acquire or change the EDID of a new output display: 1. Turn ON the VS-88DVI. 2. Connect the required acceptor to the output from which you want to acquire the EDID. - Page 17 4. Press the SELECT IN 1 and IN 3 buttons to which you want to copy the EDID. 5. Make sure that the relevant input numbers flash on the display. 6. Press the EDID button. The process is complete when the display returns to normal. VS-88DVI - Operating the VS-88DVI...
-
Page 18: Connecting The Vs-88Dvi Using Rs-232
6.4.3 Acquiring the Default EDID To reset to the default EDID, do the following: 1. Turn ON the VS-88DVI. 2. Press the EDID and STO buttons simultaneously and hold them for 3 seconds. Both buttons flash. 3. Press the SELECT IN button to which the EDID is copied. -
Page 19: Connecting The Vs-88Dvi Using Ethernet
Connecting the Ethernet Port directly to a PC (Crossover Cable) You can connect the Ethernet port of the VS-88DVI to the Ethernet port on your PC, via a crossover cable with RJ-45 connectors. This type of connection is recommended for identifying the VS-88DVI with the factory configured default IP address. -
Page 20: Figure 6: Local Area Connection Properties Window
Figure 6: Local Area Connection Properties Window 6. Select Use the following IP Address, and fill in the details as shown in Figure 7. Click OK. Figure 7: Internet Protocol (TCP/IP) Properties Window VS-88DVI - Operating the VS-88DVI... - Page 21 Connecting the Ethernet Port via a Network Hub (Straight- Through Cable) You can connect the Ethernet port of the VS-88DVI to the Ethernet port on a network hub or network router, via a straight through cable with RJ-45 connectors. 6.6.3...
-
Page 22: Technical Specifications
10% to 90%, RHL non-condensing DIMENSIONS: 19" x 7" x 2U W, D, H WEIGHT: 2.5kg (5.5lbs) approx. ACCESSORIES: Power cord, infrared remote controller, null- modem adapter Specifications are subject to change without notice at http://www.kramerelectronics.com VS-88DVI - Technical Specifications... -
Page 23: Hex Table
01 87 88 81 IN 8 01 88 81 81 01 88 82 81 01 88 83 81 01 88 84 81 01 88 85 81 01 88 86 81 01 88 87 81 01 88 88 81 VS-88DVI - Hex Table... -
Page 24: Protocol 2000
The default data rate is 9600 baud, with no parity, 8 data bits and 1 stop bit. Note: Compatibility with Kramer’s Protocol 2000 does not mean that a machine uses all of the commands below. Each machine uses a sub-set of Protocol 2000, according to its needs. -
Page 25: Instruction Codes
OUTPUT is assigned the value of the requested parameter. The replies to instructions 10 and 11 are according to the definitions in instructions 7 and 8 respectively. For example, if the present status of machine number 5 is breakaway setting, then the reply to HEX code: is HEX code: VS-88DVI - Protocol 2000... - Page 26 NOTE 16 – The reply to the REQUEST WHETHER PANEL IS LOCKED is the same as in NOTE 4 above, except that OUTPUT is assigned with the value 0 if the panel is unlocked, or 1 if it is locked. VS-88DVI - Protocol 2000...
- Page 28 For the latest information on our products and a list of Kramer distributors, visit our Web site where updates to this user manual may be found. We welcome your questions, comments, and feedback. Web site: www.kramerelectronics.com E-mail: info@kramerel.com SAFETY WARNING...
Need help?
Do you have a question about the VS-88DVI and is the answer not in the manual?
Questions and answers