
Subscribe to Our Youtube Channel
Related Manuals for Kramer VS-6464DN


Summary of Contents for Kramer VS-6464DN
- Page 1 K R A ME R E LE CT R O N IC S L TD . USER MANUAL MODEL: VS-6464DN 64x64 Digital Matrix Switcher P/N: 2900-300045 Rev 3...
-
Page 3: Table Of Contents
DVI Input Card 15.2 DVI (HDCP) Input Card Communication Protocols Figures Figure 1: VS-6464DN 64x64 Digital Matrix Switcher Figure 2: VS-6464DN Front Panel Numeric Keypad Figure 3: VS-6464DN 64x64 Digital Matrix Switcher Rear Panel Showing DVI Cards VS-6464DN – Contents... - Page 4 Figure 4: Connecting the VS-6464DN Figure 5: Sample Port Numbering Figure 6: Local Area Connection Properties Window Figure 7: Internet Protocol (TCP/IP) Properties Window Figure 8: Default Startup Status Display Sequence Figure 9: Resolution DIP-switch Figure 10: Signal Paths for Isolating problems...
-
Page 5: Introduction
Introduction Welcome to Kramer Electronics! Since 1981, Kramer Electronics has been providing a world of unique, creative, and affordable solutions to the vast range of problems that confront video, audio, presentation, and broadcasting professionals on a daily basis. In recent years, we have redesigned and upgraded most of our... -
Page 6: Getting Started
Achieving the Best Performance To achieve the best performance: Use only good quality connection cables (we recommend Kramer high- performance, high-resolution cables) to avoid interference, deterioration in signal quality due to poor matching, and elevated noise levels (often associated with low quality cables) ... -
Page 7: Safety Instructions
Kramer Electronics has made arrangements with the European Advanced Recycling Network (EARN) and will cover any costs of treatment, recycling and recovery of waste Kramer Electronics branded equipment on arrival at the EARN facility. For details of Kramer’s recycling arrangements in your particular country go to our recycling pages at http://www.kramerelectronics.com/support/recycling/. -
Page 8: Overview
For maximum bandwidth supported by each card type see Technical Specifications in Section 13 The VS-6464DN is highly configurable–you can add or remove inputs and outputs independently in groups of eight and mix different types of input/output cards in the same chassis. -
Page 9: About The Power Connect™ Feature
The infrared remote control transmitter The VS-6464DN is a sophisticated device but has been designed to be as simple as possible to operate. Due to space limitations on the front panel, 128 input/output selector buttons are instead substituted by a keypad. For details of how to route inputs... -
Page 10: Redundant Power Supplies
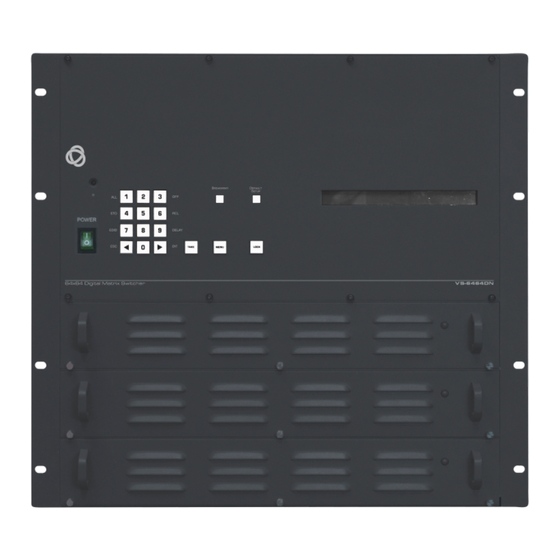
Redundant Power Supplies The VS-6464DN is supplied with three power supplies accessible from the front of the device (see Figure 1) that are held in place with thumb-screws. The power supplies operate in a redundant mode whereby the failure of any one power supply does not cause the device to stop operating. - Page 11 (lower row), (see Section 6.1). Displays user interface messages and menus Power Supplies Three power supplies providing redundancy (see Section 11) Note: After pressing the MENU button, the STO, ALL, OFF and RCL buttons light and are enabled. VS-6464DN - Overview...
-
Page 12: Figure 2: Vs-6464Dn Front Panel Numeric Keypad
Press to shift the sliding window to the left Since the LCD display is large enough to show only 13 cross-points out of a total of 64 Figure 3 defines the rear panel of the VS-6464DN showing DVI cards installed as an example. VS-6464DN - Overview... -
Page 13: Figure 3: Vs-6464Dn 64X64 Digital Matrix Switcher Rear Panel Showing Dvi Cards
Figure 3: VS-6464DN 64x64 Digital Matrix Switcher Rear Panel Showing DVI Cards Feature Function Video Generator Output Connect to one of the relevant video inputs to aid Connector in troubleshooting (see Section PATTERN Button Press the button repeatedly to change the video... -
Page 14: Using The Ir Transmitter
Connect to the relevant video acceptors, depending on the cards installed (33 to 64, see Section Using the IR Transmitter You can use the RC-IR3 IR transmitter to control the machine via the built-in IR receiver on the front panel. VS-6464DN - Overview... -
Page 15: Installing In A Rack
Installing in a Rack This section provides instructions for rack mounting the unit. VS-6464DN - Installing in a Rack... -
Page 16: Connecting The Vs-6464Dn
Connecting the VS-6464DN Always switch off the power to each device before connecting it to your VS-6464DN. After connecting your VS-6464DN, connect its power and then switch on the power to each device. The configuration of DVI input/output cards shown in... -
Page 17: Port Numbering
5. If necessary, review and set the system configuration using the Menu (see Section Note: Following HDCP regulations, if an input signal is HDCP encoded the VS-6464DN outputs a signal only if the output port to which it is switched supports HDCP. Port Numbering On all cards apart from the DVI dual link cards, there are eight physical ports and the numbering of ports is sequential from top to bottom and left to right. -
Page 18: Port Switching And Edid Numbering Examples
The following table is based on the port numbering shown in Figure 5 and lists EDID configuration requests and their results. EDID Request EDID Sent From OUT 21 Blank (256 bytes of 0xFF) From IN 25 None (error message displayed) VS-6464DN - Connecting the VS-6464DN... -
Page 19: Connecting To The Vs-6464Dn Via Rs-232
5.3.1 Connecting the Ethernet Port directly to a PC You can connect the Ethernet port on the VS-6464DN to the Ethernet port on your PC via a crossover cable with RJ-45 connectors. This type of connection is recommended for identification of the factory... - Page 20 6. Select Use the following IP Address and enter the details as shown in Figure 7. You can use any IP address in the range 192.168.1.1 to 192.168.1.255 (excluding 192.168.1.39) that is provided by your IT department. VS-6464DN - Connecting the VS-6464DN...
- Page 21 7. Click OK. 5.3.2 Connecting to the Ethernet Port via a Network Switch/Hub To connect to the Ethernet port on the VS-6464DN via a network switch/hub: Connect the PC to the Ethernet network switch/hub using a straight through cable...
-
Page 22: Operating Your Video Matrix Switcher
The text in the LCD display may vary (according to machine settings). Figure 8: Default Startup Status Display Sequence The front panel of the VS-6464DN includes a numeric keypad within the selector buttons area. This keypad lets you enter both the output and input numbers as... -
Page 23: Using The Selector Buttons
Using the Selector Buttons For numbers between 1 and 9, the VS-6464DN can handle two digit numbers as well as single digit numbers. When entering a single digit number (for example 5), you can either press 0 followed by 5, or 5 followed by ENT. -
Page 24: Confirming Actions
The TAKE button lights and actions now require user confirmation. 2. Press the lit TAKE button to toggle from the Confirm mode back to the At Once mode. The TAKE button is no longer lit and actions no longer require user confirmation. VS-6464DN - Operating Your Video Matrix Switcher... -
Page 25: Switching Actions
LCD display shows a segment of the input-output status that includes the switched input and output (for example, 14-12) In the Confirm mode, the LCD display shows the following: In 14 => Out 12 Incomplete actions time out after approximately 15 seconds. VS-6464DN - Operating Your Video Matrix Switcher... - Page 26 Input being blank underneath the relevant Output. To turn an output off: 1. Press MENU. The Menu buttons light and are enabled. 2. Press OFF (3) on the numeric keypad (see Figure The following message is displayed: VS-6464DN - Operating Your Video Matrix Switcher...
- Page 27 The DEFAULT SETUP button flashes and the following message is displayed: recall DEFAULT setup press FLASHING button to confirm 2. Press DEFAULT SETUP. The following message is displayed: all Setups and Connections change press TAKE to confirm The TAKE button flashes. VS-6464DN - Operating Your Video Matrix Switcher...
-
Page 28: Locking The Front Panel Buttons
Locking the Front Panel Buttons You can lock the VS-6464DN to prevent tampering with the unit or prevent the settings from being changed accidentally via the front panel buttons. You can still operate the device remotely via RS-232 or Ethernet when the front panel is locked. -
Page 29: Using The Configuration Menu
Using the Configuration Menu The configuration menus let you configure the VS-6464DN to best suit your needs. There are two configuration menus: Setup Menu—those that are accessed on a regular basis (for example, storing setups and setting the delay), see Section 7.1... - Page 30 2. Press 3 (OFF) on the numeric keypad (see Figure The following is displayed: out__ => OFF 3. Using the numeric keys, enter the output to be turned off. The TAKE button flashes. 4. Press TAKE. The selected output is turned off. VS-6464DN - Using the Configuration Menu...
- Page 31 This option assigns an EDID to between one and eight inputs at a time which are stored in non-volatile memory. More than eight EDID assignments must be assigned in separate batches of eight. Each input on the VS-6464DN has a factory default EDID loaded (see Section 15).
- Page 32 200ms and ranges from 0 to 15, providing delays of between 0 and 3 seconds (15 x 200ms = 3 seconds). To set the execution delay for an output: 1. Press MENU. The Setup Menu options are displayed. VS-6464DN - Using the Configuration Menu...
- Page 33 3. Using the numeric keys, enter the preset (1 to 59) in which to store the current setup. The following is displayed: Wait ….. After a few seconds, if the preset is not empty, the following is displayed: SETUP NOT EMPTY CONFIRM The TAKE button flashes. VS-6464DN - Using the Configuration Menu...
-
Page 34: Using The Config Menu
The Config Menu provides access to configuration settings that are not regularly changed and comprises the following options: Input signal detection (Section 7.2.1) Output load detection (Section 7.2.2) Interface configuration (Section 7.2.3) VS-6464DN - Using the Configuration Menu... - Page 35 7.2.1 Config Menu—Input Signal Detection Display This option displays a list of inputs and indicates on which of them signals have been detected. To display a list of inputs that have detected signals: VS-6464DN - Using the Configuration Menu...
- Page 36 Y indicates that a load is attached and X indicates that no load is detected on the relevant output. 3. Do one of the following: Press BREAKAWAY to exit the Config Menu VS-6464DN - Using the Configuration Menu...
- Page 37 Setting Reply to off causes all interfaces that are set to on to accept and execute commands, but not to reply. VS-6464DN - Using the Configuration Menu...
- Page 38 A message is displayed indicating the new status of the Reply configuration. After a few seconds the next option on the Config Menu is displayed. 7.2.5 Config Menu—Protocol Configuration The VS-6464DN supports Kramer Protocol 2000. There are currently no options to modify. 7.2.6 Config Menu—Store Default Setup This option lets you store the current setup as the default setup.
- Page 39 2. Press MENU until the following is displayed: TOTAL MATRIX RESET exit = ESC ENT = submenu 3. Press ENT to enter the Reset Submenu. The following is displayed: COMPLETELY MATRIX RESET 1:ALL outputs OFF 2:Factory default VS-6464DN - Using the Configuration Menu...
- Page 40 2. Press MENU until the following is displayed: Main Firmware Version: Front Firmware Version: 3. Either: Press BREAKAWAY to exit the Config Menu Wait approximately 15 seconds for the operation to time out VS-6464DN - Using the Configuration Menu...
-
Page 41: Configuring The Number Of Installed Input And Output Ports
Output Ports After installing or removing a module you need to set the number of input and output ports so that the VS-6464DN recognizes the new configuration. Refer to Section 5.1 for an explanation of port numbering before setting the number of input and output ports. -
Page 42: Using The Video Generator To Troubleshoot Video Problems
If your VS-6464DN has eight inputs and twelve outputs, you must configure the VS-6464DN as 9 x 13 If your VS-6464DN has 64 inputs and 64 outputs, you must configure the VS-6464DN as 65 x 65 Installing the Video Generator To install the video generator in the configuration: 1. -
Page 43: Setting The Resolution Of The Generated Video
Setting the Pattern of the Generated Video The Pattern button is used to set the pattern of generated video. There are 32 available patterns. Press the button repeatedly to cycle through the patterns. VS-6464DN - Using the Video Generator to Troubleshoot Video Problems... -
Page 44: Using The Video Generator To Troubleshoot Video Problems
Signal path: c to d; d to projector To test the projector output: 1. Configure Input 33 to Output 33 (see Section 6.4). 2. Connect Output 33 to the projector. VS-6464DN - Using the Video Generator to Troubleshoot Video Problems... - Page 45 4. Connect Output 1 to the projector. 5. Set the generated video resolution (see Section 9.2). 6. Set the pattern for the generated video (see Section 9.3). 7. Verify that the projector output is as expected. VS-6464DN - Using the Video Generator to Troubleshoot Video Problems...
-
Page 46: I/O Card Hardware Installation Instructions
I/O Card Hardware Installation Instructions The VS-6464DN I/O cards mount in one of the 16 slots on the rear of the VS-6464DN chassis. Slots are numbered from left to right and must be filled consecutively from left to right, without leaving empty slots. - Page 47 8. Using a Phillips screwdriver, tighten the retaining screws at the top and bottom of the card to secure it to the chassis. 9. Power on the VS-6464DN and follow the procedure to configure the new card (see Section 10.
-
Page 48: Power Supply Installation
Power Supply Installation The VS-6464DN is supplied with three redundant power supplies and can run on a minimum of two power supplies. To install a second power supply: 1. Remove the new power supply from its shipping carton and anti-static bag. -
Page 49: Upgrading The Vs-6464Dn Firmware
Upgrading the VS-6464DN Firmware Upgrading the firmware on the VS-6464DN is performed only by authorized service personnel. VS-6464DN - Upgrading the VS-6464DN Firmware... -
Page 50: Technical Specifications
HDCP/HDMI x.v.Color™ Equalization & re- Klocking™ (4LC 8 4LC 1.65Gbps DVI 1.0 Technology Fiber Optic) Multi-mode glass fiber cables with LC connections must be used for the 4LC Fiber Optic card, such as the Kramer C-4LC/4LC VS-6464DN - Technical Specifications... -
Page 51: Default Communication Parameters
9600 Data Bits Stop Bits Parity None Command Format Example (To switch Output 1 to Input 1) 0x01, 0x81, 0x81, 0x81 Ethernet Default Values IP Address 192.168.1.39 TCP Port # 5000 UDP Port # 50000 VS-6464DN - Default Communication Parameters... -
Page 52: Factory Default Edid
1440 x 900p at 60Hz - VESA STD 1280 x 960p at 60Hz - VESA STD 1280 x 1024p at 60Hz - VESA STD 1400 x 1050p at 60Hz - VESA STD 1680 x 1050p at 60Hz - VESA STD VS-6464DN - Factory Default EDID... -
Page 53: 15.2 Dvi (Hdcp) Input Card
1280 x 720p at 60Hz - VESA STD 1280 x 800p at 60Hz - VESA STD 1440 x 900p at 60Hz - VESA STD 1280 x 960p at 60Hz - VESA STD 1280 x 1024p at 60Hz - VESA STD VS-6464DN - Factory Default EDID... - Page 54 Front left/right center.. No Rear left/right center... No Rear LFE....No CE vendor specific data (VSDB) IEEE registration number. 0x000C03 CEC physical address..1.0.0.0 Maximum TMDS clock..165MHz Raw data 00,FF,FF,FF,FF,FF,FF,00,2E,4D,00,02,01,00,00,00,0C,10,01,03,81,46,27,78,0A,D5,7C,A3,57,49,9C,25, 11,48,4B,FF,FF,80,81,C0,81,00,95,00,81,40,81,80,90,40,B3,00,A9,40,01,1D,00,72,51,D0,1A,20,6E,28, 55,00,7E,88,42,00,00,1A,02,3A,80,18,71,38,2D,40,58,2C,45,00,C4,8E,21,00,00,1E,00,00,00,FC,00,56, 53,2D,36,34,48,44,43,50,0A,20,20,20,00,00,00,FD,00,32,55,1F,5E,11,00,0A,20,20,20,20,20,20,01,DE, 02,03,1A,71,47,11,13,05,14,84,10,1F,23,0A,06,04,83,05,00,00,65,03,0C,00,10,00,8C,0A,D0,8A,20,E0, 2D,10,10,3E,96,00,58,C2,21,00,00,18,01,1D,80,18,71,1C,16,20,58,2C,25,00,C4,8E,21,00,00,9E,01,1D, 80,D0,72,1C,16,20,10,2C,25,80,C4,8E,21,00,00,9E,01,1D,00,72,51,D0,1E,20,6E,28,55,00,C4,8E,21,00, 00,1E,01,1D,00,BC,52,D0,1E,20,B8,28,55,40,C4,8E,21,00,00,1E,00,00,00,00,00,00,00,00,00,00,00,90 VS-6464DN - Factory Default EDID...
-
Page 55: Communication Protocols
For example, to switch input 57 to output 10: 01 B9 8A 81 Input/Output Input/Output Input/Output Input/Output Number Value Number Value Number Value Number Value VS-6464DN - Communication Protocols... - Page 57 For the latest information on our products and a list of Kramer distributors, visit our Web site where updates to this user manual may be found. We welcome your questions, comments, and feedback. Web site: www.kramerelectronics.com E-mail: info@kramerel.com SAFETY WARNING...
Need help?
Do you have a question about the VS-6464DN and is the answer not in the manual?
Questions and answers