Seca 644 Instruction Manual
Hide thumbs
Also See for 644:
- Instruction manual and guarantee (409 pages) ,
- Service manual (74 pages) ,
- Manual (59 pages)

Related Manuals for Seca 644


Summary of Contents for Seca 644
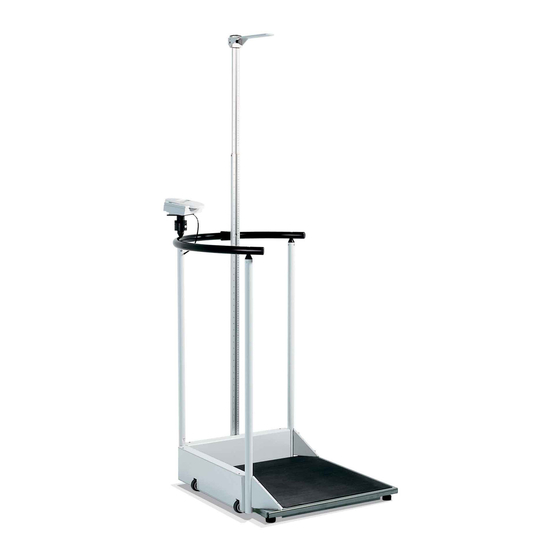
- Page 1 644 Instruction manual and guarantee Mode d’emploi et garantie Manuale di istruzioni e garanzia Manual de instrucciones y garantia...
- Page 2 In addition to the conventional determina- provide long, mobile service. tion of weight, the seca 644 also has a 2. Safety Before using the new scale, please take a little time to read the following safety instruc- tions.
- Page 3 • 2 triangular covers right/left • Display mount • Set of assembly bolts • Allan key, size 6 • Phillips screwdriver size 1 and size 3 • 1 screwdriver • 1 seca mains unit • 1 set of operating instructions Model 644...
-
Page 4: Assembling The Scale
Assembling the scale Step 1: Assemble the first side section You will need the following bolts: 3 x Allan bolts M5 – Position the side section on the right- hand side of the scale platform. – Bolt the side section to the scale plat- form using two Allan bolts. - Page 5 – Position the railing on the three col- umns. The large bore holes must point downwards, and must be inserted into the heads of the columns. – Use an oval head bolt to attach the rail- ing to the two outer columns. Model 644...
- Page 6 – Place the display mount with the peg- shaped end over the central column on the railing. – Turn the display mount until the peg clicks into place. – Screw the display mount tightly into place using the Allan bolt. Step 4: Assemble the display head You will need the following bolts: 3 x special Allan bolt, ø...
- Page 7 – Connect the plug with the rechargeable Plug battery block located in the battery compartment. – Replace the lid of the battery compart- ment, and bolt this firmly in place. – Turn the scale to the upright position. Model 644...
-
Page 8: Power Supply
Power supply The scale is powered by a mains unit and by rechargeable batteries. The scale works in- dependently of the mains, which is very handy for mobile use. The LC display and the evaluation electronics have a low power consumption – 2,000 weighing operations can be performed with a fully charged battery. -
Page 9: Operation
Activate BMI or pre-Tare function, and confirm key for entries In order to ensure that the display can be read from different positions, the display head can be rotated 180° in both directions. Model 644... -
Page 10: Correct Weighing
Correct weighing – Press the Start key. SE(a 8. 8 . 8 . 8 . 8 . 0. 0 0 appear consecu- tively in the display. The scale is then auto- matically set to zero and ready to use. – If necessary, switch the weight display (see page 28). -
Page 11: Taring Weight Display (Tara)
HOLD key again. 0. 0 appears in the display if the scale has no load on it, otherwise the current weight. The “HOLD“ display vanishes. Note: The HOLD and TARE functions can also be used simultaneously. Model 644... -
Page 12: Body-Mass-Index (Bmi)
Body-Mass-Index (BMI) Body Mass Index puts height and weight in relationship to one another, providing more accurate information than ideal Broca weight, for example. A tolerance range is given which is considered ideal for health. The Body Mass Index applies only to adults: these values are not relevant to children and young people. -
Page 13: Weighing With Pre-Tare
– Use the arrow keys to select the desired memory for storing the additional weight or where a weight may already be stored. – Then press FUNC. In the display you will see the tare value from the memory. Model 644... -
Page 14: Setting Damping
– You can alter the weight of the patient using the arrow keys in display steps. – Once the correct value is set, press the FUNC key again. – The pre-Tare function is now activated. – Mount the scale together with the pa- tient. -
Page 15: Moving The Scale
… one segment is illuminated constantly or not at all? – The relevant segment has a fault. Inform Servicing. … the display shows – Battery voltage is dropping. Charge the rechargeable batteries in the next few days. Model 644... -
Page 16: Technical Data
If this measure is equally unsuccessful, inform the Service department. 9. Maintenance Your seca scale leaves the factory with an accuracy greater than ± 0.15 %. To ensure that this accuracy is maintained, the product must be carefully set up and regularly maintained. -
Page 17: Spare Parts And Accessories
Graduations seca 644, no. 1321 009 and 644 1321 109 100 g / 0.2 lbs seca 644, no. 1321 139 (USA) 0.1 lbs / 100 g Power supply: model dependent mains unit and built-in rechargeable battery pack 11. Spare parts and accessories Rechargeable batteries seca spare part no.: 68-22-12-721...
Need help?
Do you have a question about the 644 and is the answer not in the manual?
Questions and answers