Teeter Hang Ups EP-550 Assembly Information
Hide thumbs
Also See for EP-550:
- Assembly instructions manual (20 pages) ,
- Assembly instructions manual (22 pages) ,
- Owner's manual (12 pages)

Related Manuals for Teeter Hang Ups EP-550


Summary of Contents for Teeter Hang Ups EP-550
- Page 1 EP-550 /EP-650 ™ ™ Inversion Table Assembly Instructions www.ActiveForever.com YEAR...
- Page 2 BEFORE YOU BEGIN: Review all steps before beginning assembly and read all precautions before using the inversion table. Carefully adhere to the Assembly Instructions and Owner’s Manual to help ensure safety and product integrity. IMPORTANT SAFETY INSTRUCTIONS READ ALL INSTRUCTIONS BEFORE USING THE INVERSION TABLE. WARNING WARNING - To reduce the risk of injury to persons: •...
-
Page 3: Items For Assembly
Items for Assembly Carefully remove the individual parts from the carton. You should have all of the items listed below. If any items are missing or damaged, contact Customer Service at 1-800-847-0143. Items for Assembly Item Numbers A-frame Base (F7-1002) Tether (F5-1007) Table Bed Assembly (EP-1140) (EP-1149) Bolts and Nuts (EP-1149) (F5-1007) Head Pillow (EP-1105) (EP-1140) (F7-1002) (EP-1105) Main Shaft with Ankle Lock System (EP-1120) Foam Rollers (2) (F5-1051) Rubber Plugs (2) (F5-1056) -
Page 4: Before Beginning
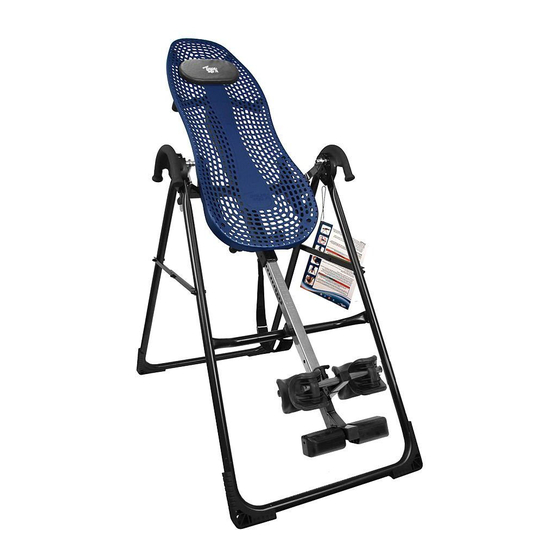
Before Beginning Table Bed Before reading further, study the drawing below to familiarize yourself with the important components of your new Teeter Hang inversion table. ® A-frame Crossbar Rear and Hand Grip Front Ankle Clamps Adjustable Foot Platform Tether Strap Main Shaft Ankle Locking Stability Feet... - Page 5 Step Right Left spreader arms Assemble the A-frame Base (F7-1002) and Install the Handles (F5-1069) • Open the A-frame and make sure the spreader arms are locked, rest the A-frame on the floor (Figure 1). The Crossbar is at the front. • Place each Hand Grip (left/right) over the outside edge of the corresponding Hinge Plate (Figure 2). •...
- Page 6 Step 2 Attach the Upper Support Arms to the Table Bed (EP-1140) Support Beam Upper Support Arms • Before following this step, make sure you have read the orange insert that came attached to the Table Bed. • Place the Table Bed face down on the floor and push down on the Support Beam, so the two holes align evenly with holes at the base of Upper Support Arms (Figure 3).
- Page 7 Step 3 Install the Roller Hinges (F5-1064) onto the Table Bed (EP-1140) • For ease-of-assembly, rest the Table Bed against the side of the A-frame (Figure 5). • Open the Cam Locks on each side of the Table Bed (Figure 5A). •...
- Page 8 Step 4 Attach the Table Bed (EP-1140) to the A-frame (F7-1002) • Holding each side near the Roller Hinges, pick up the Table Bed and stand at the front of the A-frame where the Crossbar is located. Lower each Pivot Pin into the A-frame hinge plates one at a time (Figure 7). You may need to push outward on the A-frame in order to slide the second Pivot Pin into the hinge.
- Page 9 Step 5 Insert the Main Shaft (EP-1120) into the Table Bed (EP-1140) • Loosen the De-rattler knob on the Main Shaft Housing. • With the height adjustment settings on the Main Shaft facing up, slide the end of the Main Shaft into the Main Shaft Housing on the Table Bed. •...
- Page 10 Step 6 Install the Front Foam Rollers (F5-1051) • Slide the Foam rollers over each side of the Front Ankle Bar (Figures 12 and 12A). • Insert the black plugs (F5-1056) into each open end of the Front Ankle Bar if they are not already assembled. Figure 12 Figure 12A...
- Page 11 Step 7 Attach the Tether Strap (F5-1007) to Limit the Degree of Rotation • Hook the clip at the end of the tether strap to the loop at the base of the table bed (Figure 13) to limit your degree of rotation. • Tighten or loosen the strap to restrict or extend your angle of rotation. Attach the Head Pillow •...
- Page 12 • For your reference, the serial number can be found on the back of the Table Bed. WARNING Read the Owner’s Manual thoroughly before using your Teeter Hang Ups Inversion Table. Improper settings could result in serious injury or death!
- Page 13 Adjustments / Maintenance / Storage CHANGING THE ROLLER HINGE SETTING • Stand with your legs on either side of the Main Shaft. • Reach under each Roller Hinge with your index fingers. Use your thumbs to release the locks over the Roller Hinges (See Figure 16).
-
Page 14: Pre-Assembly
• ALWAYS test and inspect the Teeter Hang Ups Conversion Bar, Gravity Boots and Inversion Table prior to use. Make sure the table rotates smoothly to inverted position and back. Make sure that all fasteners are secure. -
Page 15: Prior To Use
Test the locking function of the ankle clamp assembly prior to use. Black End Cap Figure 7 DO NOT DISCARD - KEEP FOR FUTURE REFERENCE Teeter Hang Ups® is a registered trademark of Teeter © COPYRIGHT 2011, Teeter.. LB-1003 0511-4... -
Page 16: Important Safety Instructions
This product is Listed by OWNER’S MANUAL Underwriters Laboratories Inc. Representative samples of this product have been evaluated by UL and meet applicable EP-550 /EP-650 Inversion Table ™ safety standards. ™ This product is Listed by IMPORTANT SAFETY INSTRUCTIONS Underwriters Laboratories Inc. - Page 17 BEFORE YOU INVERT make sure that the inversion table rotates smoothly to the fully inverted position Roller Hinge Selection Per User Weight and back, and that all fasteners are secure. Make sure the user settings described below are properly adjusted for your unique needs and body type.
- Page 18 Securing Your Ankles • Stand with your back to the Table Bed - do not use the inversion table face-down. • Step over the Main Shaft, placing your feet on the floor on either side. To balance yourself, rest only your lower body against the Table Bed as you slide one ankle at a time between the ankle clamps onto the Ankle Comfort Dial.
- Page 19 Inverting When correctly balanced, the table will rotate in response to simple arm movements. To invert, lift your arms overhead slowly and to return upright, bring your arms back to your sides. Your arms provide the weight needed to rotate the table. (Figure 12). To ensure the inversion table does not rotate too far, too quickly: •...
- Page 20 DO NOT use weights, elastic bands or any other stretching device. SAVE THESE INSTRUCTIONS • DO NOT over-exert your muscles while inverted so you have strength to dismount. Teeter Hang Ups is a registered trademark of Teeter and Inversion International, Ltd.
-
Page 21: User Instructions
To Attach Calf Loops: Note: If you are not using a Teeter Hang Ups product in conjunction with the Teeter Hang Ups Gravity Boots, you will need to determine Insert the base of the Calf Loop into the open the proper procedures specific to that particular bar/apparatus for safe end of the Boot Hook (Figure A).
Need help?
Do you have a question about the EP-550 and is the answer not in the manual?
Questions and answers