Table of Contents
Advertisement
Advertisement
Table of Contents

Subscribe to Our Youtube Channel
Related Manuals for Robe ColorSpot 700E AT


Summary of Contents for Robe ColorSpot 700E AT
- Page 1 Wersion1.5...
-
Page 2: Table Of Contents
4.4 Replacing the colour filters,gobos and the animation wheel ........8 4.6 DMX-512 connection....................12 4.7 Ethernet connection ....................13 5.ColorSpot 700E AT - DMX Protocol-version 1.2 ............15 6. Controller mode ......................21 6.1 DMX addressing....................... 21 6.2 Remotely controllable functions ................21 7.Control menu map...................... -
Page 3: Safety Instructions
CAUTION! Keep this device away from rain and moisture! Unplug mains lead before opening the housing! FOR YOUR OWN SAFETY, PLEASE READ THIS USER MANUAL CAREFULLY BEFORE YOU INITIAL START - UP! 1. Safety instructions Every person involved with installation and maintenance of this device have to: - be qualilfied - follow the instructions of this manual CAUTION! -
Page 4: Operating Determinations
2.Operating determinations This device is a moving-head for creating decorative effects and was designed for indoor use only. If the device has been exposed to drastic temperature fluctuation (e.g. after transportation), do not switch it on immediately. The arising condensation water might damage your device. Leave the device switched off until it has reached room temperature. -
Page 5: Description Of The Device
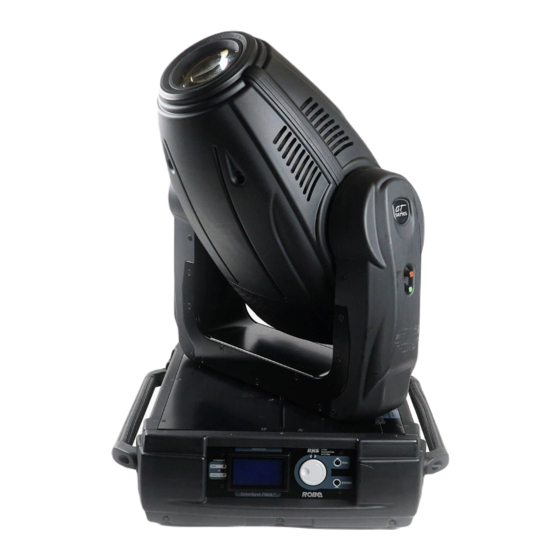
3. Description of the device 1 - Front lens 2 - Pan lock 3 - Base 4 - Handle 5 - Head yoke 6 - Tilt unlock button (green) 7 - Tilt lock button (red) 8 - Moving head The head should be locked for transportation- the tilt lock button (7) is pushed and the pan lock/unlock lever (2) is in locked position. -
Page 6: Installation
4.1 Connection to the mains For protection from electric shock,the fixture must be earthed! The ColorSpot 700E AT is equipped with auto-switching power supply that automatically adjusts to any 50/60Hz AC power source from 100-240 Volts. For use with 100-130 V supplies,the both main 6.3 A fuses has to be exchanged for 10 A fuses which are enclosed in the packing. -
Page 7: Fitting The Lamp
4.2 Fitting the lamp DANGER ! Install the lamps with the device switched off only. Unplug from mains before ! To insert the lamp (MSR GOLD 700 FastFit): 1. Disconnect the fixture from power and allow it to cool at least 15 minutes. 2. -
Page 8: Replacing The Colour Filters,Gobos And The Animation Wheel
4.4 Replacing the colour filters,gobos and the animation wheel DANGER! Install the colour filters,gobos and animation wheel with the device switched off only. Unplug from mains before! Colour filters 1. Disconnect the fixture from mains and allow it to cool. 2. - Page 9 Rotating gobos 1. Disconnect the fixture from mains and allow it to cool. 2. Remove the bottom plastic cover of the head by loosening the 4 quarter-turn fasteners on the cover. 3. Gently bend out the gobo module to release it from the distance slots and pull it up from the pressing snap. 4.
-
Page 10: Rigging The Fixture
4.5 Rigging the fixture DANGER TO LIFE! Please consider the respective national norms during the installation! The installation must only be carried out by an authorized dealer! The installation of the projector has to be built and constructed in a way that it can hold 10 times the weight for 1 hour without any harming deformation. - Page 11 only use safety-ropes with screw-on carabines. Pull the safety-rope through the two apertures on the bottom of the base and over the trussing system etc. Insert the end in the carabine and tighten the fixation screw. Fixation via the omega holders 1.Bolt each clamp (1) to the omega holder (4) with M12 bolt and lock nut through the hole in the holder.
-
Page 12: Dmx-512 Connection
4.6 DMX-512 connection The fixture is equipped with both 3-pin and 5-pin XLR sockets for DMX input and output.The sockets are wired parallel. Only use a shielded twisted-pair cable designed for RS-485 and 3-pin or 5-pin XLR-plugs and connectors in order to connect the controller with the fixture or one fixture with another. -
Page 13: Ethernet Connection
The Universe is a single DMX 512 frame of 512 channels. The ColorSpot 700E AT is equipped with 8-pin RJ- 45 socket for Ethernet input.Use a network cable category 5 (with four “twisted” wire pairs) and standard RJ-45 plugs in order to connect the fixture to the network. - Page 14 Ethernet / DMX operation Options “Ethernet/DMX” has to be selected from “Set Ethernet Mode” menu on the first fixture (connected to the network) in the fixture chain,next fixtures have standard DMX addresses. Connect the Ethernet-input of the first fixture in the data chain with the network. Connect the DMX output of this fixture with the input of the next fixture until all fixtures are connected to the DMX chain.
-
Page 15: Colorspot 700E At - Dmx Protocol-Version 1.2
5.ColorSpot 700E AT - DMX Protocol-version 1.2 Mode/Channel Type of Value Function control 0 - 255 proportional Pan movement by 530° Pan Fine 0 - 255 proportional Fine control of pan movement Tilt 0 - 255 proportional Tilt movement by 280°... - Page 16 Mode/Channel Type of Value Function control Colour wheel Continual positioning Open/white proportiona Deep red proportiona Deep blue proportiona Orange proportional Green proportional Light red proportional Amber proportional UV filter proportional 128-129 White proportional Positioning 130-137 Deep red step 138-145 Deep blue step 146-153 Orange...
- Page 17 Mode/Channel Type of Value Function control 160-167 Macro 20 step 168-175 Macro 21 step 176-183 Macro 22 step 184-191 Macro 23 step 192-199 Macro 24 step 200 - 207 Macro 25 step 208 - 215 Macro 26 step 15 14 13 12 16 216 - 223 Macro 27 step...
- Page 18 Mode/Channel Type of Value Function control 90 - 94 Gobo 6 step 95 - 99 Gobo 7 step 100 - 104 Gobo 8 step 105 - 109 Gobo 9 step Shaking gobos from slow to fast 110 - 119 Gobo 1 proportional 120 - 129 Gobo 2...
- Page 19 Mode/channel Type of Value Function control 200 - 201 Open/hole step 202 - 221 Forwards gobo wheel rotation from fast to slow proportional 222 - 223 No rotation step 21 19 19 17 224 - 243 Backwards gobo wheel rotation from slow to fast proportional 244 - 249 Random gobo selection by audio control...
- Page 20 Mode/Channel Type of Value Function control Pulse effects with Iris blackout: 192 -219 Pulse opening from slow to fast proportional 220 - 247 Pulse closing from fast to slow proportional 28 24 26 22 20 248 - 249 Random pulse opening (fast) step 250 - 251 Random pulse opening (slow)
-
Page 21: Controller Mode
The ColorSpot 700E AT is to be operated with a Philips MSR Gold 700 Fast Fit lamp. A relay inside of the ColorSpot 700E AT allows you to switch on and off the lamp via the control panel or via your DMX controller without affecting the rest of the lighting. - Page 22 Iris Motorized adjustable iris,wide range of variable pulse effects. Zoom Motorized zoom unit enables zoom between 15° and 51° beam angle. Dimmer/Shutter/Strobe Smooth 0 - 100 % dimming is provided by the mechanical dimmer/shutter unit. This unit may also be used for strobe effect.
-
Page 23: Control Menu Map
7.Control menu map Default settings=Bold print Default settings=Bold print Fixture Address DMX Address Ethernet Settings Set Ethernet Mode Disable Ethernet Ethernet Ethernet/DMX Set IP Address Default IP Address Custom IP Address Set ArtNet Universe (0 -255) Fixture information Power On Time Total Hours Resetable Hours Lamp On Time... - Page 24 Personality User Mode User A Settings User B Settings User C Settings DMX Presetting Mode 1 Ch.1 Pan Ch.36 Dimmer Fine Set Active Mode 2 Ch.1 Pan Ch.28 Dimmer Set Active Mode 3 Ch.1 Pan Ch.34 Dimmer Set Active Mode 4 Ch.1 Pan Ch.26 Dimmer Set Active...
- Page 25 Dimmer (0-255) Dimmer fine (0-255) Save Temperature Unit (°C,°F) Default Setting Lamp On/Off (On,Off) Test sequences Mode 1 Pan (0-255) Tilt (0-255) Zoom (0-255) Run Test Program Mode 2 Manual Mode Preset Effect Control Pan (Position 1,...,Position 7) Dimmer (Position 1,...,Position 6) Manual Effect Control Pan (0-255) Dimmer Fine (0-255)
- Page 26 Special functions Lamp Adjustment Pan (0-255) Tilt (0-255) Zoom (0-255) Effect Adjustment DMX Values Pan (0-255) Dimmer fine (0-255) Calibrate Values Colour Wheel (0-225) Mech. dimmer 2 (0-255) Save and Reset Load Default Values Updating Software...
-
Page 27: Control Menu
Lamp On Time - Select this submenu to read the number of the operation hours with the lamp on. Total Hours - The function shows the total number of the operation hours with the lamp on since the ColorSpot 700E AT has been fabricated. - Page 28 Resetable Hours - The function shows the number of the operation hours with the lamp on that the ColorSpot 700E AT has been powered on since the counter was last reset. In order to reset this counter to 0, press [ENTER] twice.
-
Page 29: Personality
Use this menu to to modify ColorSpot 700E AT operating behavior. User mode --- ColorSpot 700E AT allows you to recall up to 3 user settings.After switching the fixture on for the first time, the User A settings is active.All changes made in “Personality” menu ,”Fixture Address” menu and Music Trigger and Presetting Playback functions from “Stand-alone setting”... -
Page 30: Lamp On/Off
Mode 1 --- This mode is suitable for projections on the wall, ceiling or ground without any head movement. Mode 2 --- This mode uses all ColorSpot 700E AT functions including pan/tilt movement and therefore is good for a complete introduction of the fixture. -
Page 31: Stand-Alone Setting
Editing Program --- Select this menu to edit or create the program.The ColorSpot 700E AT has one built-in program and the 3 free programs,each up to 99 steps.Each program step has a step time. - Page 32 To update software in the fixture: 1.Installation of DMX Software Uploader. 1.DMX Software Uploader program is available from the ROBE web site at WWW.robe.cz. 2.Make a new directory ( e.g. Robe_Uploader) on your hard disk and download the software to it.
-
Page 33: Power Down Mode
fixtures. in DMX chain! Turn on the computer and the fixture. Make sure that the lamp is switched off. 2.Switch the fixture to the update mode by selecting the option Updating Software in menu Special Functions on the fixture control panel.(From this option you cannot return back to the main menu. If you do not want to continue in software update, you have to switch off and on the fixture to leave this option!) 3.It is recommended that you exit all programs before running this Software Uploader. -
Page 34: Error And Information Messages
LAMP_ON_MODE DEVICE_HOURS LAMP_HOURS LAMP_STRIKES ...Another options for this command (only for Robe´s fixtures): value PARAMETER_DATA=0x84 - lamp OFF by DMX value on DMX channel value PARAMETER_DATA=0x88 - lamp OFF if DMX is not present ...Commands relative resetable values 11. Error and information messages Occured errors during fixture operation are signaled by warning icon on the display: Press [ESC] to see the current error messages. - Page 35 This message will appear if the fixture was shortly disconnect from the main. Supply Frequency Error This message will appear if the frequency of the main is not standard 50 or 60 Hz.This message can appear as a result of the interference during the lamp starting (if the lamp or igniter is old) or as a result of the interference by neighbouring devices.
-
Page 36: Technical Specifications
Gobo Wheel Error 1 (Rot.Gobo Wheel Error 2 ) The messages will appear after the reset of the rotating gobo wheel if this wheel is not located in the default position. Gobo Index. Error 1 (Rot. Gobo Index. Error 2 ) The messages will appear after the reset of the rotating gobo wheel if the rotating gobos are not located in the default positions. -
Page 37: Animation Wheel
Strobe effect with variable speed (max.15 flashes per second) Dimmer: Smooth dimmer from 0 - 100 % Electronics: Control via graphic LCD display and Robe navigation system Readout fixture and lamp usage,receiving DMX values,temperature, etc Built-in analyzer for easy fault finding,error messages Remotely switching on/off the lamp... - Page 38 Temperatures Maximum ambient temperature : 40° C Maximum housing temperature : 120° C Minimum distances Min.distance from flammable surfaces: 1 m Min.distance to lighted object: 1.5 m Weight (net): 32 kg Dimensions(mm) Accessories - Omega holder (No.99010420)........2 pcs - Gobo-set 15 (No.15050024)........1 pcs Optional Accessories - Flash cable RS232/DMX (No.13050624) Beam path...
-
Page 39: Maintenance And Cleaning
13. Maintenance and cleaning It is absolutely essential that the fixture is kept clean and that dust, dirt and smoke-fluid residues must not build up on or within the fixture. Otherwise, the fixture‘s light-output will be significantly reduced. Regular cleaning will not only ensure the maximum light-output, but will also allow the fixture to function reliably throughout its life. - Page 40 air filter cover quarter-turn fasteners Replacing the fuse If the lamp burns out, the fine-wire fuse of the device might fuse, too. Only replace the fuse by a fuse of same type and rating. Before replacing the fuse, unplug mains lead. Procedure: 1) Unscrew the fuseholder on the rear panel of the base with a flat-tip screwdriver from the housing (anticlockwise).
-
Page 41: Appendix
14.Appendix 14.1 Standard effect configuration Static gobo wheel Rot. gobo wheel... -
Page 42: Optional Animation Wheels
Gobo-set 15 ( No.15050024) Animation wheel 14.2 Optional animation wheels...
Need help?
Do you have a question about the ColorSpot 700E AT and is the answer not in the manual?
Questions and answers