Table of Contents
Advertisement
Available languages
Available languages
Advertisement
Table of Contents

Subscribe to Our Youtube Channel
Related Manuals for Selta Netfon 350


Summary of Contents for Selta Netfon 350
-
Page 1: User Guide
NETFON 350 NETFON 300 User Guide... - Page 2 SELTA RESERVES THE RIGHT TO MODIFY THE CONTENTS OF THIS MANUAL WITHOUT NOTICE AND DECLINES ALL RESPONSIBILITY FOR ANY ERROR OR OMISSION WITHIN Selta S.p.A. Selta Espana, S.A. Selta S.p.A Via Emilia, 231 C/ Puerto Guadarrama, 50 Via Nazionale, km 404,500...
-
Page 3: Table Of Contents
Index ITALIANO NETfon 300/350 - Istruzioni per l’uso 1. Premessa ..........................................1 2. Sicurezza..........................................2 3. Dichiarazione di conformità ..................................2 4. Indicazioni di classe A....................................3 5. Indicazioni di sicurezza ....................................3 6. Impatto ambientale ....................................... 3 7. Descrizione del telefono....................................4 7.1. - Page 4 Index ENGLISH NETfon 300/350 - User guide 1. Performance information..................................33 2. Safety ..........................................34 3. Conformity declaration..................................... 34 4. Class A information product................................... 34 5. Safety declaration ....................................... 35 6. Environmental impacts and end life disposal ..........................35 7. An overview of telephone..................................36 7.1.
- Page 5 Index 9.4. Factory Reset procedure............................ 62 NETfon 300/350 - User Guide 723142003-A0-LM...
- Page 6 Index Русский NETfon 300/350 - Руководство пользователя 1. Введение.......................................... 63 2. Безопасность ....................................... 64 3. Заявление о соответствии.................................. 64 4. Информация о продукте Класса A..............................64 5. Заявление о безопасности................................. 65 6. Утилизация и влияние на окружающую среду........................65 7. Внешний вид телефона NETfon 300 ............................... 66 7.1.
-
Page 7: Premessa
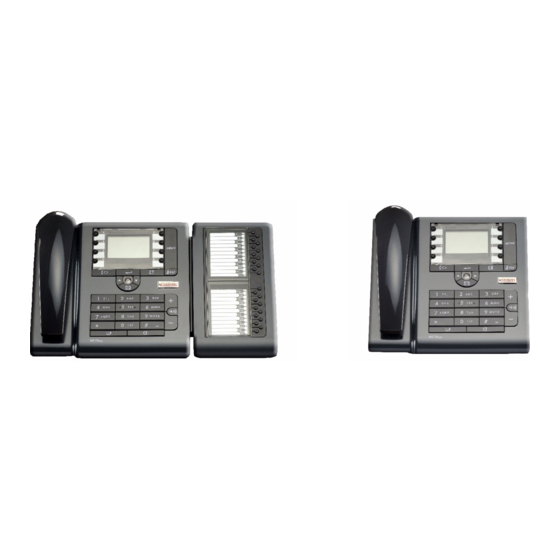
NETFON 300 - 220x230x80 mm NETFON 350 - 340x230x80 mm Il NETfon 350 si differenzia dal NETfon 300 per la presenza del modulo DSS che fornisce un’espansione di ulteriori 24 tasti programmabili oltre agli 8 presenti nel telefono base. Per tale motivo le descrizioni contenute in questa guida sono valide per entrambi i modelli. -
Page 8: Sicurezza
L’apparecchio è stato progettato per esclusivo utilizzo con sistemi telefonici SAMIP SELTA. 3. Dichiarazione di conformità La SELTA spa dichiara sotto la propria responsabilità che i prodotti NETfon 300/NETfon 350 sono conformi alla direttiva 1999/05/CE del Parlamento Europeo e del Consiglio del 9 Marzo 1999 per le apparecchiature radio e le apparecchiature terminali di telecomunicazioni ed il reciproco riconoscimento delle loro conformità. -
Page 9: Indicazioni Di Classe A
Indicazioni di classe A 4. Indicazioni di classe A Questo è un apparecchio di Classe A. In un ambiente residenziale questo apparecchio può provocare radiodisturbi. In questo caso può essere richiesto all’utilizzatore di prendere misure adeguate. 5. Indicazioni di sicurezza Se il telefono è... -
Page 10: Descrizione Del Telefono
Descrizione del telefono 7. Descrizione del telefono 7.1. Descrizione della tastiera del telefono DESCRIZIONE DEI TASTI 8 Tasti programmabili + 24 tasti programmabili su modulo DSS da parte dell’amministratore di sistema. Opportunamente personalizzati, quando premuti avviano i servizi per i quali vengono configurati (es.: deviata, risposta per assente, conferenza a tre, prenotazione, ecc.). -
Page 11: Descrizione Delle Icone Del Display Grafico
Descrizione del telefono Svincolo/Esc Svincola la chiamata in corso; Accede al menu di livello superiore; Esce dal menu di impostazione/programmazione locale; Impegna/svincola la linea in modalità cuffia(1). Call list Entra nel registro delle chiamate (perse / in uscita / risposte) per richiamare, consultare e cancellare le liste. - Page 12 Descrizione del telefono DESCRIZIONE DELLE ICONE DI STATO Cavo scollegato = Il cavo di collegamento alla rete LAN non è collegato o non è funzionante. CA Backup = Il telefono è collegato al Call Agent di backup. Microtelefono = Microtelefono in uso. Cuffia = Cuffia in uso.
-
Page 13: Utility Per Accesso Rapido Al Menu Locale
Descrizione del telefono Server FTP = segnala la non raggiungibilità del Server FTP 7.3. Utility per accesso rapido al menu locale ACCESSO RAPIDO ALLE FUNZIONI Menu/Enter + numero della voce di menu(*) permette l’accesso direttamente all’interno della voce di menu prescelta. (*) Legenda: 1 = RUBRICA LOCALE 2 = RUBRICA CENTRALE... -
Page 14: Posizionamento Del Piede Di Appoggio Al Corpo Del Telefono
Descrizione del telefono 7.4. Posizionamento del piede di appoggio al corpo del telefono Possibilità di scegliere tra dieci configurazioni di aggancio del piede di appoggio al retro del corpo del telefono, per offrire all'utente un ventaglio di soluzioni di angolazione del prodotto in grado di individuare quella più... -
Page 15: Operazioni Di Utente
Operazioni di utente 8. Operazioni di utente 8.1. Personalizzare il proprio telefono 8.1.1. Modificare password per accesso al menu ed ai registri di chiamata E’ possibile proteggere l’accesso al menu locale (tasti menu/enter) e ai registri di chiamata (tasto call list ) con una password personalizzabile nel seguente modo: 1. -
Page 16: Contrasto Display
Operazioni di utente 8.1.3. Contrasto display Per regolare il contrasto del display seguire le seguenti istruzioni: 1. entrare nel menu di impostazione locale premendo i tasti menu/enter 2. scorrere con i tasti freccia le opzioni fino alla voce IMPOSTAZIONI UTENTE 3. -
Page 17: Lingua
Operazioni di utente 6. scorrere con i tasti freccia le opzioni fino alla voce RETROILLUMINAZIONE 7. scorrere con i tasti freccia le opzioni e selezionare una delle opzioni: SEMPRE ATTIVA - 10 sec. - 30 sec. - 3 min. - 5 min. 8. -
Page 18: Regolazione Volume Microtelefono, Altoparlante, Suoneria E Cuffia
Operazioni di utente 8.1.8. Regolazione volume microtelefono, altoparlante, suoneria e cuffia Per regolare il volume microtelefono, altoparlante e suoneria, seguire le seguenti istruzioni: 1. entrare nel menu di impostazione locale premendo i tasti menu/enter 2. scorrere con i tasti freccia le opzioni fino alla voce IMPOSTAZIONI UTENTE 3. - Page 19 Operazioni di utente 1. entrare nel menu di impostazione locale premendo il tasto enter 2. scorrere con i tasti freccia le opzioni fino alla voce IMPOSTAZIONI UTENTE 3. confermare premendo il tasto enter 4. scorrere con i tasti freccia le opzioni fino alla voce LOGIN-LOGOUT 5.
-
Page 20: Gestire Una Chiamata
Operazioni di utente 8.2. Gestire una chiamata Nel seguito vengono descritte le operazioni di base per la gestione di una chiamata con il telefono. Operazioni richieste Operazioni da effetturare Effettuare una chiamata • sollevare il microtelefono + comporre direttamente il numero con microtelefono oppure •... - Page 21 Operazioni di utente Effettuare una chiamata La rubrica centralizzata può utilizzare i contatti/numeri brevi del sistema da rubrica centrale oppure il server LDAP. La modalità per effettuare una chiamata, varia come descritto nel seguito. RUBRICA CENTRALE che utilizza i contatti del sistema E’...
-
Page 22: Consultare La Propria Casella Vocale
Operazioni di utente Terminare una • riagganciare il microtelefono conversazione oppure • premere il tasto viva voce (se si è in modalità viva voce) oppure • premere il tasto ESC oppure • in modalità cuffia(2): premere il tasto ESC Rispondere ad una •... -
Page 23: Informazioni
Operazioni di utente 8.4. Informazioni Permette di visualizzare la versione del firmware e dei suoi componenti, presente nel telefono. Entrare nel menu di impostazione locale premendo il tasto enter per accedere al menu IMPOSTAZIONI UTENTE e scorrere con i tasti freccia fino alla voce INFORMAZIONI e confermare. 8.5. - Page 24 Operazioni di utente Operazioni richieste Operazioni da effetturare Deviare le chiamate verso Impostazione altro numero 1. entrare nel menu di impostazione locale premendo i tasti menu/enter 2. scorrere con i tasti freccia le opzioni fino alla voce SERVIZI 3. premere il tasto enter 4.
-
Page 25: Impostare Il Servizio Non Disturbare
Operazioni di utente Annullamento 1. ripetere i passi da 1. a 6. descritti sopra per l’impostazione 2. per annullare: • devia sempre (deviata variabile) premere il tasto enter ed attendere l’esito dell’operazione che appare sul display • devia a tempo premere il tasto enter ;... - Page 26 Operazioni di utente Operazioni richieste Operazioni da effetturare Mettere il telefono in Non Impostazione disturbare 1. entrare nel menu di impostazione locale premendo i tasti menu/enter 2. scorrere con i tasti freccia le opzioni fino alla voce SERVIZI 3. premere il tasto enter 4.
-
Page 27: Modificare La Classe Personale Di Appartenenza
Operazioni di utente 8.5.4. Modificare la classe personale di appartenenza Nel seguito vengono descritte le operazioni per modificare la propria classe di servizio. Operazioni richieste Operazioni da effetturare Modificare la classe di Impostazione appartenenza del 1. entrare nel menu di impostazione locale premendo i tasti menu/enter telefono 2. -
Page 28: Servizi Di Menu A Disposizione Dell'utente Con Microtelefono Sollevato
Operazioni di utente 8.6. Servizi di menu a disposizione dell’utente con microtelefono sollevato Per accedere ai seguenti servizi premere i tasti menu/enter con il microtelefono sollevato oppure durante la conversazione con un interlocutore oppure se il chiamato è occupato. NOTA: Alcuni servizi elencati nel seguito sono soggetti ad abilitazione; in caso di non attuazione degli stessi rivolgersi all’amministratore di sistema. -
Page 29: Configurare I Tasti Funzione
Operazioni di utente Risposta per Il richiedente è in Per rispondere ad una chiamata diretta verso un altro derivato: assente stato di libero 1. Alzare il microtelefono oppure premere il tasto Vivavoce 2. premere i tasti menu/enter 3. selezionare la voce “Risposta per assente” 4. -
Page 30: Tasti Programmabili
Operazioni di utente se accanto al numero scelto c’è uno spazio vuoto (es.: [2]: ---), il menu accede alla rubrica locale dalla quale occorre selezionare un nome, confermare o uscire da menu premendo più volte il tasto ESC o a timeout se accanto al numero scelto c’è... -
Page 31: Personalizzare La Rubrica Locale
Operazioni di utente 8.8. Personalizzare la rubrica locale La personalizzazione della rubrica locale dell’apparecchio, che consiste nell’aggiungere, modificare o cancellare i contatti in rubrica locale, e l’associazione tasti funzione/chiamata diretta, sono operazioni realizzabili dall’utente dal menu di programmazione locale. Accedere alla rubrica locale premendo i tasti menu/enter. Nella rubrica locale del telefono è... -
Page 32: Gestire Il Registro Delle Chiamate (Tasto Call List)
Operazioni di utente Per cancellare una lettera premere il tasto freccia sinistra giù. L’opzione Chiama permette di effettuare la chiamata verso l’utente della rubrica locale selezionato, semplicemente premendo il tasto enter o sollevando il microtelefono. L’opzione Leggi permette di visualizzare il numero telefonico dell’utente della rubrica locale selezionato, se è... -
Page 33: Cancella Liste
Operazioni di utente • Cancella liste • Cancella dati • Cancella tasti • Filtro 5. confermare la scelta premendo il tasto enter 6. uscire da menu premendo il tasto ESC 8.10.1. Cancella liste Nel menu Cancella liste si può scegliere di cancellare le liste delle chiamate, selezionando nell’ordine: •... -
Page 34: Istruzioni Riservate All'amministratore Di Sistema/Installatore
Istruzioni riservate all’amministratore di sistema/installatore 9. Istruzioni riservate all’amministratore di sistema/installatore 9.1. Connessione del telefono I collegamenti di cui necessita il telefono sono riassunti nell’immagine seguente che mostra lo schema della base del telefono e le etichette che contrassegnano i connettori per un corretto collegamento: Etichette Descrizione Connettore modulo DSS... -
Page 35: Connessione Del Modulo Dss
Nell’immagine seguente viene mostrato lo schema della base del DSS e le etichette che contrassegnano i connettori per un corretto collegamento. Il numero massimo di moduli opzionali DSS è di 1 per il NETfon 350 e di 2 per il NETfon 300. Etichette... -
Page 36: Dati Di Amministrazione Del Telefono
Istruzioni riservate all’amministratore di sistema/installatore 9.3. Dati di amministrazione del telefono L’accesso all’impostazione dei dati di configurazione del telefono affidata all’amministratore di sistema è protetto da password (default ”999999”), si effettua dal menu IMPOSTAZIONI DI RETE a cui si accede premendo i tasti menu/enter e scorrendo con i tasti freccia le opzioni fino alla voce IMPOSTAZIONI DI RETE. -
Page 37: Procedura Per Il Factory Reset
Istruzioni riservate all’amministratore di sistema/installatore Call Agent backup E’ l'indirizzo del Call Agent secondario (di backup) che permette al telefono che non riesce a collegarsi al Call Agent principale dopo un certo numero di tentativi, tenta il collegamento verso l'indirizzo del Call Agent secondario. - Page 38 Istruzioni riservate all’amministratore di sistema/installatore NETfon 300/350 - User Guide 723142003-A0-LM...
-
Page 39: Performance Information
NETFON 300 - 220x230x80 mm NETFON 350 - 340x230x80 mm NETfon 350 is different from NETfon 300 because one DSS module is included and provides an expansion module with 24 programmable buttons; so user instructions described in this guide are valide for both models. -
Page 40: Safety
This telephone is intended exclusively for the use with SELTA SAMIP platforms. 3. Conformity declaration The SELTA spa declares under its responsibility that the product NETfon 300/NETfon 350 is compliant to the CE directive 1999/05/CE of the European Parliament and the European Commission dated 9th of March 1999 for radio equipment and for telecommunications terminal equipment and the reciprocal recognition of their conformity. -
Page 41: Safety Declaration
Safety declaration 5. Safety declaration If the phone is powered directly from the LAN connector (Power over Ethernet) the power sourcing equipment shall conform to the standard IEEE 802.3af and classified as a Limited Power Source in accordance with IEC 60950-1:2001. 6. -
Page 42: An Overview Of Telephone
An overview of telephone 7. An overview of telephone 7.1. Understanding buttons DESCRIPTION 8 Programmable buttons + plus 24 buttons of DSS module (by the system administrator) Depending on configuration, when pressed, the features for which they are set up, start: ( i.e.: call forward, call pick up, 3 way conference, call completion, etc.). -
Page 43: Understanding State Icons
An overview of telephone Release/Esc End the call in progress; Return to upper level; Exit from the telephone configuration; Engage/release the line in headset mode (1). Call list Access the call list (missed / received / made) to dial from it, edit or delete the displayed names. - Page 44 An overview of telephone DESCRIPTION Disconnected cable = The network cable is disconnected or doesn’t work. CA Backup = The telephone is linked to Backup Call Agent. Handset = Handset in use. Headset = Headset in use. Mute Toggles the microphone on or off. When the microphone is muted, the partner cannot listen to the conversation.
-
Page 45: Quick Access To Local Programming Menu
An overview of telephone FTP Server = Impossible to reach FTP server. 7.3. Quick access to local programming menu DESCRIPTION By pressing Menu/Enter + number of menu item(*) you directly access the menu item corresponding to the number selected. (*) Legend: 1 = LOCAL TEL. -
Page 46: Install The Support Of The Phone
An overview of telephone 7.4. Install the support of the phone You can choose ten different positions to install the support of the phone, to offer the user a wide range of solutions that will adjust the inclination to a proper use of the phone and a perfect display of the screen. See, in the following images, ten different possibilities for installing the support to the rear phone. -
Page 47: User Operations
User operations 8. User operations 8.1. Changing settings 8.1.1. Customizing your password To access the programming local menu (menu/enter buttons) and the call list (call list button) you can customize a password in the following way: 1. press menu/enter buttons 2. -
Page 48: Customizing The Screen
User operations 8.1.3. Customizing the screen Adjust the contrast of the screen in the following way: 1. press menu/enter buttons 2. scroll the menu up to USER SETTINGS 3. press enter 4. scroll the menu up to LCD 5. press enter 6. -
Page 49: Customizing The Language
User operations 10. <Save the changes?> to save press enter , to cancel press ESC 8.1.6. Customizing the language Change the language of the screen in the following way: 1. press menu/enter buttons 2. scroll the menu up to USER SETTINGS 3. -
Page 50: Automatic Enblock
User operations 6. the screen displays a status bar with the actual value, to make adjustment press UP or DOWN arrows 7. to confirm press enter 8. to exit the menu press ESC 9. <Save the changes?> to save press enter , to cancel press ESC 8.1.9. -
Page 51: Handling Calls
User operations 5. with UP and DOWN arrows select LOGOUT 6. press enter 7. wait for disconnection. If the procedure is successful the display shows on the screen the previous phone number; otherwise, or the question “Data save not possible, continue?” appears, please contact your system administrator 8.2. - Page 52 User operations Make a phone call from 1. press one of the arrows buttons to access the personal directory personal directory 2. scoll the names/numbers 3. choose the name/number and confirm with enter 4. make the phone call by pressing enter Make a phone call from The corporate directory can use contacts/speed numbers of SAMIP corporate directory...
-
Page 53: Listening To Your Voice Messages
User operations End a phone call • return the handset to its cradle. • from automatic handsfree mode press speakerphone • press ESC • from headset mode(2): press ESC Answer a phone call • lift the handset • press speakerphone •... -
Page 54: About
User operations 8.4. About Display the firmware version of the phone and its components. Enter in the local programming menu and press enter , scroll the menu up to USER SETTINGS and select ABOUT with up and down arrows and confirm. 8.5. - Page 55 User operations You have to: Forwarding calls to Setting another number 1. press menu/enter buttons 2. scroll the menu up to SERVICES 3. press enter 4. scroll the menu up to CALL FORWARD 5. scroll the three options: - Forw. Always - Forw.
-
Page 56: Do Not Disturb
User operations Cancel 1. repeat from step 1. to 6. above described 2. to cancel: • forward always press enter and wait for the result of the operation on the phone screen • forward on no reply press enter and enter a value in the timer field;... - Page 57 User operations You have to: Activate Do Not Disturb Setting 1. press menu/enter buttons 2. scroll the menu up to SERVICES 3. press enter 4. select DO NOT DISTURB 5. confirm with enter 6. with UP and DOWN arrows select ACTIVE press enter to send to the system the new setting and wait for the result of the operation on the phone screen...
-
Page 58: Changing The Class Of Service Of Your Phone
User operations 8.5.4. Changing the class of service of your phone The user can modify his own class of service in the following way. You have to: Modify the class of Setting service 1. press menu/enter buttons 2. scroll the menu up to SERVICES 3. -
Page 59: Available Features By Lifting The Handset
User operations 8.6. Available features by lifting the handset Lift the handset and press menu/enter buttons to access the following services. NOTE: Some features listed in the following table are subject to enabling; in case the feature doesn’t work, please contact the system administrator. Feature Available if You have to:... -
Page 60: Configuring Function Keys
User operations Call pick up The promoter is To answer a call directed to another user: free 1. lift the handset or press speakerphone button 2. press menu/enter buttons 3. select “Call pick up” 4. select the number of the user to which the call is directed 5. -
Page 61: Programming Keys
User operations if near the number of key there is an empty space (e.g.: [2]: ---), it is possible to access the personal address book and select a name from it, to save press Enter or to cancel press or wait until the timer elapses. if near the number of key there is a name, it is possible to CHANGE or CANCEL it, in both cases return to point a). -
Page 62: Managing Your Personal Directory
User operations 8.8. Managing your personal directory Adding, modifying or calcelling your contacts from the personal directory and associating telephone numbers to the programmable keys, can be realized from local programming menu by pressing menu/ enter buttons. Access the Personal Address Book by pressing menu/enter buttons. You can create up to 250 contacts consisting of telephone numbers and names (up to 12 characters) and associate a direct call button and a melody. -
Page 63: Managing The Call List
User operations CALL: allows to call the selected contact, simply by pressing enter or by lifting the handset. READ: displays the telephone number of the selected contact and if it is a private or public number and if it has or not an associated direct button and a ring. MODIFY: changes all the data of the selected contact . -
Page 64: Delete Lists
User operations 8.10.1. Delete lists The items of Delete lists are: • Delete outg. calls (cancel the list of made calls) • Delete ans. calls (cancel the list of received calls) • Delete unans. calls (cancel the list of missed calls) Confirm the operation after having choosen the list to be deleted. -
Page 65: System Administrator And Installer Operations
System administrator and installer operations 9. System administrator and installer operations 9.1. Connecting the telephone To correcly connect the IP phone, see the image below and the connectors’ description: Number Description DSS expansion module cable connector Connect the termination of the cable coming from the DSS expansion module (optional) LAN connector Connect a termination of the network cable to the Ethernet interface of the telephone... -
Page 66: Connecting The Dss Module
To correcly connect the DSS module, see the image below and the connectors’ description. The maximum number of optional DSS modules is 1 for NETfon 350 and 2 for NETfon 300. Number... -
Page 67: Settings Data
System administrator and installer operations 9.3. Settings data Configuring the phone is up to the system administrator that has to press menu/enter buttons and scroll the menu up to NETWORK SETTINGS menu. Menu is protected by password (default “999999”). Some options of this menu can be modified by the user without compromising the good working of the phone and others which, for their high impact on the telephone functions, must be only modified in agreement with the system administrator. - Page 68 System administrator and installer operations Backup Call Agent IP Address of Backup Call Agent that the telephone tries to reach if it cannot connect the Main Call Agent, after some attempts. If the Backup Call Agent doesn’t answer, the telephone tries to connect the Main Call Agent again and so on.
- Page 69 Внешний блок питания (дополнительно) • Настенное крепление (дополнительно) NETfon 350 отличается от NETfon 300 только наличием консоли DSS (24 дополнительных программируемых кнопок), которая включается в комплект поставки. Данное Руководство распространяется на оба типа телефона. В первой части этого руководства описывается внешний вид телефона, назначение кнопок и их...
- Page 70 1999/05/EC of the European Parliament and the European Commission от 9 Марта 1999 для радио оборудования и телекоммникационным терминалам по электромагнитной совместимости. Оригинал этого документа хранится в архиве компании Selta spa - Via Nazionale, Km 404,500 - 64018 Tortoreto Lido (TE) Italia.
- Page 71 Заявление о безопасности 5. Заявление о безопасности Если телефон получает электропитание из разъема LAN (Power over Ethernet) то источник питания должен соответствовать стандарту IEEE 802.3af и классифицирован как Limited Power Source в соответствии с IEC 60950-1:2001. 6. Утилизация и влияние на окружающую среду. Данный...
- Page 72 Внешний вид телефона NETfon 300 7. Внешний вид телефона NETfon 300 7.1. Назначение кнопок Клавиша вызова Программируемые кнопки Графический Меню дисплей 128Х64 Клавиша “Ввод” Клавиша “Журнал” Кнопка “Удержание” Клавиша ESC Клавиши Индикатор Звонка навигаци Голосовая почта Регулировка громкости Клавиша Спикерфоа Отключение...
- Page 73 Внешний вид телефона NETfon 300 Release/Esc - Освобождение/Выход Окончание разговора; выход из текущего меню на предыдущий уровень; выход из режима конфигурации; отмена действия освобождение линии в при работе с гарнитурой (1). Call list - Журнал вызовов открывает список вызовов (принятых, набранных, пропущенных) для просмотра, редактирования...
- Page 74 Внешний вид телефона NETfon 300 ОПИСАНИЕ Disconnected cable - Кабель отключен = Сетевой кабель отключен или неисправен. CA Backup - Резервная = Телефон зарегистрирован на резервной системе. Handset - Трубка = Трубка снята Headset - Гарнитура = Используется телефонная гарнитура. Mute - Микрофон...
- Page 75 Внешний вид телефона NETfon 300 7.3. Быстрый доступ к настройке телефона ОПИСАНИЕ Нажмите клавишу Menu (2 сек) или ВВОД и цифру номера меню(*) вы или сразу переключитесь в окно соответствующего меню. (*) Описание: 1 = LOCAL TEL. BOOK - Локальный телефонный справочник 2 = MAIN TEL.
- Page 76 Операции пользователя 8. Операции пользователя 8.1. Настройки аппарата NETfon 300/350 8.1.1. Установка пароля Для доступа к режиму программирования (кнопка menu/enter ) и просмотру журнала вызовов (кнопка ) вы можете установить собственный пароль следуя инструкции ниже: 1. Нажмите кнопку menu/enter 2. Пролистайте до пункта меню OPTIONS - ОПЦИИ 3.
- Page 77 Операции пользователя 8.1.3. Настройка дисплея Регулировка контраста дисплея: 1. Нажмите menu/enter 2. Пролистайте до меню SETTINGS-УСТАНОВКИ 3. Нажмите menu/enter 4. Пролистайте до меню LCD CONTRAST - Контраст дисплея 5. Регулируйте кнопками ВВЕРХ ВНИЗ 6. Подтвердите нажав menu/enter 7. Для выхода нажимайте ESC 8.
- Page 78 Операции пользователя 7. Появится надпись <Save the changes? - Сохранить изменения,> - нажмите menu/enter , или ESC для отмены. General / Общий Это стандартный повторяющийся звонок. Meeting / Совещание Это звонок, который звучит один раз в течение 2 секунд после начала вызова, затем только мигает индикатор...
- Page 79 Операции пользователя 8.2. Управление вызовом Следующие инструкции описывают базовые операции по управлению вызовом Для: Сделайте: Сделать звонок • снимите трубку и наберите номер или • нажмите кнопку спикерфона и наберите номер или • наберите номер не снимая трубки и нажатия на кнопку спикерфона...
- Page 80 Операции пользователя Сделать звонок из Вы можете сделать звонок из общего телефонного справочника системного системы SAMIP (см также скоростной набор[*]). Поиск необходимого телефонного номера по имени осуществляется пролистыванием списка имен с справочника помощью кнопок ВВЕРХ / ВНИЗ или вводом первых букв имени с клавиатуры...
- Page 81 Операции пользователя Набор последнего 1. Нажмите кнопку [#]. номера (1) Зависит от конфигурации системы (уточните у администратора АТС). (2) Режим гарнитуры означает, что данный режим установлен для вашего телефонного аппарата в конфигурации системы (уточните у администратора АТС) или запрограммирован в настройках вашего аппарата 8.3.
- Page 82 Операции пользователя 8.4.2. Переадресация вызовов Пользователь может заказать или отменить услугу переадресации входящих вызовов на другой телефонный номер. Существует три типа переадресации (П.А.): • Always - Всегда = любой входящий вызов сразу звонит на указанном номере телефона. • On busy - Занято = Входящий вызов звонит на другом номере телефона, если ваш телефон...
- Page 83 Операции пользователя Отменить 1. Повторите шаги с 1 по 6 описанные выше. переадресацию на 2. Для отмены: другой телефонный • П.А. Всегда оставьте поле Новый номер пустым и номер нажмите кнопку menu/enter и подождите окончания операции. • П.А. Не отвечает нажмите кнопку menu/enter и...
- Page 84 Операции пользователя Отменить услугу “Не 1. Повторите шаги с 1 по 5 описанные выше беспокоить” 2. Выберите пункт ВЫКЛ 3. Нажмите кнопку menu/enter и дождитесь подтверждения операции 4. Для возврата в исходное состояние нажимайте кнопку ESC или дождитесь когда сработает таймер возврата в исходное...
- Page 85 Операции пользователя 8.5. Услуги, доступные при снятой трубке Снимите трубку и нажмите кнопку menu/enter , вам будут доступны следующие услуги. Примечание: Некоторые услуги могут быть вам запрещены при программировании АТС, за консультацией обратитесь к администратору системы Функция Доступна если Сделать: Call back - Набранный...
- Page 86 Операции пользователя Отключение Инициатор в Разъединение текущего разговора: состоянии 1. Нажмите menu/enter разговора 2. Выберите “Disconnection - Отключение” Удержание Инициатор в Удержание текущего разговора: состоянии 1. Нажмите menu/enter разговора 2. Выберите “Hold - Удержание” Перехват Инициатор в Ответить на вызов, адресованный другому абоненту: вызова...
- Page 87 Операции пользователя 8.6. Программирование локального справочника и кнопок быстрого набора 8.6.1. Программирование локального справочника Доступ к локальному справочнику (вашей персональной телефонной книги) осуществляется двойным нажатием кнопки menu/enter . (или одним нажатием на одну из кнопок со стрелкой Вверх / Вниз) Вы...
- Page 88 Операции пользователя Для ввода пробела нажмите кнопку ВВЕРХ. Для удаления последнего знака нажмите кнопку ВНИЗ. CALL - ВЫЗОВ: позволяет вызвать контакт простым нажатием на кнопку menu/enter или снятием трубки. READ - ПРОСМОТР: отображает информацию, содержащуюся в данной записи, включая номер, имя, назначенную...
- Page 89 Операции пользователя READ - Просмотреть: Отображает информацию о номере, указывается дата и время вызова и тип этого номера - внешний (E) или внутренний (I). DELETE - Удалить: Удаляет эту запись из журнала. STORE - Сохранить: Сохраняет этот номер в локальном справочнике телефона. Примечание: Городские...
- Page 90 Операции пользователя 8.8.4. Фильтр Фильтр позволяет сохранять в журнале внутренние или внешние вызовы для каждого типа записи: • Ans. call filter - Фильтр отвеченных • Unan. call filter - Фильтр упущенных • Out. call filter - Фильтр исходящих Для этих трех фильтров существует четыре варианта: •...
- Page 91 Для правильного подключения см картинку ниже и назначение разъемов: Номер Назначение Разъем для подключения консоли DSS Подключается консоль DSS с помощью специального кабеля (входит в комплект поставки NETFon 350) Разъем LAN Подключите к этом разъему сетевой кабель LAN от вашей локальной сети Ethernet 10/100. Разъем PC Аппарат...
- Page 92 Консоль DSS состоит из 24 программируемых кнопок, которые программируются при настройке конфигурации системы Для правильного подключения см картинку ниже: Максимально можно подключить 2 консоли DSS к аппарату NETfon 300 (или 1 дополнительную к NETfon 350). Номер Назначение Разъем для подключения консоли расширения DSS Подключается...
- Page 93 Подключение телефона 9.3. Установка телефона Настройка телефона осуществляется в соответствии с рекомендациями администратора системы. Нажмите кнопку menu/enter и пролистайте до пункта меню SETTINGS - УСТАНОВКИ Некоторые установки в этих параметрах могут привести к полной неработоспособности аппарата, вносите изменения только с ведома администратора системы. 9.3.1.
- Page 94 Подключение телефона Handset volume См Регулировка громкости трубки, гарнитуры, спикерфона и Громкость трубки громкости звонка Speaker volume См Регулировка громкости трубки, гарнитуры, спикерфона и Громкость динамика громкости звонка Headset enable Включить/Выключить режим гарнитуры (1) Включение гарнитуры Headset volume См Регулировка громкости трубки, гарнитуры, спикерфона и Громкость...
Need help?
Do you have a question about the Netfon 350 and is the answer not in the manual?
Questions and answers