Table of Contents
Advertisement
Advertisement
Table of Contents

Related Manuals for Laspaziale Lucca A53 MINI


Summary of Contents for Laspaziale Lucca A53 MINI
- Page 1 A53 MINI ESPRESSO MACHINE INSTRUCTION MANUAL...
-
Page 2: Table Of Contents
A53 MINI LUCCA INDEX 1. GENERAL DESCRIPTION OF THE MACHINE …………………………………………………………………….…………………………….……………………………………………………. ……………………… 3 1.1 DESCRIPTION OF THE CONTROL PANEL………………………………………………………………………………………………………………………………………………………………………………………. 4 2. GENERAL ADVICE FOR THE INSTALLER………………………………………………………………………………………………………………………………………….……………………………………………….. 5 2.1 GENERAL WARNINGS………………………………………………………………………………………………………………………………………………………………………………………………………………………………. 5 2.2 INSTALLATION …………………………………………………………………..……………………………………………………………………….……………………………………………………………………………………….…….. 5 2.3 WARNING/TECHNICAL DATE LABELS AND NAMEPLATES APPLIED TO THE MACHINE…………………………………………………………………….……………. 9 3. - Page 3 S1 MINI VIVALDI 12. DIAGRAM………………..……………………………………………………………………………………………………………………………………………………………………………………………………………………… 34 12.1 POWER DIAGRAM……..…..……………………………………………………………………………………………………………………………………………………………………………………………… 35 12.2 KEYBOARD DIAGRAM………………………………………………………………………………………………………………………………………………………………………………………………………35 12.3 KEY TO WIRING DIAGRAM……………….…….………………………………………………………………………………………………………………………………………………………………….. 37 13. HYDRAULIC SYSTEM DIAGRAM………………………………………………………………………………………………………………………………………………………………………………………… 38 13.1 HYDRAULIC SYSTEM LEGEND………………………………………………………………………………………………………………………………………………………………………………… 39 14. TECHNICAL DATE……… ……………………………………………………………………………………………………………………………………………………………………………………………………..37...
- Page 4 S1 MINI VIVALDI IMPORTANT: WARRANTY INFORMATION LUUCA espresso machines carry a 12-month parts and labor warranty when purchased directly from Clive Coffee. Warranty does not cover: * Normal wear parts including gaskets, filters, o-rings, grinder burrs, plastic hoppers and other moving parts. * Problems relating to water damage, poor water quality and scaling.
-
Page 5: General Description Of The Machine
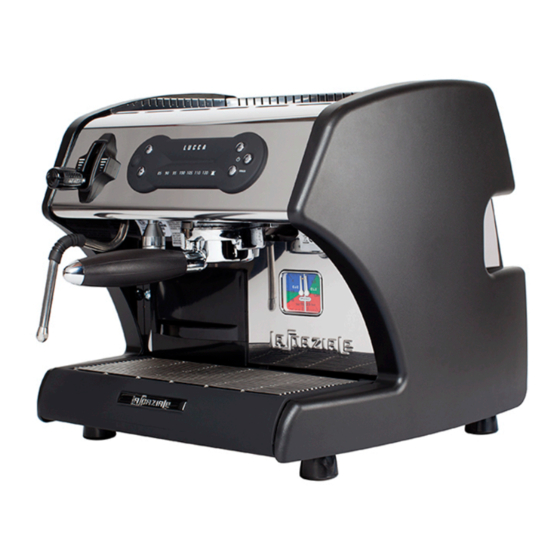
S1 MINI VIVALDI 1. GENERAL DESCRIPTION OF THE MACHINE LEGEND Top Grid 5. Gauge 9. Steam Wand Steam Le er 6. Drip Tray Grid 10. Hot Water Outlet Control Panel 7. Water Drip Tray Portafilter 8. Tank... -
Page 6: Description Of The Control Panel
S1 MINI VIVALDI 1.1 DESCRIPTION OF CONTROL PANEL LEGEND Single coffee button G. Boiler button D. Stand-by light Logo H. Water tank em t E. On-off button C. Hot ater utton I. Coffee group temperature F. Boiler light L. Double coffee utton... -
Page 7: General Advice For The Installer
S1 MINI VIVALDI 2. GENERAL ADVICE FOR THE INSTALLER Read carefully the instructions and warnings contained in this manual, since they provide important indications concerning the installation of the appliance. The appliance must only be used for its intended purpose and it must be installed in a suitable place for its use. Any other use will therefore be considered as improper and unreasonable. - Page 8 S1 MINI VIVALDI DANGER! The electrical safety of the appliance is fully achieved only after it has been correctly connected to an earthing system as required by the laws in force. It is necessary to have the earthing connection checked by professionally qualified personnel. The manufacturer cannot be held liable for any damage caused by the lack or inefficiency of the system’s earthing connection.
-
Page 9: Installation
S1 MINI VIVALDI • The appliance has IPX2 protection against water and therefore, it cannot be installed in areas where it may be subject to jets of water. • The appliance has class I protection against electric shocks. • The noise emitted by the appliance during normal operation is less than 70 dB. ATTENTION! Failure to comply with the above regulations could jeopardise the correct operation and safety of the appliance as well as its useful lifetime. -
Page 10: Warning/Technical Date Labels And Nameplates Applied To The Machine
S1 MINI VIVALDI 2.3 WARNING/TECHNICAL DATE LABELS AND NAMEPLATES APPLIED TO THE MACHINE In the figure below are shown the warning/technical data labels and nameplates positioned on the machine. ATTENTION! Dedicate the time necessary to familiarise yourself with these labels. Ensure that they are readable and keep them clean or replace those that have deteriorated or illegible (both the text and the graphics). -
Page 11: Removing The Packaging
S1 MINI VIVALDI 3. REMOVING THE PACKAGING After unpacking the machine, please check its integrity; in case of doubt, do not use it and consult the manufacturer. Packaging materials must not be left within children’s reach since they are potentially dangerous. ATTENTION! The appliance weight is more than 30 kg and therefore, it cannot be moved by a single person alone. -
Page 12: Water Softner
S1 MINI VIVALDI 4.1 WATER QUALITY In order to prevent limescale from damaging and clogging the interior of your machine, it is important to fill the water reservoir with soft water. You can test the hardness of your water using simple test strips. The target water hardness for espress machines is less than 50 parts per million (ppm) or 3 grains per gallon (gpg). -
Page 13: Filling The Water Tank
S1 MINI VIVALDI FILLING THE WATER TANK Remove the drip tray (7). • Then remove the container (8) and fill it with cold drinking water. • Fit in the water tank (8), pushing it in as far as it will go, and place the drip tray (7). •... -
Page 14: Switching On The Machine
S1 MINI VIVALDI Press and hold down the buttons ON/OFF (E) and hot water delivery (C) together until water begins to come • out of the delivery group. During this stage, the control lights to signal no water (H) and the power control light (D) will flash •... - Page 15 S1 MINI VIVALDI Every time that the temperature of the group or boiler drops below the set temperature, the control light for the operating temperature will start to flash (appliance heating phase), until the set temperature is reached. The appliance is now ready for use. •...
-
Page 16: Coffee Preparation
S1 MINI VIVALDI 6.1 COFFEE PREPARATION Unfasten the orta ilter (4) from the brewing group and ensure filter as et is in lace. • Fill it with ground coffee, (using the coffee doser provided) making sure not to leave coffee powder •... -
Page 17: Steam Delivery
S1 MINI VIVALDI The hot water delivery starts (at this stage the pump is working). • Once the desired quantity is reached, stop the delivery by pressing the same button (C). • 6.3 STEAM DELIVERY Insert the steam wand (8) in the pitcher containing the drink to be heated up. •... -
Page 18: Operating Temperature Adjustment
S1 MINI VIVALDI 7. OPERATING TEMPERATURE ADJUSTMENT The operating temperature of the machine can be modified to improve the flavor profile of the coffee according to individual tastes. The recommended brewing temperature range for espresso coffee is 92 to 96 degrees celcius. While the appliance is operating, press and hold down the button ON//OFF (E) for about 3 seconds. - Page 19 S1 MINI VIVALDI To adjust the operating temperature by single degree increments, proceed as follows: Switch off the appliance by pressing the button ON/OFF (E); the red control light (D) will go from lit to • flashing (machine on stand-by). Press and hold down the two-cup button (L) for about 3 seconds;...
-
Page 20: Volumetric Dose Programming
S1 MINI VIVALDI VOLUMETRIC DOSE PROGRAMMING T e rogramma le olumetric osing eature allo s rogramming o t e Single Cu A an Dou le Cu uttons to is ense ate er uantities o es resso t e user esires. T eir use or single cu an ou le cu uantities is merel a suggestion. -
Page 21: Alarms Descriptions
S1 MINI VIVALDI 10. ALARMS DESCRIPTIONS NO WATER TANK The lack of water in the tank (8) is signalled by the red control light “ ” on the control panel (I), which will switch on. Fill the tank with at least 1 litres of cold drinking water (the tank can hold up to 3 litres of water). VOLUMETRIC DOSING SYSTEM FAULTY This alarm indicates the malfunction of the flowmeter or a too fine coffee grinding. - Page 22 S1 MINI VIVALDI (temperature above 145°C) or is interrupted (temperature inferior to 60°C). The lights 110-120- turn on. To eliminate the visualization deactivate the boiler pressing the Boiler button G and the machine can keep working even without the boiler being on. If this alarm is visualized call the authorized assistance centre.
-
Page 23: Regular Maintenance Of The Equipment By The User
S1 MINI VIVALDI 11. REGULAR MAINTENANCE OF THE EQUIPMENT BY THE USER In order to grant the efficiency of the equipment and to maintain its proper operation, it is necessary to follow the manufacturer’s instructions carrying out a regular cleaning and maintenance program. WARNING!. - Page 24 S1 MINI VIVALDI 11.2 BACKFLUSHING Cleaning and maintaining your machine is imperative to ensuring not only good tasting shots, but also to ensuring the long life of the machine. 1. Replace the brew portafilter basket with the blind basket (non-perforated). 2.
-
Page 25: Every 3 Days
S1 MINI VIVALDI 11.3 EVERY 30 DAYS Remove the shower-heads with the provided tool, brush them carefully, making sure that all the holes are clean. Then reassemble everything following the sequence shown below. A. Fastening screw B. Small shower head C. -
Page 26: Bodywork
S1 MINI VIVALDI 11.4 BODYWORK Clean the bodywork of the appliance using mild detergent to prevent any damage. We recommend not to use abrasive sponges that could damage the body panels. WARNING! Everyday at the end of the work and after daily cleaning, turn off the machine by pressing the button ON/OFF, disconnect the plug of the machine from the socket of the electric system. - Page 27 S1 MINI VIVALDI 12 WIRING DIAGRAM...
- Page 28 S1 MINI VIVALDI 12.1 POWER DIAGRAM 12.2 KEYBOARD DIAGRAM...
- Page 29 S1 MINI VIVALDI 12.3 KEY TO WIRING DIAGRAMS EV GR Delivery group solenoid valve EV H Hot water delivery solenoid valve EV AL Automatic boiler refill solenoid valve Connection of static relay feeding the boiler heating element on main board Connection of static relay feeding the group heating element on main board Connection of main board to the static relay feeding the boiler heating element Connection of main board to the static relay feeding the group heating element...
- Page 30 S1 MINI VIVALDI Economy mode selector connection External display selector connection External display selector Economy mode selector...
- Page 31 S1 MINI VIVALDI 13 HYDRAULIC SYSTEM DIAGRAM...
- Page 32 S1 MINI VIVALDI 13.1 HYDRAULIC SYSTEM LEGEND TANK VIBRATION PUMP EXPANSION VALVE FLOWMETER BOILER COFFEE GROUP EV1 COFFEE GROUP SOLENOID WATER REFILL SOLENOID WATER GAUGE HOT WATER AND STEAM BOILER GAUGE HOT WATER AND STEAM BOILER BOILER SAFETY VALVE HOT WATER SOLENOID STEAM TAP...
-
Page 33: Technical Data
S1 MINI VIVALDI 14 TECHNICAL DATA DIMENSIONS AND WEIGHT POWER SUPPLY VOLT 415 mm 50/60 385 mm 2000 415 mm WEIGHT... - Page 34 S1 MINI VIVALDI...
- Page 35 S1 MINI VIVALDI...
- Page 36 La Spaziale S.p.A. Via E. Duse, 8 40033 Casalecchio di Reno Bologna - (Italy) TEL +39 051 611.10.11 FAX +39 051 611.10.40 ! info@laspaziale.com " www.laspaziale.com...
Need help?
Do you have a question about the Lucca A53 MINI and is the answer not in the manual?
Questions and answers