VADDIO RoboSHOT 12 User Manual
Hd robotic ptz camera systems featuring the quick-connect usb mini with usb 2.0 streaming
Hide thumbs
Also See for RoboSHOT 12:
- Installation and user manual (68 pages) ,
- Release notes & update instructions (7 pages) ,
- Installation and user manual (44 pages)
Table of Contents
Advertisement
V
™ R
ADDIO
RoboSHOT 12 and RoboSHOT 30, HD Robotic PTZ Camera Systems
featuring the Quick-Connect™ USB Mini with USB 2.0 Streaming
RoboSHOT 12
High-definition Robotic PTZ Conferencing Camera
Featuring a 12X, 73º Wide Angle Optical Zoom Lens
and Tri-Synchronous Motion
RoboSHOT 12 QMini System, 999-9901-000 (North America), 999-9901-001 (Int'l)
RoboSHOT 30 QMini System, 999-9911-000 (North America), 999-9911-001 (Int'l)
RoboSHOT 30 QMini System, 999-9911-000W (North America), 999-9911-001W (Int'l)
(Note: The W suffix on the part number indicates white version of the RoboSHOT 30)
© 2015 Vaddio - All Rights Reserved. RoboSHOT QMini Systems - Document Number 342-0793 Rev B
SHOT™ S
OBO
High-definition Robotic PTZ Camera for Medium to Large Venues
Featuring 30X Optical Zoom Lens and Tri-Synchronous Motion.
Available in Black or White finishes.
Quick-Connect USB Mini System Interface
System Model and Part Numbers
Installation and User Guide
ERIES
RoboSHOT 30
C
AMERAS
Advertisement
Table of Contents

Related Manuals for VADDIO RoboSHOT 12


Summary of Contents for VADDIO RoboSHOT 12
- Page 1 RoboSHOT 30 QMini System, 999-9911-000W (North America), 999-9911-001W (Int’l) (Note: The W suffix on the part number indicates white version of the RoboSHOT 30) © 2015 Vaddio - All Rights Reserved. RoboSHOT QMini Systems - Document Number 342-0793 Rev B...
- Page 2 RoboSHOT HD Cameras Inside Front Cover - Blank RoboSHOT HD Cameras - Document Number 342-0793 Rev B Page 2 of 60...
-
Page 3: Table Of Contents
Image: RoboSHOT 12 Camera ......................... 8 Image: RoboSHOT 30 Camera ......................... 9 Image: RoboSHOT 12 and 30 Rear Panel Connections ................10 Quick-Connect USB Mini ............................11 Image: Front Panel with Feature Call-outs ...................... 11 ... - Page 4 RoboSHOT HD Cameras Screen Shot: Admin Menu - System ....................... 26 Screen Shot - Admin Menu - Help ........................27 The Quick-Connect USB Mini Screen Shot Tour ....................29 Compatible Web Browsers ..........................29 Screen Shot: Login ............................29 ...
-
Page 5: Overview
The RoboSHOT Platform consists of two models; the RoboSHOT 12 and the RoboSHOT 30. The RoboSHOT 12 is perfect for small to medium sized conference rooms. This model features a 12X optical zoom and a 73° wide angle... - Page 6 (ubiquitously referred to as Cat-5 or Cat-5e). For best results, please use quality Cat-5e cable and real RJ-45 crimpers. Unlike phone and data lines that use the four center conductors (pairs 3 & 6 and pairs 4 & 5), the Vaddio EZCamera systems use all of the pins in most configurations.
-
Page 7: Unpacking The Camera Systems
Identify the following parts for each camera: RoboSHOT 12 QMini System Part Number 999-9901-000 (North America) One (1) RoboSHOT 12 HD PTZ Camera (998-9900-000) One (1) Thin Profile Wall Mount (535-2000-240) with Mounting Hardware One (1) IR Remote Commander (998-2100-000) -
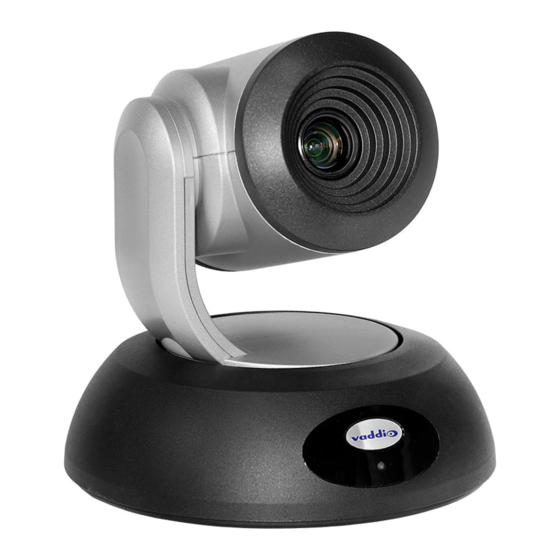
Page 8: Image: Roboshot 12 Camera
RoboSHOT HD Cameras Image: RoboSHOT 12 Camera Camera Front View with Feature Call-outs ① Color: Silver and Black ② ⑤ ③ ⑥ ④ 1) Camera and Zoom Lens: This RoboSHOT model features a 12X optical zoom lens (12X in Super-Wide mode and 10X in normal mode) that is built around an Exmor 1/2.8-Type, high-speed, low noise image sensor with a total... -
Page 9: Image: Roboshot 30 Camera
RoboSHOT HD Cameras Image: RoboSHOT 30 Camera The differences between the 12X model and the 30C models center around the power of the optical zoom lens and overall color of the camera models. The 30X is available in both black and white. ①... -
Page 10: Image: Roboshot 12 And 30 Rear Panel Connections
RoboSHOT HD Cameras Image: RoboSHOT 12 and 30 Rear Panel Connections Rear panel connections are identical for both models (RoboSHOT 12 shown). ① ④ ⑤ ② ⑥ ③ 1) CAMERA SETTINGS: DIP switch settings for IR remote frequency, baud rate and image flip can be configured on these switches. -
Page 11: Quick-Connect Usb Mini
RoboSHOT HD Cameras USB M UICK ONNECT Image: Front Panel with Feature Call-outs ➋ ➊ 1) USB Port: USB Type-B port for connectivity to streaming or capture computer. 2) POWER LED: Indicates presence of 24 VDC power for the Quick-Connect USB Mini. The USB Mini will automatically show up as a native USB 2.0 device on the connected computer. -
Page 12: Application Diagrams
RoboSHOT HD Cameras PPLICATION IAGRAMS Diagram: Basic Wiring Configuration - UCC Application Room Monitor Simulated Video Feed Laptop with UCC Application IP Network Video RoboSHOT HD Camera Rear View Ethernet USB 2.0 (UVC) Quick-Connect Ethernet USB Mini Connection for Configuration and Camera Control Front Panel... -
Page 13: Setting Up The Roboshot
Image Flip (SW4): To invert the camera, turn the IMAGE FLIP ON (switch down). Super-Wide Mode: Super-wide works only with the RoboSHOT 12 model and allows the camera to switch from 67.3º wide end HFOV to a Super Wide 73º wide end HFOV. The RoboSHOT 30 does not have a Super Wide mode. -
Page 14: Installation Basics
The Cat-5e cables should feed-through the cable management slots provided by level the mount… all Vaddio mounting options. If the wall mount is to be mounted on a 2-gang wall box, use the screws supplied with the wall box cover plate to attach Thin Profile Wall Mount Bracket. -
Page 15: Usb Mini Details
The Quick-Connect USB Mini Interface is a Cat-5/5e/6 camera interface and a USB 2.0 streaming appliance with a built-in webserver for camera set-up and control. The USB Mini will auto-load the control protocols of the Vaddio camera attached. Setup and control are available to the administrator of the system from any approved browser on any computer. -
Page 16: Controlling The Roboshot Camera
RoboSHOT HD Cameras SHOT C ONTROLLING THE AMERA IR Remote Commander The following functions are accessible with the Vaddio IR remote: Camera Power On/Off (Toggle on/off same button) Back Light Compensation (Toggle on/off same button) Data Screen: Toggle on/off the OSD for the RoboSHOT’s IP/MAC Address ... -
Page 17: Controlling The Quick-Connect Usb Mini
Linux Evolving Compatibilities: As more UC soft-client and lecture capture programs are released and gain popularity, Vaddio will provide a continuing research and development effort to ensure the compatibility with other manufacturer’s products. USB 2.0 UVC Drivers The USB 2.0 UVC (Universal Video Class) video driver resolution table is an internal list of resolutions available for the Host PC and the Quick-Connect USB Mini to negotiate and use for any approved/tested USB application. -
Page 18: The Roboshot Screen Shot Tour
RoboSHOT HD Cameras SHOT S CREEN The RoboSHOT camera platform uses a Linux OS and has a built-in web server. The internal web pages will allow control of the camera via an Ethernet network connection. These web pages will allow the user or administrator to control the camera, set PTZ presets, set security passwords, change the IP address, view diagnostics, access the firmware upgrade page and more! Compatible Web Browsers... -
Page 19: Screen Shot: Camera Control Page
CCU Scenes: The user has access to the CCU scenes set and stored on the Admin pages. There are three (3) user definable presets and six (6) presets preconfigured by the technical folks at Vaddio (really Scott set them all) that are meant to be used in certain lighting scenarios. -
Page 20: Screen Shot: Storing Presets
RoboSHOT HD Cameras Screen Shot: Storing Presets ➊ ➋ ➌ ➍ 1) Store Preset: When the Store Preset button is clicked (point 6 on previous page), the Store Preset dialog pops into existence. To save the current camera shot, click one of the Preset buttons (1 through 12), the button will be highlighted and the dialog box will present the Tri-Sync controls and if the CCU setting are to be kept with the preset. -
Page 21: Screen Shot: Admin Login From The Camera Control Page
RoboSHOT HD Cameras Screen Shot: Admin login from the Camera Control Page On the security page, which will be reviewed at a bit later in the tour, allows the Admin to set the system to allow automatic guest access to the main camera control page. If guest access is turned on by the Admin, then system will open to the camera control page and an additional Admin Login is provided. -
Page 22: Screen Shot: Admin Menu - Camera Settings
RoboSHOT HD Cameras Screen Shot: Admin Menu - Camera Settings Once the Admin logs in, then all the admin menu buttons appear on the left side of the screen. The first menu after camera controls is Camera Settings. ➊ ➋ ➌... -
Page 23: Screen Shot: Admin Menu - Room Labels
RoboSHOT HD Cameras Iris: Move adjustment slider as required to adjust the iris opening. A numeric value will be displayed in the box to the right of the slider. Gain: Move adjustment slider as required for amount of iris gain desired. Numeric value will be displayed in the box to the right of the slider. -
Page 24: Screen Shot: Admin Menu - Dhcp Network Configuration
RoboSHOT HD Cameras Screen Shot: Admin Menu - DHCP Network Configuration Under the Networking menu, The Network Configuration and Network Interfaces are displayed. This is where the Network administrator assigns either DHCP or a Static address and the associated parameters. Notes: If the LAN has a DHCP (dynamic host configuration protocol) server, then the IP address, gateway and routing information will automatically be assigned. -
Page 25: Screen Shot: Admin Menu - Security
An Admin Login is provided on the camera control page if the “Allow Guest Access” box is checked. Screen Shot: Admin Menu - Diagnostics Diagnostics menu button will display a set of self-diagnostics. These diagnostics may help the Vaddio technical support team diagnose a problem with the RoboSHOT camera... -
Page 26: Screen Shot: Admin Menu - System
RoboSHOT HD Cameras Screen Shot: Admin Menu - System The System Menu is where the System Info is displayed and Firmware Updates are performed. There will be firmware updates and upgrades over the life of the camera. The file for the firmware update is chosen in this menu and the update is started here too. -
Page 27: Screen Shot - Admin Menu - Help
After choosing an update file and clicking on “Begin Firmware Update…” a confirmation pop-up and warning will be displayed. Please contact Vaddio Tech support for assistance with updates. Please read and completely understand the pop-up warnings as it is easy to lose patience waiting for updates. Click on continue to start the update. - Page 28 System information is listed on support@vaddio.com. TECHNICAL SUPPORT NOTE: Please work with your Network Administrator prior to calling Vaddio for technical support. Please have on-site network personnel initiate tech support calls with Vaddio. This concludes the RoboSHOT Screen Shot Tour.
-
Page 29: The Quick-Connect Usb Mini Screen Shot Tour
RoboSHOT HD Cameras USB M UICK ONNECT CREEN The internal web pages will allow control of the Quick-Connect USB Mini and control of the attached camera via a network connection. As mentioned previously, The USB Mini interface has two modes: Video Streaming Mode and Web Control Mode. -
Page 30: Screen Shot: User Menu - Camera Control Page
6) CCU Scenes: The user has access to the CCU scenes set and stored on the Admin pages. There are three (3) user definable presets and six (6) presets preconfigured by the technical folks at Vaddio (really Scott set them all) that are meant to be used in certain lighting scenarios. These lighting presets included: Automatic,... -
Page 31: Screen Shot: Storing Presets
RoboSHOT HD Cameras Screen Shot: Storing Presets ➊ ➋ ➍ ➌ 1) Store Preset: When the Store Preset button is clicked (point 6 on previous page), the Store Preset dialog pops into existence. To save the current camera shot, click one of the Preset buttons (1 through 12), the button will be highlighted and the dialog box will present the Tri-Sync controls and if the CCU setting are to be kept with the preset. -
Page 32: Screen Shot: Admin Login
RoboSHOT HD Cameras Screen Shot: Admin Login If there is a User name and password, the Login for the Admin is on the Camera Control page. Admin Screen Shot: Admin Menu - Camera Control Page From the Admin Menu Camera Control Page, all 10 menu buttons are accessible. These menus on the left of the screen include Camera Settings, Streaming, Labels, Room Labels, Networking, Security, Diagnostics, System, Help and last but not least the Admin Logout. -
Page 33: Screen Shot: Admin Menu - Camera Settings
RoboSHOT HD Cameras Screen Shot: Admin Menu - Camera Settings The Global Camera Settings, CCU Scenes, Color Settings and Custom Scene Labels are accessible from this menu. ➊ ➋ ➌ ➍ ➎ ➏ 1) Load Preset at Startup: Check this box to move the camera to a predefined preset location when the camera powers up. - Page 34 RoboSHOT HD Cameras Gain: Move adjustment slider as required for amount of iris gain desired. Numeric value will be displayed in the box to the right of the slider. Back Light Compensation: Is only available in Auto Iris Mode. When checked, Back Light Compensation will be applied to the camera if camera is in Auto White Balance mode.
-
Page 35: Screen Shot: Admin Menu - Usb 2.0 Or Ip Streaming Mode Page
RoboSHOT HD Cameras Screen Shot: Admin Menu - USB 2.0 or IP Streaming Mode Page ➊ ➋ 1) USB Device Name: Allows the user to use a “friendly name” per system. In a BYOD format, the user has the ability to move between different UC conference rooms and have the ability to assign the PC’s USB resources to that room. -
Page 36: Screen Shot: Admin Menu - Room Labels
RoboSHOT HD Cameras Screen Shot: Admin Menu - Room Labels The Room Labels menu allows the administrator to label the company name, room name, room phone and help phone on a per QC-USB basis. The labels appear on every page at the top/middle of the page. Simply enter the room information and click Save. -
Page 37: Screen Shot: Admin Menu - Networking
RoboSHOT HD Cameras Screen Shot: Admin Menu - Networking Under the Networking menu, the Network Configuration page displays the Hostname and allows configuration of Ethernet over the USB port. Screen Shot: Admin Menu - Security The Security menu allows the Admin to UPDATE “user” PASSWORD and UPDATE “admin” PASSWORD. The default “user”... -
Page 38: Screen Shot: Admin Menu - Diagnostics
RoboSHOT HD Cameras Screen Shot: Admin Menu - Diagnostics Diagnostics menu button will display a set of self-diagnostics. These diagnostics may help the Vaddio technical support team diagnose a problem with the Quick-Connect USB and attached camera. The log can be downloaded and refreshed at the bottom of the screen. -
Page 39: Screen Shot: Admin Menu - Update Confirmation
After choosing an update file and clicking on “Begin Firmware Update…” a confirmation pop-up and warning will be displayed. Please contact Vaddio Tech support for assistance with updates. Please read and completely understand the pop-up warnings as it is easy to lose patience waiting for updates. Click on continue to start the... -
Page 40: Screen Shot: Admin Menu - Help
Service/Help information can be found under the Help menu. Support phone numbers and e-mail, manuals, FAQ’s and System information is listed on this page. Have the System page open when calling Vaddio Tech Support. This concludes the Screen Shot Tour for the Quick-Connect USB Mini. The General... -
Page 41: General Specifications
3.60” (91.4mm) H x 4.48” (113.8mm) W x 1.25” (31.75mm) D , 1.1 lbs. (0.5kg) Notes: Specifications and pricing are subject to change without prior notice or obligation. For dimensional drawings of the products, go to support.vaddio.com and click on drawings. RoboSHOT HD Cameras - Document Number 342-0793 Rev B Page 41 of 60... -
Page 42: Communication Specification
8) TXD (to RXD of control source) NOTE: The Vaddio RoboSHOT Control Protocol is similar, but not identical to, the Sony® VISCA™ command set in order to be compatible with several popular control devices. Not all VISCA commands are supported and there are many Vaddio specific commands in the following Command and Inquiry Lists. - Page 43 RoboSHOT HD Cameras RoboSHOT Command List (2/3) Command Set Command Command Packet Comments CAM_Shutter Reset 8x 01 04 0A 00 FF Shutter Setting 8x 01 04 0A 01 FF Down 8x 01 04 0A 02 FF Direct 8x 01 04 4A 00 00 0p 0q FF pq=Shutter Position (00h –...
- Page 44 8x 01 04 1E 00 00 00 0s 0t 0u s: Polarity offset (0 is plus, 1 is minus) tu: Offset s=0 (00h to 40h) RoboSHOT 12 (00h to 10h), RoboSHOT 30 (00 to 40h) Pan-TiltDrive 8x 01 06 01 vv ww 03 01 FF...
- Page 45 RoboSHOT HD Cameras RoboSHOT Inquiry List (1/2) Inquiry Command Command Response Packet Comments CAM_PowerInq 8x 09 04 00 FF y0 50 02 FF y0 50 03 FF Off (Standby) CAM_ZoomPosInq 8x 09 04 47 FF y0 50 0p 0q 0r 0s FF pqrs: Zoom Position CAM_FocusModeInq 8x 09 04 38 FF...
-
Page 46: Important Notes
RoboSHOT HD Cameras RoboSHOT Inquiry List (2/2) Inquiry Command Command Response Packet Comments CAM_LR_ReverseModeInq 8x 09 04 61 FF y0 50 02 FF On (mirror) y0 50 03 FF CAM_FreezeModeInq 8x 09 04 62 FF y0 50 02 FF y0 50 03 FF CAM_PictureEffectModeInq 8x 09 04 63 FF y0 50 00 FF... -
Page 47: Roboshot Telnet Serial Command Api
ERIAL OMMAND The Vaddio Serial Command protocol is a high level text based command line interface supported via telnet session on the RoboSHOT. The command application protocol interface is intended to allow external device such as AMX or Crestron to control the camera. The protocol is based upon ASCII format following the VT100 terminal emulation standard and uses an intuitive text command nomenclature for ease of use. - Page 48 RoboSHOT HD Camera Systems Camera Preset NAME camera preset - Recall and storing of camera presets SYNOPSIS camera preset {recall|store} [1-6] DESCRIPTION Method used to recall and store camera presets OPTIONS recall Recall preset store Store preset preset Required value from 1-12 used to indicate the preset number ...
- Page 49 RoboSHOT HD Camera Systems Camera NAME camera - Base command for camera control command. Used in conjunction with control arguments to include home, pan, tilt, zoom, preset etc... SYNOPSIS camera {ccu|home|pan|preset|standby|tilt|zoom} DESCRIPTION The camera command is the base command used to control the camera movement ...
- Page 50 RoboSHOT HD Camera Systems CCU Camera Scene NAME camera ccu scene - Stores or recalls the ccu scene SYNOPSIS camera ccu scene {recall {factory [1-6]|custom [1-3]} | store [1-3]} DESCRIPTION Method used to get or set the ccu scene ...
- Page 51 RoboSHOT HD Camera Systems Camera CCU NAME camera ccu - Stores and recalls scenes and gets and sets CCU settings SYNOPSIS camera ccu DESCRIPTION Method used to get or set the ccu scene or ccu setting OPTIONS scene Used for storing/recalling scenes Used for getting CCU settings...
- Page 52 RoboSHOT HD Camera Systems Exit NAME exit - ends the current API command session SYNOPSIS exit DESCRIPTION Exit ends the current API command session. If the session is over telnet, the session is ended and the socket is closed. If the session is over serial, a new session is started.
- Page 53 RoboSHOT HD Camera Systems Network Settings NAME network settings - get current network settings SYNOPSIS network settings {get} DESCRIPTION Method used to get the current network settings of the device OPTIONS get Get the current network settings for the machine ...
- Page 54 RoboSHOT HD Camera Systems System Factory‐Reset NAME system factory-reset - Gets or sets factory reset status SYNOPSIS system factory-reset {get|on|off} DESCRIPTION Method used to get or set the factory reset status OPTIONS Get the current factory reset status Enable factory reset on reboot Disable factory reset on reboot ...
- Page 55 RoboSHOT HD Camera Systems System NAME system - gets or Sets the Current System Settings SYNOPSIS system {factory-reset {get|on|off} | reboot [ <seconds>]} DESCRIPTION Method used to get/set the current system settings or execute system commands OPTIONS factory-reset Get or set the factory reset status...
-
Page 56: Compliance And Ce Declaration Of Conformity - Roboshot Hd Ptz Cameras
Operation is subject to the following two conditions: (1) This device may not cause interference, and (2) This device must accept any interference including interference that may cause undesired operation of the device. Changes or modifications not expressly approved by Vaddio can affect emission compliance and could void the user’s authority to operate this equipment. -
Page 57: Compliance And Ce Declaration Of Conformity - Quick-Connect
Changes or modifications not expressly approved by Vaddio can affect emission compliance and could void the user’s authority to operate this equipment. ICES-003 Compliance... -
Page 58: Warranty Information
Vaddio Customer Service: Vaddio will test, repair, or replace the product or products without charge if the unit is under warranty. If the product is out of warranty, Vaddio will test then repair the product or products. The cost of parts and labor charge will be estimated by a technician and confirmed by the customer prior to repair. - Page 59 RoboSHOT HD Camera Systems Inside Back Cover - Mostly Blank RoboSHOT HD Cameras, Document Number 342-0793 Page 59 of 60...
- Page 60 ©2015 Vaddio - All Rights Reserved. Reproduction in whole or in part without written permission is prohibited. Specifications and pricing are subject to change without notice or obligation. Vaddio, RoboSHOT, EZCamera, Quick-Connect and HSDS are trademarks of Vaddio. All other trademarks are property of their respective owners.
Need help?
Do you have a question about the RoboSHOT 12 and is the answer not in the manual?
Questions and answers