Table of Contents
Advertisement
Quick Links
Advertisement
Table of Contents

Subscribe to Our Youtube Channel
Related Manuals for dji ZENMUSE H4-3D


Summary of Contents for dji ZENMUSE H4-3D
- Page 1 ZENMUSE H4-3D User Manual V1.0 2015.1...
-
Page 2: Warning & Disclaimer
Hero4 Black) before delivery. You do not need to perform extra calibration. Do not attempt to modify the gimbal or mount extra components/devices (such as a filter, lens hood, etc.) to the camera. Be sure to use a DJI approved battery, otherwise the performance of the gimbal may be affected. -
Page 3: Table Of Contents
Video Connection Configuration Driver and PC Assistant Installation PC Assistant Interface Channel Setting Firmware & Software Upgrade Test Flight Pre-flight Checklist Gimbal Test Appendix Troubleshooting Settings When Using the A2 Flight Control System Specifications © 2015 DJI. All Rights Reserved. -
Page 4: Profile
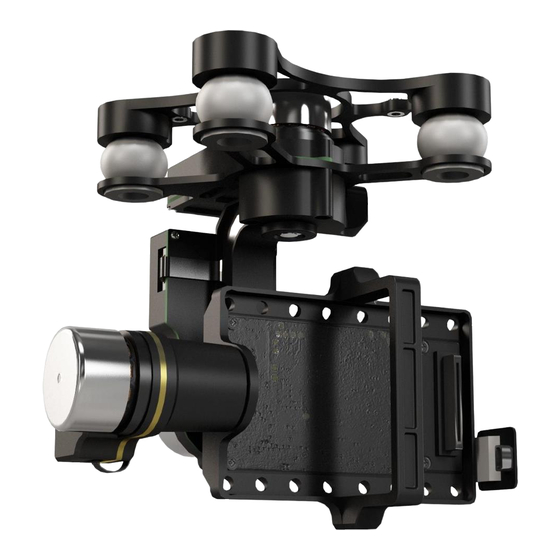
Profile The Zenmuse H4-3D gimbal offers excellent stabilization features for aerial hobbyists and professional aerial photographers. Powered by a built-in IMU (Inertial Measurement Unit) and a special servo module, this gimbal is built to hold a GoPro camera and enables stable, quality aerial photography. - Page 5 H4-3D gimbal that does not come with a GCU unit (namely, the H4-3D specifically designed for a Phantom 2). You can mount the H4-3D gimbal onto other DJI aircraft by using the below accessories. You may purchase the accessories according to your aircraft type.
-
Page 6: Installation
ZENMUSE H4-3D User Manual F450 & Phantom 1 Adapter For installing the H4-3D gimbal onto a F450 or Phantom 1. F550 Adapter For installing the H4-3D gimbal onto a F550. Must be used with the above F450 adapter. Installation Gimbal Description Ensure the gimbal servos are unobstructed, otherwise they may be damaged during operation. -
Page 7: Installing H4-3D Onto An Aircraft
ZENMUSE H4-3D User Manual Installing H4-3D onto an Aircraft Installing H4-3D onto a Phantom 2 (new version) There are two versions of the Phantom 2. The latest Phantom 2 can hold the H4-3D gimbal directly, while the older version of the Phantom 2 requires an adapter to hold the H4-3D. The difference between the two versions can be seen on the bottom of Phantom. - Page 8 ZENMUSE H4-3D User Manual 2. Attach the bottom plate of the damping unit to the upper plate. To do this, insert the securing pins on the tip of the vibration absorbers into the mounting holes on the bottom plate. 3. Cover the securing pins with washers to lock the damping unit in place. Only push the washers past the first nut.
- Page 9 ZENMUSE H4-3D User Manual Installing the H4-3D onto Other DJI Aircraft You can install the H4-3D onto other DJI aircraft by using the corresponding adapter. Refer to the relevant instructional video or user manual for more details. 1. Use the Phantom 2 (old version) adapter to install the H4-3D onto previous versions of the Phantom 2.
- Page 10 ZENMUSE H4-3D User Manual 3. Use the F450 adapter to install the H4-3D onto the DJI F450. DJI F450 F450 adapter H4-3D 4. Use the F450 adapter and F550 adapter to install H4-3D to DJI F550. DJI F550 F450 adapter F550 adapter H4-3D Aircraft, camera, and accessories are not included with the gimbal.
-
Page 11: Camera Installation
Camera Installation Follow the instructions below to mount your GoPro Hero4 Black camera. Visit http://www.dji.com/product/zenmuse-h4-3d/video and watch the installation video tutorial before mounting your GoPro camera to the H4-3D gimbal. The gimbal cables are delicate items, handle with extreme care. Always check all connections before each flight and ensure they are secure. -
Page 12: Gcu Connection
Module and Flight Compass module to a Compass module to the module to the GPS port of Control System spare CAN-Bus port CAN 2 port on the A2. the PMU V2. Connection on the PMU. © 2015 DJI. All Rights Reserved. -
Page 13: Gcu And Flight Control System Connection
ZENMUSE H4-3D User Manual Refer to GCU and Flight Control System Connection for more information about the connection. For details on the flight control system connections, refer to the corresponding flight control system user manuals. 3. Connect the GCU to the flight control system. Then connect the 8-Pin cable of the gimbal to the G8 port on the GCU. -
Page 14: Video Connection
ZENMUSE H4-3D User Manual NAZA MUTI POTOR DIY power connector NAZA V-SEN 3V 5V H -3D EXP. NAZA-M V2 Connection Diagram Leave as-is H -3D DIY power NAZA V-SEN connector 3V 5V EXP. NAZA-M Connection Diagram The PMU and GCU can both connect to the same battery. - Page 15 ZENMUSE H4-3D User Manual 1. Solder the Video Signal/GND cables to your wireless video transmission module (air system). 2. Plug the gimbal video signal cable into the GCU video signal port. Ensure the wireless video transmission unit is connected to the GCU before powering on the aircraft.
-
Page 16: Configuration
Phantom 2 PC Assistant information in your Phantom 2 User Manual instead. 1. Ensure the drivers for the flight control system are properly installed. 2. Download the PC Assistant from the official DJI website. 3. Launch the PC Assistant installer and follow each step to complete the installation. -
Page 17: Firmware & Software Upgrade
CAN-Bus cable between the GCU and main controller before you upgrade the firmware. Double check your set parameters once you have finished upgrading the firmware. Repeat the above steps if the DJI server is experiencing heavy traffic or the firmware upgrade fails. -
Page 18: Test Flight
Once such objects are no longer detected, the gimbal will resume normal operation. Use of a separate battery pack to test the gimbal is suggested before powering on the flight controller, gimbal, OSD, FPV gears, etc. © 2015 DJI. All Rights Reserved. -
Page 19: Appendix
Control System. Map the H4-3D to two channels on the transmitter as shown in the following diagram. DJI recommends the use of a knob switch or a stick with spring back function for tilt control, and a 2-position switch for MODE. -
Page 20: Specifications
42 mm ×32 mm ×9.3 mm Working Performance Angular Vibration Range Pitch/Roll:±0.02°, Yaw: ±0.03° Maximum Controlled Rotation Speed Tilt axis: ±130°/s Controlled Rotation Range Tilt axis control: -130 ~ +45° Regulatory Approvals FCC (USA) CE (EU) ROHS(EU) © 2015 DJI. All Rights Reserved. - Page 21 The content is subject to change. Download the latest version from http://www.dji.com/product/zenmuse-h4-3d/download © 2015 DJI. All Rights Reserved.
Need help?
Do you have a question about the ZENMUSE H4-3D and is the answer not in the manual?
Questions and answers