Table of Contents
Advertisement
Advertisement
Table of Contents

Related Manuals for dji RSC 2


Summary of Contents for dji RSC 2
- Page 1 User Manual v1.0 2020.10...
-
Page 2: Using This Manual
DJI RSC 2 Disclaimer and Safety Guidelines Read the entire quick start guide and user manual and watch the informational and tutorial videos on the product page on the DJI official website (http://www.dji.com/rsc-2). Read the disclaimer and safety guidelines to understand your legal rights and responsibilities. -
Page 3: Table Of Contents
Unlocking and Locking the Gimbal Mounting the Camera Balancing Grip and Built-In Battery Charging Safety Guidelines Operations Activating DJI RSC 2 Screen Operation Ronin App Settings Image Transmission Operation Modes Updating Firmware Specifications Maintenance © 2020 DJI OSMO All Rights Reserved. -
Page 4: Introduction
Titan Stabilization Algorithm. With a foldable design, DJI RSC 2 can be used in Briefcase mode without the need for other accessories and is easy to store. Locks on each axis arm enables faster and more convenient balancing as well as more secure storage. -
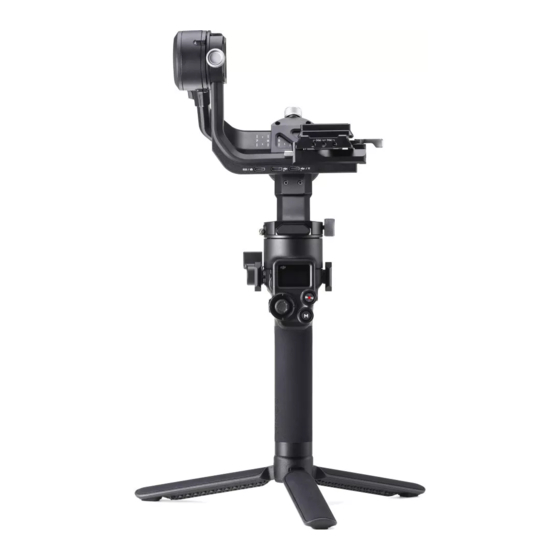
Page 5: Dji Rsc 2 Diagram
20. Power Port (USB-C) 8. Extended Grip/Tripod 9. Back Button 21. Pan Lock 10. M4/NATO Port 22. Pan Motor 23. Roll Lock 11. Lock Knob 12. Lower Quick-Release Plate 24. Roll Motor 13. Upper Quick-Release Plate © 2020 DJI OSMO All Rights Reserved. -
Page 6: Getting Started
Getting Started Unfolding the Gimbal Loosen the lock knob to the unlocked position, unfold the gimbal as shown, and tighten the lock knob to the locked position. Attaching the Extended Grip/Tripod © 2020 DJI OSMO All Rights Reserved. -
Page 7: Unlocking And Locking The Gimbal
RSC 2 Camera Compatibility List. Mounting a Camera Make sure to prepare the camera before mounting it to DJI RSC 2. Remove the lens cap and check that the battery and memory card are inserted in the camera. Make sure DJI RSC 2 is powered off or in sleep mode before mounting the camera. - Page 8 . Toggle the lever to the locked position once the camera is roughly balanced The position of the camera mounting plate can be adjusted by toggling the lever on the bottom. © 2020 DJI OSMO All Rights Reserved.
-
Page 9: Balancing
2. Before balancing, make sure to power on the camera if using an optical zoom lens and to select the focal length if using a varifocal lens. Make sure DJI RSC 2 is powered off or in sleep mode before balancing. - Page 10 . If the camera rotates to the right, move the camera to the left c. Tighten the knob. The roll axis is balanced when the camera is steady. d. Lock the roll axis. © 2020 DJI OSMO All Rights Reserved.
- Page 11 4. Balancing the Pan Axis a. Unlock the pan axis. Loosen the knob b. While holding the grip, tilt DJI RSC 2 forward, and rotate the pan arm until parallel with you. c. Check the movement of the pan axis. If the camera lens rotates to the left, push the pan axis to the right .
-
Page 12: Grip And Built-In Battery
14 hours (when DJI RSC 2 is properly balanced). Charging Before using for the first time, charge DJI RSC 2 through the power port using a charging cable (included) and a USB adapter (not included). It is recommended to use a QC 2.0 or PD USB adapter (max. - Page 13 Grip Disposal section. 3. Put out any fire using water, sand, fire blanket, or a dry powder fire extinguisher. 4. DO NOT use non-DJI batteries. DJI takes no responsibility for any damage caused by non-DJI batteries.
- Page 14 3. If the grip is stored for an extended period and the battery is depleted, the grip will enter sleep mode. Recharge the grip to exit sleep mode. © 2020 DJI OSMO All Rights Reserved.
- Page 15 1. If the grip is disabled and the battery cannot be fully discharged, contact a professional battery disposal or recycling agent for further assistance. 2. Dispose of the grip immediately if it cannot be powered on after over-discharging. © 2020 DJI OSMO All Rights Reserved.
-
Page 16: Operations
Operations Activating DJI RSC 2 DJI RSC 2 needs to be activated through the Ronin app before using for the first time. 1. Press and hold the power button to power on the gimbal. 2. Enable Bluetooth on your mobile device and launch the Ronin app. Once detected in the list of Bluetooth devices, select DJI RSC 2 and input the default Bluetooth password: 12345678. - Page 17 Push Mode: enable to manually control the tilt and pan axis. More: tap to restore the gimbal parameters and Bluetooth password to default settings, choose the onscreen language from English and Chinese (Simplified), and view the device information and firmware version. © 2020 DJI OSMO All Rights Reserved.
- Page 18 * The camera control cable must be connected in order to use the functions of the camera control button and front dial. Note that these functions will vary according to the camera. Refer to the DJI RSC 2 Camera Compatibility List on www.dji.com/rsc-2 for more information.
-
Page 19: Ronin App Settings
Top Bar Sleep/Wake: tap to enter or exit sleep mode. When DJI RSC 2 is in sleep mode, the motor will be powered off, but the gimbal remains powered on. - Page 20 5. Shoot/Record Button: tap to take photos or record videos. 6. Photo/Video Toggle: tap to switch between photo and video modes. Make sure the mode is the same as the settings on the camera. © 2020 DJI OSMO All Rights Reserved.
- Page 21 Shutter/Record Button: tap to take photos or record videos. Panorama Panorama allows users to capture a series of interconnecting still images with precise control based on the sensor type, lens focal length, overlap, and interval. © 2020 DJI OSMO All Rights Reserved.
- Page 22 The tilt axis range in Panorama is -45° to +90° in order to avoid capturing the gimbal in the shot, while the pan axis allows you to capture a full 360° rotation. Tap the shutter/record button to begin. Timelapse © 2020 DJI OSMO All Rights Reserved.
- Page 23 In Timelapse, DJI RSC 2 triggers the camera to capture still images with the set interval time and will automatically stop when completed. The duration for the Timelapse and the frame rate can be set so that DJI RSC 2 can calculate the exact number of images required.
- Page 24 Tap How to Use to learn more about the gaming controller. Balance Adjustment Tap Begin Test and DJI RSC 2 will check the balance status and provide a score for each axis. Make sure the gimbal is not obstructed in any way before performing the balance test and follow the onscreen instructions.
- Page 25 Auto Tune: the stiffness value is determined by the payload of the gimbal. Use Auto Tune to obtain the stiffness value automatically after balancing. Tap Auto Tune and DJI RSC 2 automatically calculates the result based on the weight of the gimbal setup. Alternatively, press and hold the M button and trigger simultaneously for four seconds to start auto tune without using the app.
- Page 26 Max Speed: allows the remote-controlled rotational speed to be adjusted. Smoothing: allows you to control the sensitivity of the gimbal. The lower the smoothing value, the more sensitive the movement of the gimbal. © 2020 DJI OSMO All Rights Reserved.
-
Page 27: Image Transmission
Endpoint: limits the rotational range of the gimbal by setting the endpoints. The pan axis has a slip-ring, enabling DJI RSC 2 to rotate continuously when the endpoints are set to 180°. On the tilt axis, you can set up the endpoints according to your requirements. Some longer lenses may hit the gimbal frame. -
Page 28: Operation Modes
Upright mode: Upright mode is enabled after powering on the gimbal. Underslung mode: enter sleep mode when the gimbal is in Upright mode and turn DJI RSC 2 upside down and rotate the roll axis 180°. Underslung mode is enabled after DJI RSC 2 exits from sleep mode. -
Page 29: Updating Firmware
Flashlight mode: Flashlight mode is enabled after tilting the gimbal forward 90° from Upright mode. 3D Roll 360 is available when using DJI RSC 2 in Flashlight mode. The slip-ring on the pan axis enables DJI RSC 2 to perform a continuous roll rotation. -
Page 30: Specifications
DJI RSC 2 is not waterproof. Make sure to protect it from dust and water during use. After use, it is recommended to wipe DJI RSC 2 with a soft dry cloth. DO NOT spray any cleaning liquids onto DJI RSC 2. - Page 31 This content is subject to change. Download the latest version from http://www.dji.com/rsc-2 If you have any questions about this document, please contact DJI by sending a message to DocSupport@dji.com. RONIN is a trademark of DJI OSMO. Copyright © 2020 DJI OSMO All Rights Reserved.
Need help?
Do you have a question about the RSC 2 and is the answer not in the manual?
Questions and answers