dji RONIN-S User Manual
Hide thumbs
Also See for RONIN-S:
- Quick start manual ,
- User manual (61 pages) ,
- Disclaimer and safety manuallines (10 pages)
Table of Contents
Advertisement
Quick Links
Download this manual
See also:
User Manual
Advertisement
Table of Contents

Related Manuals for dji RONIN-S


Summary of Contents for dji RONIN-S
- Page 1 User Manual RONIN-S 2019.12 v1.6...
- Page 2 Navigating to a Topic View a complete list of topics in the table of contents. Click on a topic to navigate to that section. Printing this Document This document supports high resolution printing. © 2019 DJI OSMO All Rights Reserved.
-
Page 3: Using This Manual
(http://www.dji.com/ronin-s). Read the Disclaimers and Safety Guidelines to understand your legal rights and responsibilities. If you have any questions or problems during the installation, maintenance or use of this product, please contact DJI or a DJI authorized dealer. -
Page 4: Table Of Contents
Contents Using this Manual Legend Before You Begin Download the Ronin App Download DJI Pro Assistant for Ronin Contents Introduction Ronin-S Diagram Getting Started Mounting the Grip Attaching the Extended Grip Mounting the Camera Balancing Before Balancing Balancing the Vertical Tilt... -
Page 5: Introduction
DSLR and mirrorless cameras. It is compatible with almost any DSLR or mirrorless camera setup on the market. The Ronin-S also can be mounted to a tripod or a car for shooting, with operating speeds of 75 kph*. There are many modes of operation such as SmoothTrack and Lock mode, and the newly added Sport Mode allows you to capture fast- moving scenes effortlessly. -
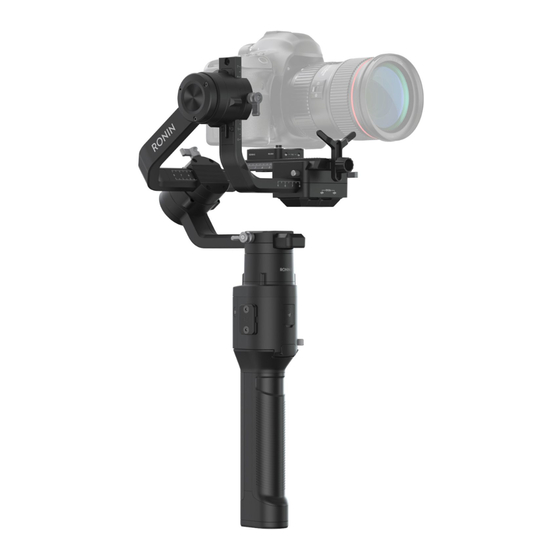
Page 6: Ronin-S Diagram
15. Battery Level Indicators 6. M Button 16. Grip Power Button 7. Camera Control Button 17. Focus Wheel 8. Grip 18. Camera Control Port (RSS Port) 9. Extended Grip/Tripod 19. Camera Mounting Plate 10. Tilt Motor © 2019 DJI OSMO All Rights Reserved. -
Page 7: Getting Started
Attach the gimbal to the grip by sliding it into the dovetail mount. Toggle the lever to the locked position. The Ronin-S’ power/data ports and connectors are not waterproof. Ensure to protect them from harmful dust and water during use to avoid damage. -
Page 8: Mounting The Camera
DSLR cameras; press once to start/ stop recording; press and hold to take a photo. Please refer to the Ronin-S Camera stop recording; press and hold to take a photo. Please refer to the Ronin-S Camera Compatibility List for details. - Page 9 Ronin-S User Manual Ronin-S User Manual Be sure the Ronin-S is not powered on when plugging/unplugging the RSS Be sure the Ronin-S is not powered on when plugging/unplugging the RSS cable. Failure to do so may burn out the cable.
-
Page 10: Balancing
To obtain the best performance from the Ronin-S, proper balancing is essential. Accurate balance is critical for shots where the Ronin-S will be subjected to fast motion or acceleration. Proper balance will also offer longer battery runtimes. There are three axes that need to be accurately balanced prior to turning on the Ronin-S and setting up the software. -
Page 11: Balancing Depth For The Tilt Axis
If the adjustment on this axis is too stiff, you can try to relieve the weight on the roll motor by either lifting up on the camera platform while making an adjustment or tilt the gimbal back a little until the roll arm is parallel with ground. 3. Tighten the knob. © 2019 DJI OSMO All Rights Reserved. -
Page 12: Balancing The Pan Axis
Ronin-S User Manual Balancing the Pan Axis 1. Grab the grip and tilt Ronin-S sideways to check for movement along the pan axis. 2. Loosen the knob on the pan motor. Adjust the camera balance until the camera stays still when rotating the pan axis 45° while lifting the grip. -
Page 13: Grip And Built-In Battery
The Grip is for handheld use. The built-in battery within the Grip has a capacity of 2400 mAh and able to power the Ronin-S for up to 12 hours (when the Ronin-S is properly balanced and used under normal conditions). -
Page 14: Safety Guidelines
Maintain a safe distance from the grip until it is completely dry. Never use the grip again, and dispose of the grip properly as described in the Grip Disposal section below. 3. Put out any grip fire using water, sand, fire blanket or a dry powder fire extinguisher. 4. Never use non-DJI batteries. Go to www.dji.com to purchase new batteries. DJI takes no responsibility for any damage caused by non-DJI batteries. 5. Never use or charge swollen, leaky, or damaged grip. If the grip is abnormal, contact DJI or a DJI authorized dealer for further assistance. 6. Never install or remove the grip from the gimbal when it is turned on. 7. The grip should be used in temperatures from -4° F to 113° F (-20° C to 45° C). Use of © 2019 DJI OSMO All Rights Reserved. - Page 15 3. DO NOT leave the grip near heat sources such as a furnace or heater. DO NOT leave the grip inside of a vehicle on hot days. The ideal storage temperature is 72° F to 82° F (22° C to 28° C). 4. Keep the grip dry. Grip Maintenance 1. Never use the grip when the temperature is too high or too low. 2. Never store the battery in environments with a temperature higher than 113° F(45℃) or lower than 32° F(0℃). © 2019 DJI OSMO All Rights Reserved.
- Page 16 1. The grip is disabled and the battery cannot be fully discharged, please contact a professional battery disposal/recycling agent for further assistance. 2. Dispose of the grip immediately if it cannot be powered on after over-discharging. © 2019 DJI OSMO All Rights Reserved.
-
Page 17: Activating Ronin-S
Activating Ronin-S Make sure the camera is balanced before powering on Ronin-S. Do not turn on Ronin-S without a balanced load, as doing so may damage the gimbal motors. 1. Press the power button once to turn on the grip, and then press and hold the gimbal power button to turn on the gimbal. - Page 18 Ronin-S User Manual Top Bar Sleep/Wake: Tap to enter or exit sleep mode. When Ronin-S is in sleep mode, the motor will be powered off, but the gimbal remains powered on. M1: Displays the current user profile . Battery Level: Displays the battery level of the gimbal.
- Page 19 When you need to track with the camera in a lower position, press the power button once to enter sleep mode, and then place Ronin-S in Underslung mode. Press the power button once to exit sleep mode, and then you can use ActiveTrack 3.0.
- Page 20 The smoothing allows you to control the sensitivity of the gimbal and ramping up and down. The lower the smoothing value, the more sensitive the movement of the gimbal. Recenter: Tap to recenter the gimbal. © 2019 DJI OSMO All Rights Reserved.
- Page 21 Panorama mode is -45° to +90° to avoid capturing the gimbal in the shot while the pan axis allows you to capture a full 360° rotation. Tap the shutter button to start capturing the sequence. © 2019 DJI OSMO All Rights Reserved.
- Page 22 In Timelapse mode, Ronin-S triggers the camera to capture still images with your desired interval time and will automatically stop when completed. The duration for the Timelapse and the frame rate can be set so that Ronin-S can calculate the exact number of images required.
- Page 23 Balance Adjustment Tap the Begin Test button and Ronin-S will check the balance status and provide a score for each axis. Make sure the gimbal is not obstructed in any way before performing the balance test and follow the on-screen instructions.
- Page 24 After selecting the tuning profile, simply tap ‘Auto Tune’. The Ronin-S will automatically work out the optimal result based on the weight of the setup. Alternatively, you can press and hold Ronin-S’ M button and front trigger simultaneously for four seconds to start Auto Tune without using the App.
- Page 25 Ensure the Ronin-S is placed on a steady platform, and working in Upright mode and centered when using Auto Tune. If mounting the Ronin-S on a car, it is recommended to adjust the Stiffness value manually after Auto Tune is complete. Manually tune the Stiffness as high as possible until you feel the gimbal start to vibrate.
- Page 26 When using the joystick, you can only control CH1 and CH3, which is mapped to tilt and pan axes by default. You can customize channel mapping by tapping on the name of the axis on the right of the screen. © 2019 DJI OSMO All Rights Reserved.
- Page 27 Endpoint: Limits the rotational range of the gimbal by setting the endpoints. The pan axis has a slip-ring, enabling Ronin-S to rotate continuously when the endpoints are set to 180°. On the tilt axis, you can set up the endpoints according to your requirements. Some longer lenses may hit the gimbal frame.
-
Page 28: Button Functions
The calibration has failed if the LEDs blink red. If they do try to go through the calibration process again. 5. Press and hold Ronin-S’ M button and trigger simultaneously for four seconds to start Auto Tune. The default Auto Tune grade is Medium. - Page 29 3. Press and hold to take a photo. Focus Wheel The Focus Wheel is used for controlling camera focus. When a compatible camera system connects to the Ronin-S, you can pull focus via the included cable. Button Functions 1. Focus Wheel Rotate to control camera focus.
- Page 30 To mount the focus wheel to the other side, remove the protector from the port first. Please note that other Ronin-S accessories can be mounted to the 8-pin port. Use the protector when the port is not in use.
-
Page 31: Operation Modes
Channels) and re-map CH3 to the Roll axis (originally mapped as Pan axis) and also set the CH1 as N/A to avoid any input on the Tilt axis. Then hold the Ronin-S in the Flashlight mode and double tap the front trigger to re-center the gimbal orientation. Simply push the joystick left or right to get the gimbal rolling continuously. -
Page 32: Updating Firmware
Updating Firmware Download the DJI Pro Assistant for Ronin and update the firmware if there is new firmware released for Ronin-S. Follow the steps below to update the firmware: 1. Connect the Ronin-S to your computer via the USB-C Cable. -
Page 33: Specifications
Upright Mode, Underslung Mode, Flashlight Mode Mounting Modes Handheld, Car Mount Mode Built-in, independent IMU modules Advanced 32-Bit ARM Processor DJI Specialized Gimbal Drive Motors with Encoders Bluetooth Module S-Bus Receiver Supported DJI Pro Wireless Receiver Supported Extended GPS Supported USB-C Port 360°... - Page 34 Roll axis: 360 ° continuous rotation Controlled Rotation Pan axis: 360 ° continuous rotation Range Tilt axis: +180° to -90° (Upright Mode), +90° to -135° (Underslung and Flashlight Mode) Roll axis: ±30°, 360° continuous rotation (Roll 360 Mode) © 2019 DJI OSMO All Rights Reserved.
- Page 35 Contents are subject to change. Download the latest version from http://www.dji.com/product/ronin-s If you have any questions about this document, please contact DJI by sending a message to DocSupport@dji.com. © RONIN is a trademark of DJI OSMO. Copyright 2018 DJI OSMO All Rights Reserved.
Need help?
Do you have a question about the RONIN-S and is the answer not in the manual?
Questions and answers