Table of Contents
Advertisement
Advertisement
Table of Contents

Related Manuals for dji RS 3 MINI


Summary of Contents for dji RS 3 MINI
- Page 1 User Manual v1.0 2023.01...
- Page 2 Searching for Keywords Search for keywords such as “battery” and “install” to find a topic. If you are using Adobe Acrobat Reader to read this document, press Ctrl+F on Windows or Command+F on Mac to begin a search. Navigating to a Topic View a complete list of topics in the table of contents.
-
Page 3: Using This Manual
It is recommended to watch all the tutorial videos on the official website (https://www.dji.com/ rs-3-mini) or in the DJI Ronin app and read the Safety Guidelines before using for the first time. Make sure to review the Quick Start Guide before using for the first time and refer to this user manual for more information. -
Page 4: Table Of Contents
Using this Manual Legend Read Before First Use Download the Ronin App and Watch the Tutorial Videos Introduction DJI RS 3 Mini Diagram Using for the First Time Charging DJI RS 3 Mini Attaching the Extended Grip/Tripod Unlocking and Locking the Gimbal... -
Page 5: Introduction
It is compatible with a wide range of mainstream cameras and lenses and supports a tested payload of up to 2 kg (4.4 lbs). DJI RS 3 Mini boasts enhanced gimbal performance thanks to the 3rd-Gen RS Stabilization Algorithm. -
Page 6: Dji Rs 3 Mini Diagram
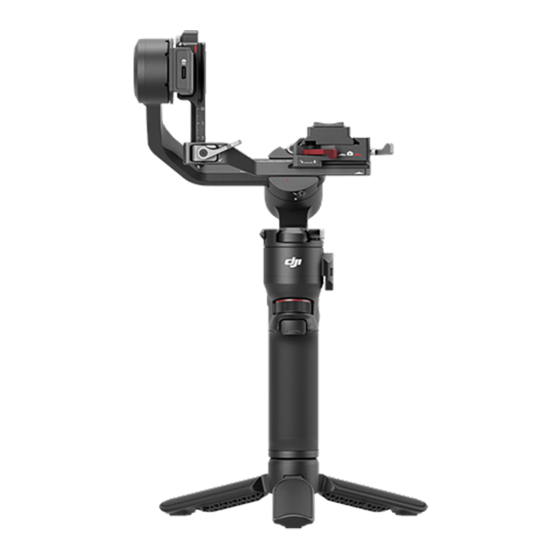
DJI RS 3 Mini User Manual DJI RS 3 Mini Diagram Upper Quick-Release Plate Lower Quick-Release Plate Horizontal Arm Roll Arm Roll Motor 1.4-inch Full-Color Touchscreen Joystick Camera Control Button Grip (Built-in battery with 1/4"-20 screw hole) 10. Extended Grip/Tripod 11. -
Page 7: Using For The First Time
Using for the First Time Charging DJI RS 3 Mini Charge DJI RS 3 Mini through the power port (USB-C) using the charging cable (included) and a USB adapter (not included). It is recommended to use a 5V-2A USB adapter. The battery can be fully charged in approximately 2.5 hours. -
Page 8: Unlocking And Locking The Gimbal
Adjust the gimbal position as shown and toggle the tilt and roll locks in the locked position before mounting the camera. • The tilt and roll axis of DJI RS 3 Mini have different locked positions, which can be locked and stored according to the actual situation. -
Page 9: Mounting The Camera
Supported Cameras and Lenses DJI RS 3 Mini has been rigorously tested to support a payload of 2 kg (4.4 lbs). Make sure the combined weight of the camera, lens, and other accessories are within 2 kg (4.4 lbs). Refer to the official DJI website (https://www.dji.com/support/compatibility) for the most updated... - Page 10 DJI RS 3 Mini User Manual Horizontal Shooting Loosen the lever ① on the lower quick-release plate. Insert the upper quick-release plate with the camera attached into the lower quick-release plate ② , as shown below. Adjust the lower quick-release plate to an appropriate position according to the width of the camera, and then tighten the lever ③...
- Page 11 DJI RS 3 Mini User Manual Vertical Shooting Detach the Lower Quick-Release Plate Loosen the red lever ① on the lower quick-release plate, and then move the lower quick- release plate while pressing the safety lock ② beside the lever.
- Page 12 DJI RS 3 Mini User Manual • DO NOT install the lower quick-release plate in the wrong direction. Otherwise, the camera will not be properly secured to the vertical arm. Attach a Camera to the Gimbal Make sure the lever ② on the lower quick-release plate is the unlocked position. Insert the camera and upper quick-release plate ①...
-
Page 13: Balancing
To obtain the best performance from DJI RS 3 Mini, proper balancing is essential. Proper balance is critical for shots with DJI RS 3 Mini where fast motion or acceleration is required and also offers longer battery runtimes. There are three axes that need to be properly balanced before powering on DJI RS 3 Mini and setting up the software. - Page 14 DJI RS 3 Mini User Manual Balancing in Horizontal Shooting 1. Balancing the Vertical Tilt a) Unlock the tilt axis ① and loosen the lever on the horizontal arm ② . b) Rotate the tilt arm, so that the camera lens points upward. Check to make sure the camera is not top or bottom-heavy.
- Page 15 DJI RS 3 Mini User Manual 3. Balancing the Roll Axis a) Unlock the roll axis ① and loosen the lever on the roll axis ② . b) Check the direction in which the roll motor swings. If the camera rotates to the left, move the camera to the right ③...
- Page 16 DJI RS 3 Mini User Manual Balancing in Vertical Shooting 1. Balancing the Vertical Tilt a) Unlock the tilt axis ① and loosen the red lever on the lower quick-release plate ② . b) Rotate the tilt arm, so that the camera lens is in the upward. Check to make sure the camera is not top or bottom-heavy.
- Page 17 DJI RS 3 Mini User Manual 3. Balancing the Roll Axis a) Unlock the roll axis ① and loosen the lever on the roll axis ② . b) Check the direction in which the roll motor swings. If the camera rotates to the left, move the camera to the right ③...
-
Page 18: Activating Dji Rs 3 Mini
Activation is required for DJI RS 3 Mini through the Ronin app. Follow the steps below to activate DJI RS 3 Mini: Press and hold the power button to power on DJI RS 3 Mini, and select the language on the touchscreen. -
Page 19: Connecting A Camera
The gimbal is ready to be used after the auto tune calibration is complete. Press and hold the power button to power on DJI RS 3 Mini, or press once or twice to exit sleep mode. Tap the auto tune icon on the touchscreen to enable the auto tune calibration. -
Page 20: Operations
• Press halfway: autofocus • Press once: start or stop recording • Press and hold: take a photo Refer to https://www.dji.com/support/compatibility. Check the Ronin Series Compatibility list for detailed information on supported camera features. M Button • Press once: select a user profile •... -
Page 21: Touchscreen
DJI RS 3 Mini User Manual Touchscreen Home Follow Speed Indicates the current user profile. Users can set and save three user profiles: M1, M2, and M3. Indicates a camera control cable is connected. Indicates Bluetooth is connected. Indicates Sport Mode is enabled. In Sport Mode, the follow speed of the gimbal increases. - Page 22 The three motors of the gimbal control the three axes. The tilt motor controls the tilt axis to follow, the pan motor controls the pan axis to follow, and the roll motor controls the roll axis to follow. DJI RS 3 Mini supports the following Follow Modes: PF, PTF, FPV, Custom, and 3D Roll 360. The Follow Modes can be switched by clicking the M button or tapping directly on the touch screen.
- Page 23 DJI RS 3 Mini User Manual Custom: enables or disables any axis follow as required. Lock mode is enabled when the three axes are disabled. Custom All the three axes will not follow the movement of the grip in lock mode.
- Page 24 DJI RS 3 Mini User Manual Slide Down: Control Center Screen Slide down from the top of the screen to enter the control center screen. Screen Lock Tap the screen lock to lock the touchscreen to avoid unexpected operation. Slide up to unlock the touchscreen after enabling screen lock.
- Page 25 DJI RS 3 Mini User Manual Settings Item Description Disable Selfie prevents accidentally entering selfie mode and interrupting Disable Selfie recording. If disabled, Selfie mode will not be entered if the trigger is pressed three times. When enabled, the gimbal obtains smoother movements after enabling Orbit Follow when shooting arc shots.
-
Page 26: Ronin App Settings
DJI RS 3 Mini User Manual Ronin App Settings The Ronin App contains the features of the touchscreen as well as more features of the gimbal. The screenshots below are based on the iOS version of the app. Top Bar Sleep/Wake: tap to enter or exit sleep mode. - Page 27 DJI RS 3 Mini User Manual Create Virtual Joystick Use the virtual joystick in the app to control the movement of the gimbal and to capture images or record video. Control Bar: control the speed and smoothness of the gimbal by adjusting the control bar.
- Page 28 DJI RS 3 Mini User Manual Force Mobile Force Mobile requires the phone holder and a mobile phone mounted on a tripod or handlebar vertically. After enabling this feature in the Ronin app, the gimbal movement can be controlled by tilting and rotating your mobile phone. (The gimbal movement cannot be controlled by rolling the mobile phone by default.)
- Page 29 DJI RS 3 Mini User Manual Panorama Panorama allows users to capture a series of interconnecting still images with precise control based on the sensor type, lens focal length, overlap, and interval. Make sure you have connected the camera and gimbal using the corresponding camera control cable before using Panorama.
- Page 30 User Manual Timelapse In Timelapse, DJI RS 3 Mini triggers the camera to capture still images with a set interval time and will automatically stop when completed. The duration for the Timelapse and the frame rate can be set so that DJI RS 3 Mini can calculate the exact number of images required.
- Page 31 DJI RS 3 Mini User Manual Track Track is designed to capture video with up to 10 waypoints. Users need to select the waypoint manually by moving the gimbal or using the virtual joystick. The duration parameter below the grid map indicates how much time it will take for the gimbal to travel from one waypoint to the next.
- Page 32 DJI RS 3 Mini User Manual Gaming Controller PS4 DualShock and Xbox controllers can be used to control the gimbal and camera. After connecting the controller to the mobile device and gimbal, users can control gimbal movements, focus, and zoom, and can record videos, recenter gimbal, switch user profile, and capture images.
- Page 33 DJI RS 3 Mini User Manual Camera Setting All displayed parameters (excluding high ISO) can only be controlled based on the capabilities of the camera. Refer to camera instructions for more information. 31 © 2023 DJI All Rights Reserved.
- Page 34 DJI RS 3 Mini User Manual Balance Test Tap Begin Test to check the balance status and provide a score for each axis. If the balance status is not good, view the on-screen tutorial videos on how to balance. Ensure the gimbal is held at an incline between 15°...
- Page 35 DJI RS 3 Mini User Manual Stiffness can be displayed and adjusted on the motor parameters page. Tap Auto Tune to automatically calculate the result based on the weight of the gimbal setup. After auto tune is complete, the user can see detailed motor diagnostics at the bottom of the screen. Tap More to display the detailed motor diagnostic information.
- Page 36 • Endpoint: limits the rotational range of the gimbal by setting the endpoints. The pan axis has a slip-ring, enabling DJI RS 3 Mini to rotate continuously when the endpoints are set to 180°. On the tilt axis, the user can set the endpoints according to the desired requirements. Some longer lenses may hit the gimbal frame.
-
Page 37: Firmware Update
Firmware Update The firmware of DJI RS 3 Mini is updated using Ronin App. If new firmware is available, users will be notified by the Ronin app. Update the firmware according to the on-screen instructions. DO NOT power off the gimbal or exit the app during the firmware update. -
Page 38: Grip And Built-In Battery
This product is not intended for use by children without direct adult supervision. DO NOT alter this product in any way outside of the documents provided by SZ DJI TECHNOLOGY CO., LTD. These Safety Guidelines contain instructions for safety, operation and maintenance. - Page 39 DJI RS 3 Mini User Manual DO NOT use or charge a swollen, leaky, or damaged grip. If the grip is abnormal, contact DJI or a DJI authorized dealer for further assistance. The grip should be used in temperatures from -10° to 45° C (-14° to 113° F). Use of the grip in environments above 50°...
- Page 40 DJI RS 3 Mini User Manual Grip Disposal Dispose of the grip in specific recycling boxes only after a complete discharge. DO NOT place the grip in regular trash containers. Strictly follow your local regulations regarding the disposal and recycling of batteries.
-
Page 41: Operation Modes
Underslung Mode Briefcase Mode The NATO port on the side of DJI RS 3 Mini supports the installation of the DJI RS Briefcase Handle (sold separately). The angle of the briefcase handle can be adjusted using the knob, which makes low-angle camera movements more intuitive. -
Page 42: Maintenance
DJI RS 3 Mini is not waterproof. Make sure to protect it from dust and water during use. After use, it is recommended to wipe DJI RS 3 Mini with a soft dry cloth. DO NOT spray any cleaning liquids onto DJI RS 3 Mini. - Page 43 This content is subject to change. Download the latest version from https://www.dji.com/rs-3-mini If you have any questions about this document, please contact DJI by sending a message to DocSupport@dji.com. is a trademark of DJI. Copyright © 2023 DJI All Rights Reserved.
Need help?
Do you have a question about the RS 3 MINI and is the answer not in the manual?
Questions and answers
display on dji rs3 mini is not in english how do I reset to english