Table of Contents
Advertisement
Quick Links
I
ntroduction
The HDMI to VGA & Audio Converter Scaler
converts digital HDMI to VGA and stereo audio.
Key Features and Benefits
•
Supports PC resolution up to WUXGA
(1920x1200@60Hz)
•
Supports de-interlacing & video H/V mirror
•
Active video area adjustment and over/
under scanning adjustable
•
Supports noise reduction and video
enhancement
•
Stereo S/PDIF and analog Stereo audio
output
•
OSD control interface and IR remote control
•
Metal housing with wall mount capability
04-0916A
HDMI to VGA & Audio
Converter Scaler
Installation Guide
1
Advertisement
Table of Contents

Related Manuals for SIIG HDMI to VGA & Audio Converter Scaler


Summary of Contents for SIIG HDMI to VGA & Audio Converter Scaler
-
Page 1: Installation Guide
HDMI to VGA & Audio Converter Scaler Installation Guide ntroduction The HDMI to VGA & Audio Converter Scaler converts digital HDMI to VGA and stereo audio. Key Features and Benefits • Supports PC resolution up to WUXGA (1920x1200@60Hz) • Supports de-interlacing & video H/V mirror •... -
Page 2: Package Contents
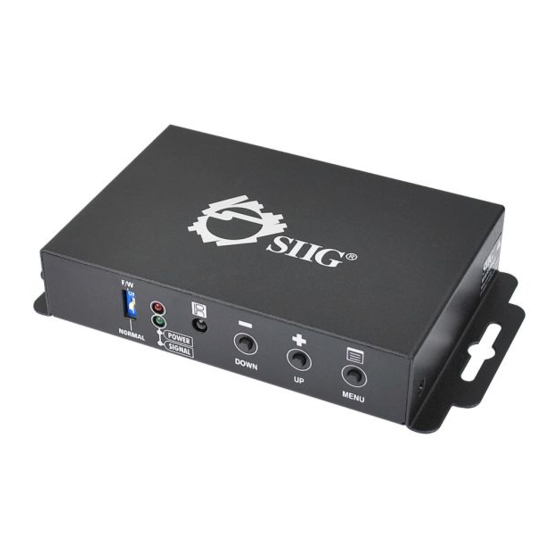
Package Contents • HDMI to VGA & Audio Converter Scaler • Screw Kit and 4 rubber pads • Power adapter (5V/2A) • IR remote control • Software CD and Installation guide Layout IR Sensor LED Indicator DIP Switch Push Buttons Figure 1: Front Layout •... -
Page 3: Hardware Installation
Power Jack S/PDIF Audio Out VGA Output Mini USB port Stereo Audio Out HDMI Input Figure 2: Rear Layout • Power Jack: Plug in the power adapter here • Mini USB port: Connects to a USB port of a computer to control the Scaler via software. •... - Page 4 Connect the S/PDIF audio speaker to the Scaler's S/PDIF Audio Out, if needed. Connect an HDMI cable (cable not included) to your HDMI source, then connect the other end to the Scaler's HDMI Input. Plug the included power adapter into the Scaler's Power Jack, then plug it into a reliable power outlet.
-
Page 5: Scaler Control
Scaler Control The Scaler can be controlled by the front panel push buttons, IR remote control or Scaler software. IR Sensor Push Buttons Push Button Press the MENU button to open the selection menu, see Figure 4. Use the UP or DOWN button to select the setting you want to change. - Page 6 IR Remote Control Point the remote control at the Scaler's IR sensor. Figure 5 Scaler Software Connect the Scaler's mini USB port to your computer's USB port using a USB cable (cable not included). Insert the included software CD to your computer, double click the Setup file and follow the on-screen instructions to install the driver.
- Page 7 Figure 6: Scaler Software Main Menu COM Port search button: Click the button to search for available COM ports. COM Port selection menu: Select the Scaler's COM port from the drop down menu. Output Setup button: Select the output resolution, output mode, default pattern, and the EDID audio channel from the drop down menu, then click Apply to enforce these changes.
- Page 8 Figure 7 Image button: Click the Image button to set up your preferred display contrast, brightness, saturation, hue and other related values. Figure 8...
- Page 9 Adjustment Button: Click the Adjustment Button to adjust the screen size, change the aspect ratio or other display settings. Figure 9 System Button: Click System button, then click Get to view the current input resolution, or click Factory Reset to set the Scaler back to the default settings.
- Page 10 Resolution info: Displays the input/output port and screen resolution information. Refresh button: After making any changes, click this button to view your new configuration. Output Quick Selection: Shortcuts to some commonly used settings: (1) Aspect ratio: Click to switch aspect ratio between 4:3 and 16:9.
-
Page 11: Firmware Update
Firmware Update Note: If the Scaler Software is not installed, go to Scaler Software on page 6 now and follow the instructions to install it. Otherwise, follow the instruction below to update the firmware. Connect the Scaler to your computer using a USB cable (cable not included), double click the Scaler software icon. -
Page 12: Osd Menu
Appendix OSD menu Refer to the OSD menu below for the full list of all the selectable viewing options:... -
Page 14: Supported Video Resolution
Table 1 Supported Video Resolution Table 2... -
Page 15: Technical Support And Warranty
Go to www.siig.com, click Support, then REQUEST A PRODUCT REPLACEMENT to submit a request to SIIG RMA or fax a request to 510-657-5962. Your RMA request will be processed, if the product is determined to be defective, an RMA number will be issued. - Page 16 6078 Stewart Avenue Fremont, CA 94538-3152, USA Phone: 510-657-8688 HDMI to VGA & Audio Converter Scaler is a trademark of SIIG, Inc. SIIG and SIIG logo are registered trademarks of SIIG, Inc. All other trademarks are the property of their respective owners ©...
Need help?
Do you have a question about the HDMI to VGA & Audio Converter Scaler and is the answer not in the manual?
Questions and answers