HYT TC-320 User Manual
Hide thumbs
Also See for TC-320:
- Service manual (77 pages) ,
- Service manual (68 pages) ,
- Service manual (68 pages)
Table of Contents
Advertisement
Preface
Thank you for purchasing HYT TC-320 Business Radio. TC-320 is unique for its compact
and delicate body. It is ergonomically designed to give you exceptional experience of
portability.
This easy-to-use radio will deliver you secure, instant and reliable communications at
peak efficiency. Please read this manual carefully before use. The information presented
herein will help you to derive maximum performance from your radio.
MODELS COVERED IN THIS MANUAL
TC-320 UHF Two-way Radio
Advertisement
Table of Contents

Related Manuals for HYT TC-320


Summary of Contents for HYT TC-320
- Page 1 Preface Thank you for purchasing HYT TC-320 Business Radio. TC-320 is unique for its compact and delicate body. It is ergonomically designed to give you exceptional experience of portability. This easy-to-use radio will deliver you secure, instant and reliable communications at peak efficiency.
-
Page 2: Table Of Contents
Contents Safety Information ..........................2 Product Inspection ..........................3 Radio Overview ..........................4 Battery Information ........................... 6 Antenna Information ......................... 9 Assembly and Disassembly ......................10 Attaching/Removing the Battery ..................... 10 Attaching/Removing the Antenna ................... 11 Attaching/Removing the Belt Clip ..................12 Attaching/Removing the Battery When the Belt Clip is Attached .......... -
Page 3: Safety Information
◇ This equipment shall be serviced by qualified technicians only. ◇ Do not modify the radio for any reason. ◇ Use only HYT supplied or approved batteries and chargers. ◇ To avoid electromagnetic interference and/or compatibility conflicts, turn off your radio in any area where posted notices instruct you to do so. -
Page 4: Product Inspection
Product Inspection Please unpack the package box carefully and check that all items shipped are received; report any missing or damaged items to your dealer. Accessories Item Qty. (PCS) Antenna Nylon Strap Belt Clip Screw (Belt Clip) Li-Ion Battery Switching Power Owner’s Manual Switching Power (varying Antenna... -
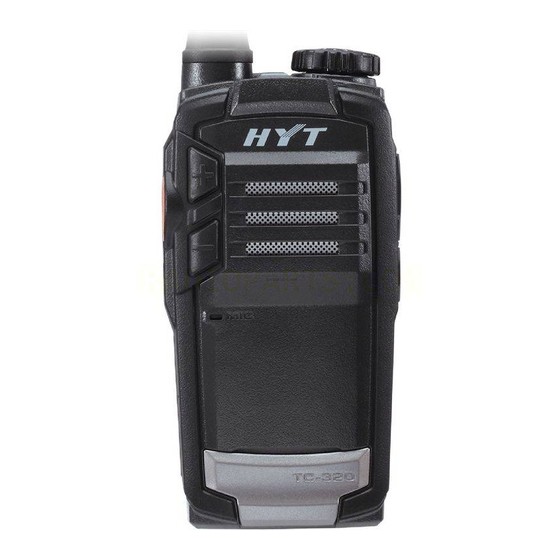
Page 5: Radio Overview
Radio Overview (1) PTT (Push-to-Talk) (4) Volume Adjust (2) SK (Side Key) (3) Speaker Keys [+]/[-] (5) Microphone (6) Nameplate (7) Charging Terminal (8) Antenna (10) Channel/Status (11) Channel Selector (12) Charge (9) Power Switch Indicator Knob Indicator (13) Accessory Jack (14) Audio Accessory (15) Mini USB Jack (16) Strap Hole... - Page 6 Side Key is a programmable key that can be assigned with long/short press functions by your dealer. Note: Short Press: Key press shorter than 1 second. Long Press: Key press longer than 1 second. ﹡Status Indicator Status indications and alert tones are shown in the table below: When the radio is turned on, the power on alert tone sounds and Power on (to enter user Status Indicator flashes orange once.
-
Page 7: Battery Information
A high-pitched tone is heard when transmit power is switched from low power to high power. One beep sounds when the VOX feature is activated. Two beeps sound when the VOX feature is disabled. * Battery Latch Used to secure or remove the battery. * Audio Accessory Jack Used to connect audio accessories such as earpieces. - Page 8 out of the limit may cause battery leakage or damage. When charging a battery attached to a radio, turn the radio off to ensure a full charge. Do not cut off the power supply or remove the battery when charging a battery. Never charge a battery that is wet.
- Page 9 1. Plug the AC connector of the switching power into the AC outlet socket. 2. Plug the Mini USB connector of the switching power into the Mini USB jack of the radio or charger. 3. Place the radio with the battery attached in the charger when the charger indicator glows green to indicate the power supplies normally.
-
Page 10: Antenna Information
Plug the AC connector of the switching power into the AC outlet socket. Plug the Mini USB connector of the switching power into the Mini USB jack of the charger. Indicator of the charger glows green. Place the battery in the charger. Make sure the battery is connected to the charger. -
Page 11: Assembly And Disassembly
Assembly and Disassembly Attaching/Removing the Battery Attaching the Battery Hold the top part of the radio’s body, and slide the battery latch in the direction of arrow ① Then lift the rear cover and remove it from the radio’s body, as shown in Figure 1. -
Page 12: Attaching/Removing The Antenna
Figure 3 Removing the Battery Turn off the radio, if it is turned on. Then follow step 1 in the section “Attaching the Battery” to remove the rear cover. Hold the top part of the radio's body, and lift the battery in the direction of arrow ① by the notch at its bottom, and then remove the battery from the radio’s body in the direction of arrow ②, as shown in Figure 4. -
Page 13: Attaching/Removing The Belt Clip
Figure 5 Removing the Antenna Turn the antenna counter-clockwise until you can remove it. Attaching/Removing the Belt Clip Attaching the Belt Clip Align the two screw holes on the metal bracket of the belt clip with holes on the elliptical protrusion on the back side of the radio. -
Page 14: Attaching/Removing The Battery When The Belt Clip Is Attached
Loosen the screw to remove the belt clip. Please refer to the operations for attaching the belt clip. Attaching/Removing the Battery When the Belt Clip is Attached When the belt clip is attached to the radio, please first press the belt clip to make its bottom up, and then attach/remove the rear cover and battery by the steps mentioned above, as shown in Figure 7. -
Page 15: Basic Operations
Basic Operations Turning the Radio On/Off Long press the Power Switch until an alert tone is heard to turn the radio on. To turn the radio off, do the same as you turn it on. Adjusting the Volume You may adjust the volume level through Volume Adjust Keys [+]/[-]. Press the [+] key to increase the volume, or press the [-] key to decrease the volume. -
Page 16: Advanced Operations
Scan Scrambler VOX (Voice-Operated Transmit) Compandor Squelch Off Squelch Off Momentary Battery Strength Indicator Channel Lock (If you rotate the Channel Selector knob with Channel Lock function enabled, the current channel number will remain unchanged. This function will not be disabled after programming. -
Page 17: Power Adjust
Your dealer may program the alert tone that sounds before the TOT timer nearly expires. Battery Strength Indicator TC-320 allows you to simply press the programmed Battery Strength Indicator key to illuminate the Status Indicator, which gives different indications representing battery strength levels. -
Page 18: Monitor
pressed at the moment, the radio will give an alert indicating that transmission is prohibited. Monitor Squelch Off Purpose: In this mode, the speaker is unmuted in any condition so as to receive any sound on the current channel. When audio signal is received on the channel, audio will be heard. - Page 19 when activity is detected and signaling condition is satisfied on a channel. Press the key again to exit scanning. When scanning is active, the radio will continuously scan for activity on scan list members. Once activity is detected on a channel, scanning will pause on the active channel for you to receive activity.
-
Page 20: Busy Channel Lockout (Bcl)
Auto If Auto Scan is enabled for a channel, the radio will automatically enter scan mode when it is switched to this channel. When it is switched to other channels or powers off, the radio will exit from scan mode. ... - Page 21 You may select VOX levels according to the operating environment. Too much noise and high VOX level may cause the radio to transmit continuously. Use only the VOX earpieces specified by HYT. Please plug a VOX earpiece into the radio’s jack properly, or the VOX function may not work.
-
Page 22: Troubleshooting
Note: To purchase accessories, please contact your local dealer. Troubleshooting Symptom Solution The battery has run out. Please recharge the battery or replace it with a new one. Cannot power on the radio. The battery is not properly installed. Please remove the battery and attach it again. -
Page 23: Care And Cleaning
Care and Cleaning Do not hold the radio by its antenna or external earpiece directly. Do not place the radio in a dusty or dirty environment. Clean the radio with a lint-free cloth to remove dirt or grease, to avoid poor contact due to excessive dust. - Page 24 The above listed items are the common optional accessories for your radio. To order other accessories, please contact your local dealer. HYT endeavors to achieve the accuracy and completeness of this manual, but no warranty of accuracy or reliability is given. All the above specifications and design are subject to change without notice due to continuous development.
Need help?
Do you have a question about the TC-320 and is the answer not in the manual?
Questions and answers