Table of Contents
Advertisement
SINCE 1996
O w n e r ' s M a n u a l
MODELS : MR-210 / MR-220 / MR-240
KCC-REM-ESO-MR-240
제품의 품질향상을 위하여 디자인 및 액세서리를 예고없이 변경할 수 있습니다.
For product quality improvement, the product design and accessories are subject to be changed without notice.
Thanks for purchasing this product.
• Please read this owner's manual before use, and use it after understanding all the features.
• Please make sure to write down the date and the place of purchase on the certificate of warranty attached.
• Free of charge warranty maintenance will be served only on the presence of the certificate of warranty.
• As this appliance is registered for electromagnetic compatibility for home use (B class),
it is intended for primarily home use and may be used in all areas.
P/No. 6311-240-01B
Advertisement
Table of Contents

Related Manuals for Memoq MR-210


Summary of Contents for Memoq MR-210
- Page 1 SINCE 1996 O w n e r ' s M a n u a l MODELS : MR-210 / MR-220 / MR-240 KCC-REM-ESO-MR-240 제품의 품질향상을 위하여 디자인 및 액세서리를 예고없이 변경할 수 있습니다. For product quality improvement, the product design and accessories are subject to be changed without notice.
-
Page 2: Table Of Contents
>> CONTENTS << 1. SAFETY PRECAUTIONS ................3 2. NAMES OF PARTS ..................4 3. LCD PANEL DESCRIPTION ................ 5 4. PREPARATION PRIOR TO USE ..............5 5. DC POWER SUPPLY USE ................6 5-1. POWER SUPPLY USE OF PC USB PORT ............6 5-2. -
Page 3: Safety Precautions
1. SAFETY PRECAUTIONS • As these instructions are for user’s safety and property protection, the user is required to read before use and to follow the instructions. • The company shall not be entitled to take responsibility for the damage caused by the use of this product or any claims from third parties. -
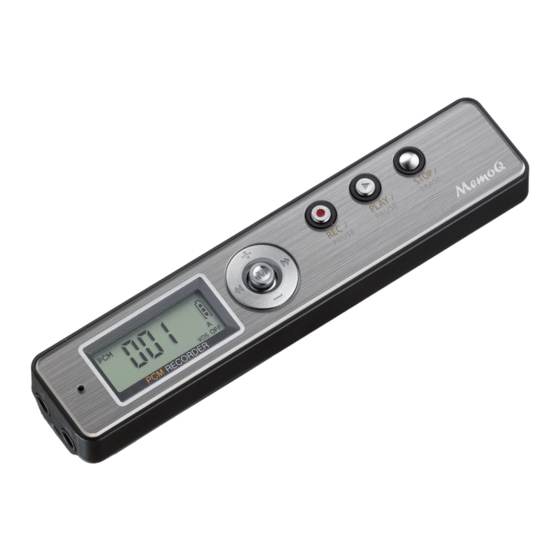
Page 4: Names Of Parts
2. NAMES OF PARTS ① ② ⑤ ④ ⑥ ⑦ ⑧ ③ ⑤Jog buttons detailed view ⑨ ⑩ ⑥ REC / PAUSE button ① Microphone jack ⑦ PLAY /PAUSE button ② Earphone / USB jack ⑧ STOP / ERASE button ③... -
Page 5: Lcd Panel Description
3. LCD PANEL DESCRIPTION ① ③ ⑨ ② ①Record/Play mode ②Time and File number display ③Battery life indicator ④RECording indicator ⑤PLAY indicator ⑧ ⑥ERASE indicator ⑦VOS indicator ⑧Recording folder indicator ④ ⑤ ⑥ ⑦ ⑨Music mode indicator 4. PREPARATION PRIOR TO USE ■... -
Page 6: Dc Power Supply Use
5. DC POWER SUPPLY USE • This appliance may be operated with the external power supply (DC adaptor), without a battery installed. 5-1. Power Supply Use of PC USB PORT • Connect the earphone/USB jack to a USB port of a PC with USB cable. •... -
Page 7: Function(Music/Voice (Hq,Sp,Lp) /Voice (Pcm) ) Change
7. FUNCTION(MUSIC/VOICE /VOICE ) CHANGE (HQ,SP,LP) (PCM) • When you push jog button to the direction of volume+ long(more than 3seconds) in standby, it is changed to MUSIC -> VOICE(HQ,SP,LP) -> VOICE(PCM) -> MUSIC and becomes standby. My Computer Local Disc(C:) •... -
Page 8: Recorded File Playback
9. RECODRED FILE PLAYBACK • For the playback of recorded file, standby screen should be like the right picture. • When you press PLAY button shortly in standby, <MP3 Format <PCM Format Standby Screen> the file of number shown on screen is played back. Standby Screen>... -
Page 9: File Preview Feature
13. FILE PREVIEW FEATURE • In the standby state, press the PLAY/PAUSE button long enough (for more than 5 seconds), then the file pre- view feature is initiated as the each file from selected one to the end file is played for 5 seconds and stopped. 14. -
Page 10: Mode Setting
16. MODE SETTING • The MODE setting feature is to set recording MODE, recording FOLDER, VOS (voice operated system) recording, REPeated play, LCD panel display, EQ (equalizer, play attribute) and CLEAN of folders/all of the files. • In the standby (stop) mode, press the MODE button for more than 3 seconds, it enters into the MODE setting feature. -
Page 11: Mode(Recording Mode(Hq/Sp/Lp)) Setting
MODE button more than 3seconds, mode setting function is completed and moves to standby. * MP3 format recording time Mode MR-210(1G) MR-220(2G) MR-240(4G) About 36 hours About 72 hours... -
Page 12: Vos(Voice Operated System) Recording Setting
16-3. VOS(Voice Operated System) Recording Setting • The VOS feature is the feature to detect the audio sound during recording. If the audio sound is not detected, the recording is paused and if the audio sound is detected, the recording is continued again. -
Page 13: Eq (Equalizer, Play Attribute) Setting
16-6. EQ (equalizer, play attribute) Setting • At the EQ setting mode display, by using previous (◀◀) and/or next (▶▶) jog buttons to select EQ play attribute setting. • The available EQ modes are FL(FLAT), ro(ROCK), Ho(HOUSE), dA(DANCE), JA(JAZZ), bA(BALLAD), rb(R&B) and CL(CLASSIC). -
Page 14: Recording By Use Of External Devices
17. RECORDING BY USE OF EXTERNAL DEVICES • It is the recording feature by using external devices (such as external microphone, external devices and wired telephone. 17-1. Recording Telephone with the Ear-Microphone (Optional Product) • Plug the ear-microphone, which a microphone is built in, in a ear and connect the other side to the microphone jack of the product. - Page 15 MEMO...
-
Page 16: Specifications
SPECIFICATIONS MR-210 MR-220 MR-240 Model Memory Cavicaty About 12 hours About 24 hours About 48 hours Maximum About 36 hours About 72 hours About144 hours recording hours by About 72 hours About 144hours About 288 hours audio quality About 288 hours About 576 hours...
Need help?
Do you have a question about the MR-210 and is the answer not in the manual?
Questions and answers