Table of Contents
Advertisement
Made in Korea
www.esonic.co.kr
Owner's Manual
MODELS : MR-710 / MR-720 / MR-740,
EVR-710/EVR-720/EVR-740
Digital Voice Recorder
Before connecting, operating or adjusting this product,
please read this owner's manual carefully and completely.
Designs and specifications are subject to change without notice for improvement.
Advertisement
Table of Contents

Related Manuals for Memoq MR-710


Summary of Contents for Memoq MR-710
- Page 1 Made in Korea www.esonic.co.kr Owner's Manual MODELS : MR-710 / MR-720 / MR-740, EVR-710/EVR-720/EVR-740 Digital Voice Recorder Before connecting, operating or adjusting this product, please read this owner's manual carefully and completely. Designs and specifications are subject to change without notice for improvement.
-
Page 2: Features
Features * Smallest micro recorder in the world (made in Korea) * Recording the mobile or wired phone call (no auxiliary tool needed) * Combined use of both charging and normal battery (compact battery pack) * Continuous recording for 3 days (unified battery pack with no wire) * Continuous recording for 23 days (via the USB adapter, MR-740/EVR-740 Model) * Built-in graphic LCD (possible to display the title of the recorded file) * File browsing (built-in navigation) -
Page 3: Table Of Contents
Table of Contents Safety note..........4 (playing characteristics)....16 Denomination of each part...5 Setting the REP Explanation of LCD screens..6 (repeated playing)......17 Preparation (charging)....6 Setting the MIC (microphone) Using the auxiliary battery pack..7 sensitivity..........17 Initialization (RESET)......7 Setting the (recording) mode...18 Using the DC power supply...8 Setting the automatic level Turning on/off the power.....9 control (ALC)........18... -
Page 4: Safety Note
Safety note • This manual is for preventing the user and his/her property from being damaged, so please read it thoroughly before using. • We are not responsible for the loss from using this product and the claim by the third party. •... -
Page 5: Denomination Of Each Part
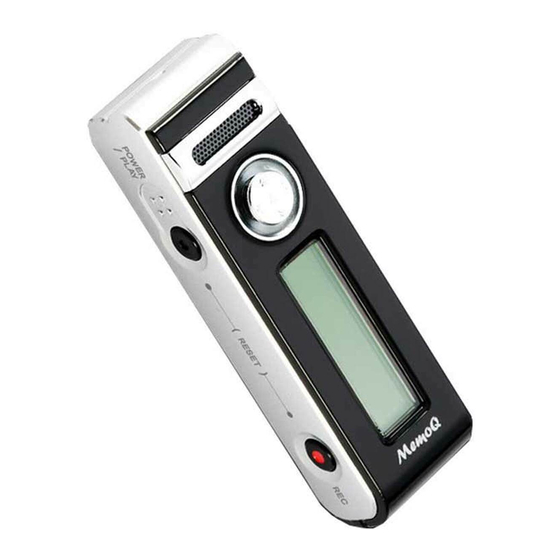
Denomination of each part 1. Record button 5. Built-in speaker 9. Clip 2. Power/Play button 6. Microphone 10. Main body 3. LCD 7. USB port 11. Strap 4. Jog (mode) button 8. Earphone connector 12. Battery pack... -
Page 6: Explanation Of Lcd Screens
Explanation of LCD screens Recording display Recording time Recorded file name Remaining battery Record/Play Playing time Microphone sensitivity VOICE ready display When recording When playing Folder Music file name Music playing Playing time MUSIC Mode MUSIC ready display When playing music Folder level Folder Folder lever... -
Page 7: Using The Auxiliary Battery Pack
Caution • When removing the auxiliary batteries, hold the speaker of the product, and then remove them slightly. Assemble Assemble Disassemble Disassemble Using the auxiliary battery pack • The auxiliary battery pack is useful when it is not possible to use the external power supply due to business trip or travel. -
Page 8: Using The Dc Power Supply
Using the DC power supply • The product can be continuously operated while charging with the external power supply (DC adapter). 1. Using the PC USB port power supply • Connect the PC USB port and the product via the USB cable. •... -
Page 9: Turning On/Off The Power
Turning on/off the power • When you press and hold the PLAY button for 3 seconds or longer, “MemoQ” is displayed at the LCD and then disappears, and it moves to the finally played file at the folder and gets being ready. -
Page 10: Recording
Recording • When pressing the REC button for 3 seconds or longer with the power turned off, the power is turned on and recording starts immediately. • With the power turned on, pressing the REC button starts recording. Pressing the REC button while recording pause recording. •... -
Page 11: Setting The Microphone Sensitivity
Setting the microphone sensitivity • The microphone sensitivity can be set during recording or at the mode setup. • During recording, pushing and holding the button to the (+) direction for 3 seconds or longer increases the microphone sensitivity by the order of 1m-4m-8m while pushing and holding the button to the (-) direction for 3 seconds or longer decreases the microphone sensitivity by the order of 8m-4m-1m •... -
Page 12: Playing The Recorded File
Playing the recorded file • The play mode should be set as VOICE for playing the recorded file. • At the ready state, pressing the PLAY button starts playing. Pressing the PLAY button toggles between pausing and playing. • While pausing or playing, pushing the jog button to Previous ( ) or Next ( ) direction moves to the previous or next file within the selected folder. -
Page 13: Volume Control
Caution – When disconnecting the USB cable from the PC, we recommend performing “Safely removing the H/W” for protecting. Saving the music file Saving the voice file <Screen showing connection to the PC as MemoQ (F :) portable disk> <Folder tree>... -
Page 14: Browsing Folder/File
Browsing folder / file • The browsing function searches for the file, which can search for the file to play immediately even while playing. • Pressing the MODE button while pausing or playing (within 1 second) switches to the BROWSE mode. •... -
Page 15: Setting The Mode
• At the BROWSE mode, pushing the jog button to Previous ( ) or Next ( ) direction moves to the previous or next folder. • Pushing the jog button to the volume (+) or (-) direction searches for the folder and the music file within the selected folder. -
Page 16: Erase (Deleting The File)
ERASE (deleting the file) • Play the file to delete, and check its contents. • Press the PLAY button to pause. • Pressing and holding the MODE button to switch to screen. • Use Previous ( ) or Next ( ) jog button to select •... -
Page 17: Setting The Rep (Repeated Playing)
Setting the REP (repeated playing) • The repeated playing can be set to OFF, 1, ALL or FOLDER. • At the REP screen, use Previous ( ) or Next ( ) jog button to select the REP mode. • Press the MODE at the selected screen to set as the displayed mode. Play all files starting from the playing file at the selected folder only and then stop. -
Page 18: Setting The (Recording) Mode
Previous ( ) or Next ( ) jog button to select the recording mode. • Pressing the MODE at the selected screen sets the displayed mode. Recording time by mode MR-710(EVR-710) MR-720(EVR-720) MR-740(EVR-740) About 144 hours About 288 hours... -
Page 19: Selecting The Lcd
• When you press and hold the MODE button for 3 seconds or longer, the mode setting is saved and the mode setup function is disabled. • The ALC function suppresses the loud sound and amplifies the weak sound to record. •... -
Page 20: Setting The Voice Operation System (Vos)
Setting the voice operation system (VOS) screen, use Previous ( ) or Next ( ) jog button to select ON or OFF. • Pressing the MODE key at the selected screen sets ON or OFF displayed on the screen. • With the VOS function, when you press and hold the MODE button for 3 seconds or longer, the mode setting is saved and the mode setup function is disabled. -
Page 21: Selecting The Recording Folder
Selecting the recording folder • The folder selection function saves the recording file at the selected folder. • It is convenient when the recorded contents are managed by folder. screen, use Previous ( ) or Next ( ) jog button to select the folder. •... -
Page 22: Exiting From The Mode Setting
Exiting from the mode setting At the screen, pressing the MODE button to disable the mode setting. • Or, pressing and holding the MODE button for 3 seconds or longer saves the mode setting and then disables the mode setup function. •... -
Page 23: Recording The Mobile Phone Call
Recording the mobile phone call • It is possible for this product to record the phone call conveniently by connecting it to the mobile phone jus like the accessory with no electric connection. • Set the microphone sensitivity to 4m, and then it is possible to record while calling as shown at the figure. -
Page 24: Specifications
Specifi cations Model MR-710/EVR-710 MR-720/EVR-720 MR-740/EVR-740 Memory About 18 hours About 36 hours About 72 hours Recording About 72 hours About 144 hours About 288 hours time About 144 hours About 288 hours About 576 hours Recording : XQ, LP mode... - Page 25 MEMO...
- Page 26 MEMO...
Need help?
Do you have a question about the MR-710 and is the answer not in the manual?
Questions and answers