Advertisement
Quick Links
MQ-L500N User's manual
Powerbank & Digital voice recorder
※ Please be sure to read user's manual before use and use product safely and properly.
※ The pictures in user's manual can be different from the real thing and contents can be changed
without prior notice to improve performance.
- Do not leave product alone in high temperature more than 40 degrees or direct sunlight for a long period of time.
Cautions in use
- To use product with other devices, check the compatibility each other first.
- We are not responsible for the loss of recordings caused by misuse, after-sale service, others.
- We are not responsible for the damage caused by the use of product and for the third party's claim for compensation.
- Decomposition, remodeling, impact or usage at low temperature, high temperature, humid place can be the cause of breakdown.
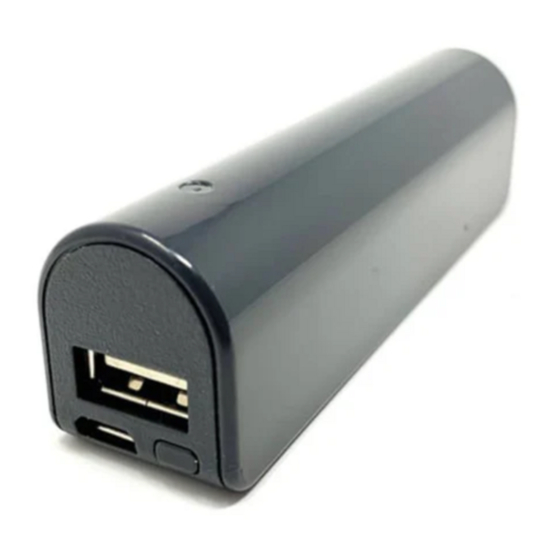
Composition
Main body
ⓐ Charging terminal for external device
ⓑ Charging/USB terminal for body
ⓒ Powerbank button
Name of each part
ⓓ Battery remains LED
ⓔ Recording LED
ⓕ Microphone
ⓖ Recording switch
- You can install product easily by using magnet.
- Attach magnet on the groove of product and put product near steel desk,
steel electronic appliances, etc. and product is attached.
Using magnet
- After connecting USB cable to USB terminal for body(ⓑ), charging it by connecting to the charging adaptor(option) or PC USB port.
Caution : Be sure to use a certified charging adapter (rated output DC5V/500mA or higher).
Damage to the product due to a defective charging adapter may result in paid repair.
My PC
Charging body
- In charging by connecting product to PC with USB cable, in case of low power supply current, charging speed can be slow.
- During charging, product and charger can be a little hot. That is normal phenomenon and does not influence the life or function of product.
- During charging, like below picture, Battery remains LEDⓓ is changed to lighting in order according to battery capacity.
When charging is completed, all LED are turned on.
Battery remains LED during charging.
Flickering
Turned on
0%
· · · · · · · ·
USB cable
Magnet
User's manual
Place to attach magnet
Magnet
USB cable
ⓑCharing/USB terminal for body
ⓓBattery remains LED
100%
User guide
- After connecting USB cable to the USB terminal(ⓑ) of body, connect the other end to the USB port of PC.
- When this device is connected into the USB port of PC, it is recognized as a "Removable disk (MEMOQ)",
and copy, movement, deletion, playback of file is possible.
- For playback, please use the music playback software of PC.
Caution : To connect it to PC, keep recording switch(ⓖ) in the state of STOP
Connecting it to PC
My PC
Caution : When you separate product from PC, please be sure to perform "hardware safety removal".
When you remove product from PC by force, fatal error on product can occur.
- After connecting USB cable to charging terminal for external device(ⓐ), connect the other end to the connector of external device.
- Press Powerbank buttonⓒ, and the charging of external device starts.
- During recording, it can not charge external device.
Charging external
device from body
- You can check battery remains by pressing Powerbank buttonⓒ.
- Battery remains is indicated for 5 seconds.
- If the remaining battery is low, charge it before use.
Checking battery
remains
How to use time setting program
① After connecting the product's USB terminal to the PC's USB port, run the "TIME SETUP" program
stored in the product.
Recording sound quality
Scheduled recording
ON/OFF
DATE_TIME.CFG
Time setting
Creation button
program
② After checking the settings according to the usage environment, click the "START" button.
③ If the "DATE_TIME.CFG" file is normally created in the product, disconnect the product from
the USB port to complete the setting.
Caution : The date and time set on the PC are displayed.
If the date and time are displayed differently, please check the PC settings.
Caution : If the product is not separated immediately after clicking the START button,
a time error will occur as much as the delayed time.
Caution : If the product is not separated from the PC after clicking the START button,
the setting will not be completed.
Caution : Time setting program only works on Window OS. (Doesn't work on macOS)
USB cable
ⓑCharing/USB terminal for body
Recording switch(ⓖ)
in state of STOP
ⓐ Charging terminal for external device
ⓒ Powerbank button
Battery remains LED(ⓓ)
Flickering
Turned on
ⓒ Powerbank button
5%under 10%
30%
60%
100%
Mode (Record Quality)
VOS Level
+2
(Basic setting)
XHQ
+1
VOS LEVEL
(Basic setting)
HQ
0
-1
-2
Schedule Recording
Off
(Basic setting)
hour
minute
hour
*Displayed only when 'ON'
Start Time :
:
Duration :
On
13
45
1
Date_Time
2023-01-01 13:00:00
Current date and time
Advertisement

Subscribe to Our Youtube Channel
Related Manuals for Memoq MQ-L500N


Summary of Contents for Memoq MQ-L500N
- Page 1 ※ The pictures in user's manual can be different from the real thing and contents can be changed - When this device is connected into the USB port of PC, it is recognized as a "Removable disk (MEMOQ)", without prior notice to improve performance.
- Page 2 MQ-L500N User's manual How to record Powerbank & Digital voice recorder Continuous recording 1. MODE - Recording sound quality setting. 1. When you turn Recording switch(ⓖ) the direction of , after about 5 seconds, the Recording LED(ⓔ) lights up and continuous recording starts.
Need help?
Do you have a question about the MQ-L500N and is the answer not in the manual?
Questions and answers
for some reason it wont record anymore. its fully charged and i even deleted a bunch of stuff, there is 3gb of room available out of 15
The Memoq MQ-L500N may not record despite being fully charged and having available storage due to the following reasons:
1. Incorrect Recording Switch Position – The Recording switch (ⓖ) must be in the correct position. For scheduled recording, it must be in the STOP position.
2. Incorrect Date and Time Settings – If the date and time settings are incorrect, scheduled recording may malfunction.
3. SVOS Recording Volume Issue – If the volume level required to trigger SVOS recording is not met, it may not start recording. Continuous recording is recommended for important recordings.
4. Compatibility Issues – If using with another device, compatibility should be checked first.
5. USB Connection Interference – If the device is still connected to a PC after setting changes, the settings may not be applied correctly.
Checking and adjusting these factors should resolve the issue.
This answer is automatically generated
sformatowałem nie zapisując danych. Windows 10 teraz nie widzi dyktafonu. W mój komputer nie pojawia się po podłączeniu dyktafon. Nie wiem co zrobić? proszę o pomoc
If Windows 10 does not recognize the Memoq MQ-L500N voice recorder after formatting, follow these steps:
1. Reconnect the Device: Disconnect and reconnect the device to a different USB port on the PC.
2. Check USB Recognition: Ensure it appears as a "Removable disk (MEMOQ)" in File Explorer or Device Manager.
3. Verify Format Type: The device may require a specific file system. Try formatting it again using FAT32.
4. Restart the PC: Restart the computer and reconnect the device.
5. Update Drivers: Check Device Manager for USB driver updates and install them if available.
6. Use a Different PC: Connect the recorder to another computer to determine if the issue persists.
7. Reset the Device: If possible, reset the recorder to factory settings.
If the issue remains unresolved, the device may need professional servicing.
This answer is automatically generated
My device appears to not be working. the charging does not charge past the first red light. then I cannot download it and also not able to record anymore. Can I send it someplace to have it checked or serviced? I only used it twice.
I NEED TO TAKE MEMOQ MQ L500N BACK TO FACTORY SETTINGS