Table of Contents
Advertisement
Quick Links
Download this manual
See also:
User Manual
Advertisement
Table of Contents

Subscribe to Our Youtube Channel
Related Manuals for BESAFE iZi Comfort


Summary of Contents for BESAFE iZi Comfort
- Page 1 Comfort group 1 (9 to 18kgs) suitable from 9 months to 4 years approx. IMPORTANT: Please read instructions carefully and keep for future reference...
- Page 2 Nothing is more important than ensuring that your child is secure and protected during the journey. The iZi Comfort has been approved to meet the European Standard ECE R44/04. To reach this standard each car seat has to pass a stringent series of tests.
-
Page 3: Table Of Contents
CONTENTS Things to do ............3/4 Things not to do ...........5/6 In the event of an emergency ......6 Notice ..............7 Checking the vehicles seat belt ......8 Features ..............9/10 General Operation Fastening the harness ..........11/12 Adjusting the harness ........... 13/14 Adjusting the shoulder strap height ....... -
Page 4: Things To Do
THINGS TO DO Read these instructions carefully before fitting your car seat. Remember, an incorrect installation could be dangerous. Put these instructions in a safe place, preferably in the pocket provided on the rear of the car seat so that you can find them for future reference. Ensure that once the car seat is fitted no parts of the seat or vehicles seat belt can become trapped by a folding seat or the vehicles door. - Page 5 Regularly check the car seat for signs of wear, especially the cover, harness webbing and the buckle. Check that luggage or other heavy or sharp objects are secured in the car. Loose objects are liable to cause injury in the event of an accident. When travelling with other passengers using both the front and rear seats, the lighter occupant should be in the rear of the vehicle and the heavier occupant in...
-
Page 6: Things Not To Do
Do not add to or modify this product in any way. Never use spare parts that are not recommended or supplied by BeSafe. Do not leave a child in the seat unattended at any time. -
Page 7: In The Event Of An Emergency
Never use this product if it has been in an accident, or if it has become badly worn. • IN THE EVENT OF AN EMERGENCY... In an emergency your child can be released quickly by pressing the red button on the car seat harness (see fastening the harness on page 8). -
Page 8: Notice
NOTICE 1. This is a “Universal” child restraint. It is approved to ECE Regulation 44. 03 for general use in vehicles and will fit most, but not all, car seats. 2. A correct fit is likely if the vehicle manufacturer has declared in the vehicle hand book that the vehicle is capable of accepting a “Universal”... -
Page 9: Checking The Vehicles Seat Belt
CHECKING THE VEHICLES SEAT BELT Your car seat must only be installed forward-facing using a three-point lap(1) and diagonal (2) seat belt in the front or rear passenger seats of the vehicle. -
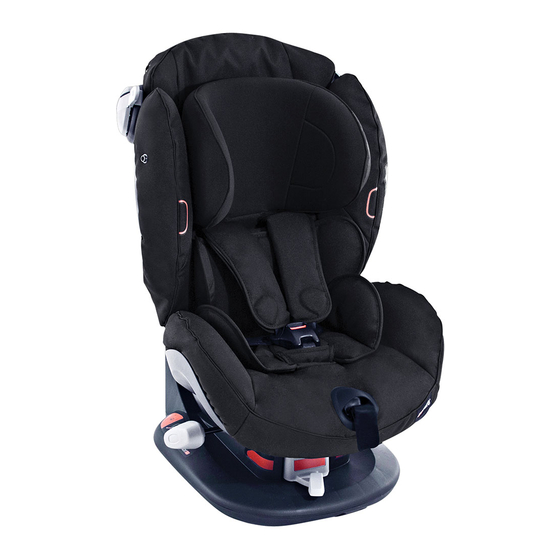
Page 10: Features
FEATURES Backrest Seat cover Shoulder pads Shoulder strap Harness release lever Harness buckle Crotch strap Seat Seat angle adjustment handl Harness Harness tensioning adjustment strap lever... - Page 11 Webbing Webbing lock lock Shoulder strap height adjuster Seat angle adjustment handle...
-
Page 12: Fastening The Harness
FASTENING THE HARNESS Your child seat has a simple-to-use harness buckle. Place your child in the seat and position the straps over the shoulders (1) and across the lap (2), position the buckle between the child’s legs (3). - Page 13 Fit the left and right harness connectors (4and 5) together and clip them into the buckle (6). A positive 'click’ is heard indicating that the locking mechanism is correctly secured. The child can be released from the seat by pushing the red button (7) on the front of the buckle downwards.
-
Page 14: Adjusting The Harness
ADJUSTING THE HARNESS TO TIGHTEN: Pull the shoulder straps upwards to tighten the lap straps (1). Pull the harness adjustment strap at the front of the seat outwards (2) until the harness is a comfortable but firm fit. - Page 15 TO LOOSEN: Push down the harness release lever, situated inside the plastic cover above the harness adjustment strap. Still holding the harness release lever down, place your hand behind the shoulder straps, below the chest pads and pull them towards you. Note: The crotch strap is a fixed length and cannot be adjusted Ensure that no part of the webbing has become twisted.
-
Page 16: Adjusting The Shoulder Strap Height
ADJUSTING THE SHOULDER STRAP HEIGHT Always check the height of the shoulder straps. Place the child into the car seat and fasten the harness. The shoulder straps MUST be in the position closest to the top of the child’s shoulder. How to change the position of the shoulder straps. - Page 17 Raise or lower the the shoulder strap height adjuster and slot it into the relevant hole in the backrest. Pull the webbing of the shoulder straps up or down until it is in the new position.
-
Page 18: Fitting The Car Seat, 9 - 18Kgs
FITTING THE CAR SEAT Suitable weight range: 9 to 18 kgs 9 months to 4 years approximately Place the car seat on the appropriate vehicle seat (with no air bag fitted). - Page 19 Open both of the webbing locks (1) by pushing them down and then backwards. Pull the webbing cover (2) down on the top of the car seats back rest.
- Page 20 FITTING THE CAR SEAT Pass the waist strap of the vehicles safety belt around the bottom of the car seat (not the base), see diagram. Fasten the vehicles safety belt. Ensure the safety belt has not become twisted.
- Page 21 Slot the diagonal section of the vehicles safety belt into the two webbing locks at the top of the car seat, ensure the safety belt running across the top of the seat is behind the webbing cover. Ensure the safety belt has not become twisted.
- Page 22 FITTING THE CAR SEAT Pull the diagonal section of the safety belt upwards to remove any slack, hold the safety belt in position. Push the car seat into the vehicles seat by placing your knee n it, and pull the remaining slack out of the safety belt and hold.
- Page 23 Pull the slack out of the end of the safety belt where it s attached to the cars body and fasten the remaining webbing lock. Before fastening the webbing lock ensure the safety belt has not become twisted.
- Page 24 FITTING THE CAR SEAT To finally remove any slack from the safety belt, push the harness tensioning lever anti-clockwise as far as it will go.
- Page 25 Fold the webbing cover back up so that it covers the safety belt webbing running across the top of the seat. The seat is now ready for use, place the child in the seat and fasten the safety harness as shown on pages 11 and 12.
-
Page 26: Adjusting The Backrest Angle
ADJUSTING THE ANGLE OF THE SEAT To adjust the angle of the seat, rotate the seat adjustment handles either clockwise or anti-clockwise until the desired angle is achieved. Always ensure the seat is correctly locked in position and the safety harness is still correctly tightened. -
Page 27: Removing The Fabric Cover
REMOVING THE FABRIC COVER To remove the cover: Gently pull the cover off the front of the seat, take care not to use excessive force and damage the cover. Slide the buckle through the cover. Slide the end of the safety harness off the attachment hooks in the corners of the seat base. -
Page 28: Final Check List
FINAL CHECK LIST Check that the car seats shoulder straps are in the correct position for your child, see page 15/16. Check that the vehicles safety belt is correctly fitted around the car seat. Check that the vehicles safety belt has not become twisted or trapped in any way. -
Page 29: After Sales Service
AFTER SALES SERVICE Guarantee All BeSafe products are carefully designed, manufactured and tested. All of our BeSafe child safety seats are tested periodically out of our continuous production in our test laboratory. Furthermore they are tested by independent test institutes. - Page 30 For more information: N-3535 Krøderen www.besafe.eu...
Need help?
Do you have a question about the iZi Comfort and is the answer not in the manual?
Questions and answers