Toshiba VIPedge IP5131-SDL User Manual
Ip telephone, messaging and call manager
Hide thumbs
Also See for VIPedge IP5131-SDL:
- Brochure (4 pages) ,
- Brochure (4 pages) ,
- Installation instructions manual (58 pages)

Related Manuals for Toshiba VIPedge IP5131-SDL


Summary of Contents for Toshiba VIPedge IP5131-SDL
- Page 1 TOSHIBA Telecommunication Systems Division IP Telephone, Messaging and Call Manager User Guide Title Page July 2012...
- Page 2 To view the latest version of this or other documents refer to the Toshiba FYI web site. Toshiba America Information Systems shall not be liable for any commercial losses, loss of revenues or...
- Page 3 In accordance with U.S. Copyright Law, a license may be required from the American Society of Composers, Authors and Publishers, or other similar organization, if radio or TV broadcasts are transmitted through the music-on-hold feature of this telecommunication system. Toshiba America Information Systems, Inc., strongly recommends not using radio or television broadcasts and hereby disclaims any liability arising out of the failure to obtain such a license.
- Page 4 WARRANTIES FOR NON-TOSHIBA BRANDED THIRD PARTY PRODUCTS A valuable element of Toshiba’s product strategy is to offer our customers a complete product portfolio. To provide this value to our customers at the most optimal prices, we offer both Toshiba-branded and third- party manufactured products that support our Toshiba VIPedge solution.
-
Page 5: Table Of Contents
Message Waiting..........................23 Responding to a Lit Msg LED ......................23 Turning On/Off MW LED on Another Extension ................23 LED Indicator Details .......................... 24 Chapter 3 – Feature Operations Account Codes............................ 25 Voluntary Account Codes ......................... 26 TOSHIBA VIPedge UG 07/12... - Page 6 To Request Notification of Non-receipt ....................55 To Schedule a Message for Future Delivery..................55 To Send a Message Using Directory Assistance ................56 To Send a Message to a Group Distribution ..................56 Delete a Message after Sending......................56 TOSHIBA VIPedge UG 07/12...
- Page 7 Contents Chapter 5 – Greetings Chapter 5 – Greetings Manage your Default Greeting ......................57 Activate your Extended Absence Greeting ..................57 Deactivate your Extended Absence Greeting ..................58 Manage your Busy Greeting ....................... 58 Manage your Custom Greetings ......................58 Change your Recorded Name ......................
- Page 8 Lookup in Outlook ...........................117 Minimize Phone Screen ........................118 Modify Call Information ........................118 Play WAV File ..........................119 Pop External Web Browser......................120 Pop Internal Web Browser ......................120 Popup Call Info Screen ........................121 Popup Phone Screen........................122 Run another Program ........................122 TOSHIBA VIPedge UG 07/12...
- Page 9 Contents Chapter 12 – Personal Call Handler Send DDE Msg ..........................123 Send Keystrokes to a Program .......................124 Set Phone Status Message ......................126 Set Phone Forwarding ........................127 System/PBX Command ........................128 Transfer Call ...........................129 Action Variables ..........................130 Call Variables..........................130 System Variables ..........................132 Exporting Actions ..........................133 Importing Actions ..........................133 Testing Actions ..........................134...
- Page 10 CF Internal and Line Calls ......................201 CF Direct Line Calls ........................201 To set up Station Call Forward .......................201 Speed Dial............................204 System Speed Dial .........................204 System Info ............................204 Display Advisory Messages ......................204 Voice Mail............................205 Account Code............................ 205 Preferences............................206 TOSHIBA VIPedge UG 07/12...
-
Page 11: Organization
Introduction This guide describes the Toshiba IP5000-series telephones and various other user operations for applications that are integrated with the VIPedge solution. Organization This guide is divided as follows: is an overview of the telephones supported • Chapter 1 – The Grand Tour by the VIPedge system. -
Page 12: Conventions
(Library CD-ROM), cross- references appear in blue hypertext. Some documents listed below may appear in different versions on the Toshiba Related FYI site or in print. To find the most current version, check the version/date in the Documents/Media Publication Information on the back of the document’s title page. -
Page 13: Chapter 1 - The Grand Tour
The full-duplex speakerphone on these telephones enables you to place and receive calls without lifting the handset. The IP5131-SDL and IP5631-SDL telephones are available with LCD backlight. However, the IP5531-SDL telephones do not have the backlight. To change the backlight settings, refer to Chapter –Feature... -
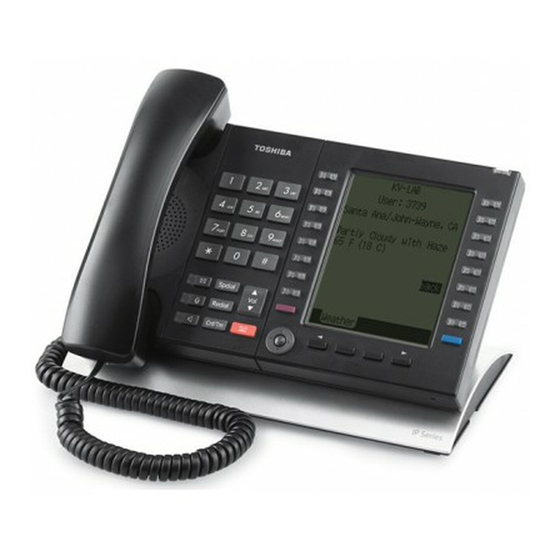
Page 14: Telephone Overview
C. Softkeys Hold Button D. Programmable Feature Buttons Microphone E. Message Waiting LED Button K. Tilt stand Microphone LED Button The fixed buttons on the dial pad help perform standard functions quickly and Fixed Buttons easily. TOSHIBA VIPedge UG 07/12... - Page 15 Microphone (Mic/Mute) button toggles between Mic and Mute. When Mic key is lit, Mute is disabled. When Mic is pressed again and light is off, Mute is enabled on the microphone in the telephone and the micro- phone in the handset. TOSHIBA VIPedge UG 07/12...
- Page 16 Hold Hold Press to place an internal or external call on Exclusive hold. If your telephone is programmed for Automatic Hold, existing calls are automatically placed on hold when you answer a call or make another call. TOSHIBA VIPedge UG 07/12...
-
Page 17: Programmable Feature Buttons
Browser Note: Toshiba’s IP5131-SDL with it’s large display screen also supports an HTML browser to allow navigation on the World Wide Web or a company’s intranet. The phone can have a homepage setup that allows navigation to begin just like a homepage in your internet browser. -
Page 18: Soft Keys
Navigation is as easy as highlighting a link and selecting it to move to the next webpage. All IP5131-SDL telephones come with the browser enabled. In order to access the browser, press the blue button on the bottom right-hand side of the phone;... -
Page 19: Chapter 2 - The Basics
The Basics This chapter reviews the basic operations of the IP5131-SDL, IP5531-SDL, and the IP5631-SDL telephones. The instructions apply to all telephone models, except when noted otherwise. Customizing Your Telephone Volume Control To adjust the Handset Volume Press the Vol to increase volume and Vol to decrease volume during the call. -
Page 20: Lcd Contrast
BL BRIGHT BL DIM Use the buttons in steps 2 and 3 on the 10 Note: button LCD Add-on Module. To change the LCD backlight brightness for IP5131-SDL or IP5631-SDL 1. Press Hold+3+6+9 (simultaneously). Others 2. Press the softkey. BL Bright 3. -
Page 21: Backlight On/Off
IP5000-series telephone. The Adjustment default is normal sensitivity. 1. Press 3+6+9+Hold (simultaneously). 2. Press 0. 3. Press Hold. 4. Press Programmable Feature Button 3 (FB3) to toggle On/Off. 5. FB3, LED On: Lower sensitivity TOSHIBA VIPedge UG 07/12... -
Page 22: Telephone Terminology
LED, and turns on the Spkr and Mic LED's. When Hot Dialing is not turned on the handset should be lifted or Sprk should be pressed in order to make a call. TOSHIBA VIPedge UG 07/12... -
Page 23: Making A Call
Dial = Cancel directory, get dial tone. 2. Choose the directory you wish to access and use the dial pad to enter the name. Notes: If a directory is not selected and a name is entered, all directories will be • searched. TOSHIBA VIPedge UG 07/12... - Page 24 BOB LAWVER BRAD FISHER BILL THOMAS BRIAN SMITH ONE TOUCH ONE TOUCH PICKUP ONE TOUCH CFAC ONE TOUCH ONE TOUCH Ext. 4227 ONE TOUCH NEXT BACK CNCL 9 Line LCD Display - Dial by Name Screen TOSHIBA VIPedge UG 07/12...
-
Page 25: Answering A Call
Perform the same steps you normally would to answer a call: press the Spkr button, the flashing DN button or lift the handset. Handsfree MIC setting needs to be enabled by your System Administrator. • TOSHIBA VIPedge UG 07/12... -
Page 26: On A Call
LED flashes. 1. While on a call, press Cnf/Trn. The call goes on hold. Consultation Hold 2. Dial another line. 3. Transfer the call or return to the held call by pressing its Line button. TOSHIBA VIPedge UG 07/12... -
Page 27: Message Waiting
Spkr or hang up to release your telephone. Your LCD shows the extension and “MW CANCEL.” ...or dial the extension that you set the Message LED on, then press 77. Then press Spkr or hang up to release your telephone. TOSHIBA VIPedge UG 07/12... -
Page 28: Led Indicator Details
AA) 10 pulses/second 2 pulses/second After disconnecting first call... 10 pulses/second steady Conference LEDs on the telephone flash at different speeds depending on the Note: function performed. Flash rates listed in the table above. TOSHIBA VIPedge UG 07/12... -
Page 29: Chapter 3 - Feature Operations
_______ _______ Voluntary Account Codes are optional. They can be entered during a call and are Voluntary Account used for tracking selected calls using Station Message Detail Report (SMDR) call Codes (Verified/Non- detail recording option. Verified) TOSHIBA VIPedge UG 07/12... -
Page 30: Voluntary Account Codes
2. Dial #46. LCD telephones prompt you to “ENTER ACCOUNT CODE NOW.” 3. Enter the account code digits. The prompt disappears upon entry of the first account code digit. After the account code is entered, the connection is restored and the LCD shows the time. TOSHIBA VIPedge UG 07/12... -
Page 31: Advisory Message
1. Go off-hook or press your extension button to hear the dial tone. Clear Registered Message 2. Press #412. 3. Go on-hook or press Spkr to release the line. 1. Login to the EMPA. Display Preset Advisory Messages 2. Select System Info then the Advisory Message tab. TOSHIBA VIPedge UG 07/12... -
Page 32: Alarm Notification
Automatic Callback. If the activator does not answer Automatic Callback for a predetermined time, Automatic Callback is automatically canceled. In either case, when Automatic Callback is completed or canceled, the ACB lamp button turns off. TOSHIBA VIPedge UG 07/12... -
Page 33: Call Forward
– Enables you Call Forward - Incoming Line Set for Another Station • to set forwarding of incoming line calls for another telephone within your telephone system. TOSHIBA VIPedge UG 07/12... - Page 34 Users must enter the Call Forward pass code for the station to be forwarded. To program call forward button destination using the EMPA. Login to your EMPA and select Call Forward to turn selections on and off. Select Home to program the button. TOSHIBA VIPedge UG 07/12...
-
Page 35: Call History
▲ ▼ Press Vol + for the next record; press Vol + for the previous • record. To view the call date, time, and status, press SK2 (press again to toggle • to call name/number). TOSHIBA VIPedge UG 07/12... -
Page 36: Call Park
2. Enter the Orbit Number where the call is parked or # for the extension from which you are calling. You cannot use to retrieve a parked call. The extension LED flashes at the in-use rate when the call is retrieved. TOSHIBA VIPedge UG 07/12... -
Page 37: Call Pickup
(on the bottom left-hand side) of a multi-button telephone. If more than one call is on hold, the call on the telephone’s lowest button • number is picked up. Ringing calls are picked up over held calls as a priority. • TOSHIBA VIPedge UG 07/12... -
Page 38: Call Transfer
2. Enter #407. 3. Enter the VM mailbox number (usually the same as the extension number) + #. 4. Hang up and the caller is connected to the VM mailbox. This feature does a blind transfer to VM. TOSHIBA VIPedge UG 07/12... -
Page 39: Call Waiting
Information 2. Use the soft keys (Next, Prev, Call or Exit). Caller ID is displayed when a call is first answered and displays for Note: the first 15 seconds of the telephone call. TOSHIBA VIPedge UG 07/12... -
Page 40: Conference Call
Only the Master can control the VM with Soft Keys. 1. While talking on an outside call, press Cnf/Trn. You hear a dial tone. The Supervising a Tandem extension LED flashes (conference rate). Call 2. Dial an outside telephone number. TOSHIBA VIPedge UG 07/12... - Page 41 Split from the conference) will be disconnected (Dropped) and conference you will rejoin the conference. If you are in a three-way conference and Split with one of the parties, the remaining party will essentially be “on hold” until you return to the conference. TOSHIBA VIPedge UG 07/12...
-
Page 42: Do Not Disturb
Emergency Call depends on off-hook preference set up for your telephone. Check with your System Administrator for the Access Code because Note: this code may be different from the one used to get an outside line. TOSHIBA VIPedge UG 07/12... -
Page 43: Emergency Monitoring Station
This is a notification to say that a call has been missed and on Another Extension the calling party would like to be called back. By sending a message to another extension you turn on their Msg LED. TOSHIBA VIPedge UG 07/12... -
Page 44: Microphone Cut-Off
– Dial an extension. When you hear a busy tone press 5 and, Manual Make an OCA Call • after one long tone, you can talk through the speaker of the destination telephone. The person you are calling has answering options as described below. TOSHIBA VIPedge UG 07/12... - Page 45 IP5000-series telephones can receive Speaker OCA which enables stations Speaker Off-hook Call to receive internal calls over their speaker while on another call using the Announce handset. TOSHIBA VIPedge UG 07/12...
-
Page 46: Override
The called parties may hear an optional tone signal prior to your entering the conversation. Your LCD displays EXEC OVR DENY if the station you called denies Executive Override. If you do not have Override privileges, you will camp on. TOSHIBA VIPedge UG 07/12... -
Page 47: Paging
2. Make your announcement, then hang up. To make a Group Page Press Group Page and enter the Group number (01~24) • — or — Press extension + #31 and enter the zone number. • TOSHIBA VIPedge UG 07/12... -
Page 48: Privacy
The outside line flashes at all appearances. When another station user enters the outside line call by pressing a common outside Line, the Privacy Release LED turns Off. To add a third station, press Privacy Release again; the process • repeats. TOSHIBA VIPedge UG 07/12... -
Page 49: Redial
= 200~999 System SD numbers a. Stations must be assigned/enabled Speed Dial capabilities in system programming. b. If your telephone does not have a Spdial button, press the * button, then dial the three digit Speed Dial bin number (nnn). TOSHIBA VIPedge UG 07/12... -
Page 50: Time And Date Setting (Local)
To change the Date From the IP telephone, dial #653 and enter YYMMDD# • Example: To set the date to March 12, 2008. YY = Year, example 08 MM = Month, example 03 DD = Day, example 12 TOSHIBA VIPedge UG 07/12... -
Page 51: Tone First / Voice First Signalling
This feature distributes incoming calls to available agents. Agents must be logged into the group to receive UCD calls. The following illustration shows the typical call flow for this service. 1. Agent logs into the UCD group. The call is received from PSTN or extension. TOSHIBA VIPedge UG 07/12... -
Page 52: Login/Logout
Login - from Agent Station #6062 Logout - from Agent Station #6161 Login - Agent Station (DN) from another station #6162 Logout – Agent Station (DN) from another sta- tion where DN = the Directory number of the agent station. TOSHIBA VIPedge UG 07/12... -
Page 53: Chapter 4 - Messaging Features
Once you have completed this set up process, the system notifies you there are any new messages in your mailbox. To access the New User Setup at any time in the future, press 7 from the main system options menu. TOSHIBA VIPedge UG 07/12... -
Page 54: Check New Messages
(in increments of five seconds or as programmed by the system administrator). You can also press 5 to pause the message and 5 again to resume it (it automatically resumes after 60 seconds or as programmed by the administrator). TOSHIBA VIPedge UG 07/12... -
Page 55: Volume /Speed Control
This option will ring their phone rather than send a message to their mailbox. 1. Press 7 while listening to a message or after the message has finished playing. 2. You now have a few options: To call the number and delete the message, press 3 • TOSHIBA VIPedge UG 07/12... -
Page 56: Redirect A Message
You can send the message with normal delivery, return receipt and/or priority. to continue, 2 to send to additional 5. The message is now sent. Press destinations, or 7 to additional destinations with the same comment. TOSHIBA VIPedge UG 07/12... -
Page 57: Erase / Delete And Retrieve A Deleted Message
2. From the subscriber’s menu, press 2 to record a message. 3. Press any key when you are done recording. Press 2 to review your message before sending • Press 3 to Re-record your message • • Press to cancel without sending TOSHIBA VIPedge UG 07/12... -
Page 58: To Mark A Message As Confidential
When you send a message as priority, you will also be provided with the option to send the message with return receipt and/or schedule it for future delivery. See this chapter for more information on these options and follow the prompts in the system to use these features. TOSHIBA VIPedge UG 07/12... -
Page 59: To Mark A Message As Priority And Confidential
1. Call the voice messaging system and select 2 from the subscriber’s menu to record a message. Press any key when you are done recording. 2. Select your delivery option. 3. Select the mailbox destination and confirm. 4. Press 2 for future delivery. TOSHIBA VIPedge UG 07/12... -
Page 60: To Send A Message Using Directory Assistance
2. Enter in the mailbox number you wish to check and the system will play the first unheard message you left for the recipient. 3. To delete the message press 3, to replay the message press 1, to hear the next message press 2. TOSHIBA VIPedge UG 07/12... -
Page 61: Manage Your Default Greeting
Extended Absence Greeting is activated or deactivated. 2. If an Extended Absence greeting has already been recorded, you can press 1 to activate the greeting. 3. To listen to the greeting you have recorded press 2, to record the greeting press 3. TOSHIBA VIPedge UG 07/12... -
Page 62: Deactivate Your Extended Absence Greeting
2. To listen to your name before saving, press 1. 3. To record your name, press 2. 4. To delete your name, press 3. 5. To save your recorded name simply hang up or press to exit. TOSHIBA VIPedge UG 07/12... -
Page 63: Chapter 6 - Other Messaging Applications
2. Enter the list number you wish to make changes to, followed by # 3. To add a new member, press 2 and the new mailbox number. The system will confirm the addition. 4. Continue entering any additional members. Press when finished. TOSHIBA VIPedge UG 07/12... -
Page 64: Delete Members From A Private Group Distribution List
# # for a public distribution list. 3. Enter the group number you wish to use followed by a # 4. Press 1 to confirm, or 2 to change your entry. TOSHIBA VIPedge UG 07/12... -
Page 65: Personal Options
2. To activate or deactivate a specific schedule line, press 2. 3. Enter the schedule line number 4. The system informs you if this schedule line is activated or deactivated. To change, press 1. TOSHIBA VIPedge UG 07/12... -
Page 66: Set A Wake Up Call
1. Call the voice messaging system and select 3 4 2 2. The system will ask you to press # to confirm deletion If you delete your mailbox password your mailbox will not be Important! password-protected. TOSHIBA VIPedge UG 07/12... -
Page 67: Personal Assistant
Button LED Description Follow Me feature is not activated. The call should ring the default station (usually the user’s desktop phone). Follow Me feature is activated, and the call will follow the Follow Me personal schedule. TOSHIBA VIPedge UG 07/12... -
Page 68: Setting Up Follow Me
2. Press # to accept the call. 3. At any time during the conversation, press # again to trigger the call options. You can press 0 for the operator or # and another extension number, then hang up. TOSHIBA VIPedge UG 07/12... -
Page 69: Setting Up Call Screening
The subject line of voice and fax messages will include caller ID; voice messages will include the duration of voicemail (in seconds), while faxes will show fax sender and number of pages. TOSHIBA VIPedge UG 07/12... -
Page 70: Access Your Voicemails Through Email
Click the “Link to message” to play your message using the telephone. The following options display. Click on the appropriate button. TOSHIBA VIPedge UG 07/12... -
Page 71: Chapter 7 - Call Manager Basics
It can easily interface with many popular programs (like Microsoft Outlook, • Goldmine, ACT, etc.). This allows you to dial from and “screen-pop” into these programs or the Internet / Intranet. TOSHIBA VIPedge UG 07/12... -
Page 72: The Main Screen
Hides Call Manager into the system tray. Double- click on the Call Manager icon (shown right) in the system tray to return the Call Manager to the screen. Minimize Button Used to change the phone to/from its “Compact” view and its “Expanded” view. TOSHIBA VIPedge UG 07/12... - Page 73 Call Forward Key and Displays the current “PBX call forwarding” status for your Indicator phone. Hover the mouse over this area to see the entire FWD status. Click to change your PBX forwarding status and destination. TOSHIBA VIPedge UG 07/12...
- Page 74 Call Manager. The list of Shortcut keys can be found using the menu selection Setup>Shortcut Keys. Note: The F1 key is the HELP key a can be pressed at any time to access the Help document. TOSHIBA VIPedge UG 07/12...
-
Page 75: Expanded View
Programmable Buttons – A number of keys can be easily configured by the • user as “Feature” keys, “Speed Dial” keys, “Call” keys, “User Action” keys, etc. TOSHIBA VIPedge UG 07/12... -
Page 76: Screen Docked Views
The Main menu screen menu item expands into an ability to Change the Login settings, an ability to reset the phone to its default settings, access help, and check the Call Manager version and serial number. TOSHIBA VIPedge UG 07/12... -
Page 77: Shortcuts
Preferences > Hot Keys. When a call rings the phone, the alert window pops up, and the user can answer Call Alert the call from the pop up window or the open the Call Manager main window. TOSHIBA VIPedge UG 07/12... -
Page 78: The Side Window Screen
Buttons Mode provides 25 user-programmable buttons for the user. User Programmable Buttons – A number of keys can be easily configured • by the user as Feature keys, Speed Dial keys, Call keys, User Action keys, etc. TOSHIBA VIPedge UG 07/12... -
Page 79: Companion Application Windows
Screen Colors The Call Manager has three color schemes. To change the color of your display, click the Color drop down and select either Blue, Silver or Black. Color icon TOSHIBA VIPedge UG 07/12... - Page 80 This page is intentionally left blank.
-
Page 81: Chapter 8 - Using Call Manager Features
Using Call Manager Dialpad 1. Click the dialpad button to expose the dialpad. 2. Enter the number to be dialed including a trunk access code; the call will proceed automatically once a valid number is entered. TOSHIBA VIPedge UG 07/12... -
Page 82: Answering Calls
While talking on an existing call and another call rings in (not marked • “Campon”), click the Answer button or double-click on the ringing call in the Calls View Window TOSHIBA VIPedge UG 07/12... -
Page 83: Hangup
Using Drag and Drop While talking with a caller, use the mouse to drag and drop the call from the • Calls Window onto a button for immediate transfer to another station. TOSHIBA VIPedge UG 07/12... -
Page 84: Call Forwarding
3. Enter a Destination for the forwarded calls. 4. Click Save to compete the setting. To Clear Call Forwarding 1. Click the. button 2. Choose <None> from the pull-down listing. 3. Click Save to remove the previous setting. TOSHIBA VIPedge UG 07/12... -
Page 85: Status Messages And Dnd
5. Click the Save button when done. Turning Off DND or Message Only 1. Click the button to bring up the or Status Message window. 2. Click the Msg Off radio button to remove the Status Message. TOSHIBA VIPedge UG 07/12... -
Page 86: Viewing Extra Call Information
Customer number to look up the status of an order. Clicking Copy and switching to the other program and pasting into the appropriate field allows for a fast lookup. TOSHIBA VIPedge UG 07/12... -
Page 87: Chapter 9 - Preferences
To access Preferences click on Preferences tab. The settings in Preferences are divided between four tabs each defined below. Depending on your configuration you may not be able to change the Note: Preferences, in which case you should check with your System Administrator. TOSHIBA VIPedge UG 07/12... -
Page 88: General
When checked, KeyTips will be disabled, allowing you to use the ALT key without them popping up. Enable Call Logging – To have Call Manager collect and display Call Call History • History, Call Logging must be enabled. TOSHIBA VIPedge UG 07/12... - Page 89 Static Information Fields – These fields will have a fixed area within the Call • Notes window for the information to be displayed. You have the ability to Add, Change an existing or Remove any field. TOSHIBA VIPedge UG 07/12...
- Page 90 Preferences screen with the following options: Enable Outlook Integration – This main option enables/disables the • Outlook Integration features. This must be checked for any Outlook features to work. If you're not using Outlook, then this should be disabled. TOSHIBA VIPedge UG 07/12...
- Page 91 Outlook Phone Link – With the Outlook Link application installed, click the • Setup button to access the Setup Configuration for Outlook Link. For details on setting up Outlook Link see the Application Note “Screen Pop Outlook”. TOSHIBA VIPedge UG 07/12...
-
Page 92: Dialing Tab
# is assumed and automatically inserted for the first digit. Home Area Code – Your local area code should be defined here. This is • used only when you choose to use the Local Dial Plan. TOSHIBA VIPedge UG 07/12... - Page 93 Optionally, the label can be changed to meet your needs. Call Results – Enable the Action button and select the Action to be performed • when the button is pressed. Optionally, the label can be changed to meet your needs. TOSHIBA VIPedge UG 07/12...
- Page 94 If you chose to use the Local Dialing Plan, you need to create a dialing plan. If you chose SERVER Dial Plan, then you should check with your System Administrator if you have questions. TOSHIBA VIPedge UG 07/12...
- Page 95 Add+1 – Check the box if you need to dial a leading 1 before the number for • calls within your Home Area Code. Dial Area Code Plus the Number – Check the box when the home area code • is also to be dialed. TOSHIBA VIPedge UG 07/12...
- Page 96 Dialing plans can become complex. Use these boxes to enter different Test a Phone Number telephone numbers and check to see the number that will be dialed. The dialed number should be identical to what you need to dial when using your phone. TOSHIBA VIPedge UG 07/12...
-
Page 97: Docking Tab
Once you’ve changed the screen-docking settings, the new settings will Note: not be used until the Call Manager is ‘undocked’ (if it’s already screen- docked) and then re-docked. Docked profile – Regular provides the original docking mode. Slim provides • one-line docking mode. TOSHIBA VIPedge UG 07/12... -
Page 98: Advanced Tab
Technical Support for debugging problems encountered. The TAPI Service Provider should not be changed unless your System Administrator has instructed you to update the settings for finding Net Server for your application. TOSHIBA VIPedge UG 07/12... - Page 99 Hostname – Enter the name of the Server PC where Net Server resides. • Use Remote Access Port – Check this box only when connecting remotely through the Internet. When connected locally through your LAN, do not check this box. TOSHIBA VIPedge UG 07/12...
- Page 100 Options – Clicking the Options button opens a screen to provide options • for how the files are to be sent. Uncheck "Send Directly to Toshiba Support Site", and the files can be zipped into smaller files, saved on your PC in your Local Settings folder, typically “C:\Documents and...
-
Page 101: Setting Up Hot Key Dialing & Popup
Answer – Answer the ringing call. • • Hold – Place the active call on hold. • Hang Up – Disconnect the active call. • Expand / Contact – Toggle Call Manager between the compact mode and regular mode. TOSHIBA VIPedge UG 07/12... - Page 102 Many applications use various “hot keys” or keyboard shortcuts. Note: These keys are defined in advanced settings that your administrator can change if you encounter a conflict with another application. See “Call Manager System Administration Manual” for details. TOSHIBA VIPedge UG 07/12...
-
Page 103: Skin Editor
PNG, BMP, JPEG, GIF. Application Menu – change the application menu logo to another image file. It • supports similar file formats as those of Title Bar. Bold Font – select to change the menu font to Bold. • TOSHIBA VIPedge UG 07/12... -
Page 104: Skins Files
With the Skin loaded to be deleted, click the Delete icon. Click Yes in the To Delete a Skin dialog box to confirm the action. The system should have at least one skin; deleting the last skin will be rejected. TOSHIBA VIPedge UG 07/12... -
Page 105: The Skin Editor
Right-click on the LCD area to bring up the menu options: Change background color • Change Top Line Text color • Change High Priority Text Color • Change Medium Priority Text Color • Change Low Priority Text Color • Change Font • Reset • TOSHIBA VIPedge UG 07/12... -
Page 106: Insert Your Logo Into The Skin
To send the skin using email, click on the email Email skins skin button (shown right). A Microsoft Outlook message dialog box displays (shown below). Email skins Enter the appropriate address(s) to send the skin. Microsoft Outlook is required when using this function. TOSHIBA VIPedge UG 07/12... -
Page 107: Tab Settings
Update Tab tooltip of each tab in your tab view. The 'Name' or 'Tooltip' can be changed by clicking in the cell and typing.Use the Up and Down buttons to move the tabs appropriately, then click OK. TOSHIBA VIPedge UG 07/12... -
Page 108: Delete Tab
Browser tab the browsing history may be lost, since deleting a web browser tab and adding a new one always starts on a new blank page. Click the revert button to bring all the companion applications back to the Revert main window as tabs. TOSHIBA VIPedge UG 07/12... -
Page 109: Chapter 10 -Buttons
/ undock button on the left. You can create tabs of more buttons. There are 8 banks with a total of up to 64 buttons each. Each Buttons application can be assigned to one of these TOSHIBA VIPedge UG 07/12... -
Page 110: User Programmable Keys
& drop to new location. Keys will copy within the same window and between the Side window and the Main Screen. Keys on the Main Screen or the Side window will not copy to keys on the Extra Buttons windows or vice versa. TOSHIBA VIPedge UG 07/12... -
Page 111: To Change Key
Default Colors – Pressing this button will reset the colors of the key and text to • the default for the skin used. Action – Choose an action to be performed. This selection will open additional • settings corresponding to that action. See the settings below for the different possible actions. TOSHIBA VIPedge UG 07/12... - Page 112 LCD of the pager (i.e. “5551234x4969040#”), or (3) dialing a long distance access code (i.e. “8884083279 x17135551234”). Note: You can use more than one “X” in the phone number and it will wait after each “X” (i.e. “4969040 x8 x*1009,1234”). TOSHIBA VIPedge UG 07/12...
- Page 113 Dial xxxxxx – xxxx= the number to Start Record dial. Hangup – Hangup current call. Stop Record Hold – Hold current call. Set Bookmark “Msg” * An enhanced feature is available in User Defined Actions TOSHIBA VIPedge UG 07/12...
- Page 114 Select the appropriate action or button to add, copy, edit, test, or delete action. The appropriate action screen displays. Click Save and then click Done. Refer to Chapter 11 – Actions for more information on editing actions. TOSHIBA VIPedge UG 07/12...
- Page 115 You can then change the colors and edit the name for easy identification. Web keys allow you to program an Internet (or intranet) URL into the key. Press Web Keys the key to open the default web browser to the specified web page. TOSHIBA VIPedge UG 07/12...
- Page 116 IPT Fixed Key Fix keys on the phone such as Message Waiting, Microphone, Speaker, Speed Dial, Redial, Conference/Transfer, Hold, and SHIFT key. Please note that Shift key must be disabled for the phone. TOSHIBA VIPedge UG 07/12...
- Page 117 Drag a Contact from Microsoft Outlook to a key to create a Speed Dial • button Drag a call from the Call History to create a Speed Dial button • Drag an entry from the Contacts application to create a Speed Dial button • TOSHIBA VIPedge UG 07/12...
- Page 118 This page is intentionally left blank.
-
Page 119: Chapter 11 -Actions
The left column shows a listing of currently defined actions that you can Add, Copy, Edit/Test or Delete using the menu. When an action is selected, its contents are shown and can be edited. When actions are copied, created, or edited, those TOSHIBA VIPedge UG 06/12... -
Page 120: Attach Account Code
(typically the 'Main Listed Phone #') before they press SAVE to export the information to the centralized database. Path & Filename – Enter the complete path name for writing the exported • file or browse to find the path. TOSHIBA VIPedge UG 06/12... -
Page 121: Log Info To File
12/02/04 16:28 In 1027 949-853-3351 Katz Yamag Yes This action will lookup the phone number in Microsoft Outlook and then selectively Lookup in Outlook opens a contact, creates a new contact, or adds a journal entry. TOSHIBA VIPedge UG 06/12... -
Page 122: Minimize Phone Screen
Name – Enter a name for the caller to be used as the Caller ID name. • This replaces an existing name or adds a name, if blank. Account # – Enter an account code for the call. This replaces an existing • number or adds a number, if blank. TOSHIBA VIPedge UG 06/12... -
Page 123: Play Wav File
This action will play a specified WAV file on the PC sound card. Play WAV File Path & Filename – Enter the complete path name for the WAV file to be • played or browse to find the path of the file. TOSHIBA VIPedge UG 06/12... -
Page 124: Pop External Web Browser
Another use may be to have several “Personal Directories” where the 8 button limit may not allow access to more directories. Assigning a programmable button can allow opening these personal directories using one-click access. TOSHIBA VIPedge UG 06/12... -
Page 125: Popup Call Info Screen
Extra Call Information window Popup Info Screen Type – Choose either Standard Info or Extra Info. When • Extra Info is selected, choose when the popup will occur: Always, Any Info Attached, or Any Priority Info. TOSHIBA VIPedge UG 06/12... -
Page 126: Popup Phone Screen
Parameters – Enter any additional parameters that may be accepted as • part of the command line to startup the program. The example above uses Outlook to pop open a “sticky note” with data and time recorded. TOSHIBA VIPedge UG 06/12... -
Page 127: Send Dde Msg
Run Program and Program EXE – If the target program is NOT found to be • running, you can have the action attempt to automatically start the program. TOSHIBA VIPedge UG 06/12... -
Page 128: Send Keystrokes To A Program
2. Key Strokes: To restore Notepad (Alt Sp R): Key Strokes:= %%{ }R and to move to the end of the file (Control+End): append to Key Strokes: ^{END} 3. In Program EXE: Enter program name and file name to open “Notepad.exe /calls.txt”. TOSHIBA VIPedge UG 06/12... - Page 129 {F7} Help {HELP} {F8} Home {HOME} {F9} {INS} {F10} Left Arrow {LEFT} {F11} Num Lock {NUMLOCK} {F12} Page Down {PGDN} {F13} Page Up {PGUP} {F14} Right Arrow {RIGHT} {F15} Scroll Lock {SCROLLLOCK} {F16} Spacebar Control Shift TOSHIBA VIPedge UG 06/12...
-
Page 130: Set Phone Status Message
Custom 2nd Line – Optionally enter a second line to display on the lower • line of the phone’s display message. Action Variables may be used including the time variable plus ‘x’ Note: minutes to set a current time plus 60 minutes in the example above. TOSHIBA VIPedge UG 06/12... -
Page 131: Set Phone Forwarding
(Immediate, Busy, No Answer, Busy/No Answer, or Off) and the destination. Choose Forwarding – Select from the drop down list the forwarding action to • use. Destination – Define the number for the destination of the forwarding. This is • left blank when using Forwarding Off. TOSHIBA VIPedge UG 06/12... -
Page 132: System/Pbx Command
Recommend using Modify Call Information or “Field”, “Value Attach Acct Code action. TRANSFER Recommend using Transfer Call action. Recording Option When Recording is active on Call Manager. RECORD RECORDBKMAKR Substitute your bookmark text for “Text” “Text RECORDSTOP SET WORKUNITS TOSHIBA VIPedge UG 06/12... -
Page 133: Transfer Call
Voice mailbox, or to an outside phone number (i.e. 9,4969040). Transfer To – Enter an extension number or outside number to be called. • Transfer Mbox – Enter a mailbox number if going to a Voice Mail number. • TOSHIBA VIPedge UG 06/12... -
Page 134: Action Variables
Action Variables replaces the variable token code with the appropriate value when the action executes. For example, %P becomes ‘4804969040’ when you receive a call from Toshiba. Refer to the table below for call variables and their values. Call Variables... - Page 135 ‘x’ or leftmost characters. Insert –x to restrict the variable value to the last ‘x’ or rightmost characters. For example, to pass the first 8 characters of the Calling Party Name, enter: %+8N. To send the last 4 digits of the Calling Phone Number, enter: %-4P. TOSHIBA VIPedge UG 06/12...
-
Page 136: System Variables
LUNCH message and a second line of UNTIL &U+’30’. If this action is used at 11:55 AM, then the resulting message on Call Manager is OUT TO LUNCH UNTIL 12:25 PM. Examples for Text Reader/ Announcer: Speak Reminder: SPEAK,"Reminder,%OR("SUBJ"),Starting %OR("DIFF")",&V1,&V2 Speak Appointment: SPEAK,"Appointment,%OC("SUBJ"),Starting Now",&V1,&V2 Announce Call: CA,%T,&F,"%N",%H,&V1,&V2 TOSHIBA VIPedge UG 06/12... -
Page 137: Exporting Actions
This file is exported into the user’s application data folder (typically, “C:\Documents and Settings\<user name>\Local Settings\Application Data\Toshiba\Strata Call Manager”). In order to identify the file more easily you may want to user Explorer to rename that file to something more appropriate (i.e. -
Page 138: Testing Actions
Handler you may want to open the Main Menu Icon > Setup > Advanced > Show Events screen (see your System Administrator if you do not have the Advance menu item) to see what is actually occurring when that action is being used. TOSHIBA VIPedge UG 06/12... -
Page 139: Chapter 12 -Personal Call Handler
Then you can create a Personal Call Handling Rule and choose which event will trigger the action(s) and then refine this by setting the conditions for when the trigger will occur. TOSHIBA VIPedge UG 07/12... -
Page 140: Creating Personal Call Handling Rules
1. Click the Personal Call Handler icon > Personal Call Handler tab. The following screen displays. To Delete a Rule Highlight the rule to delete and click Delete. • To Add or Change a Call Handling Rule 1. Click the Add button TOSHIBA VIPedge UG 07/12... - Page 141 Account Code – Select the account code type to be used. For the last two options, enter a specific number in the box including wildcard characters when needed. See Like Matches and Unlike Matches for use of wildcards. TOSHIBA VIPedge UG 07/12...
- Page 142 Account Code – Select the account code type to be used. For the last two options, enter a specific number in the box including wildcard characters when needed. See Like Matches and Unlike Matches for use of wildcards. TOSHIBA VIPedge UG 07/12...
- Page 143 Phone Software Startup – Happens whenever the Call Manager software • starts up and is in full operation with the PBX. Phone SoftwareShutdown – Happens whenever Call Manager software is • shutdown (using a normal Exit). TOSHIBA VIPedge UG 07/12...
- Page 144 Account Code – Select the account code type to be used. For the last two options, enter a specific number in the box including wildcard characters when needed. See Like Matches and Unlike Matches for use of wildcards. TOSHIBA VIPedge UG 07/12...
- Page 145 For the item with a message to match, enter the beginning characters of the message. See Like Matches and Unlike Matches for use of wildcards. • Affected Phone – Select whether this rule will be based upon My Phone or My Secondary Extension. TOSHIBA VIPedge UG 07/12...
- Page 146 See Like Matches and Unlike Matches for use of wildcards. Outlook Calendar may also send a ‘Tentative’ status setting which is Note: treated using the ‘Any’ setting. TOSHIBA VIPedge UG 07/12...
-
Page 147: Like Matches
Example 2: To trigger on any caller from your local office code 496: Set the Specific Number on Caller ID Number to: 602496? Example 3: To trigger on any caller with a caller ID name starting with C: Set the Specific Name on Caller ID name to: C*. TOSHIBA VIPedge UG 07/12... -
Page 148: Unlike Matches
To Export Call Handler Rule – Click the Export Rule to create a.RUI file in the PC user’s “C:Document and Settings\Application Data\Toshiba\Strata Call Manager” folder. Each rule created can be saved as a file for backup purposes and copying to another PC to allow the same rule to be used by other users. -
Page 149: Export Rules
(i.e. 2.ACI). The file is exported into the user’s application data folder (typically, “C:\Documents and Settings\<user name>\Application Data\Toshiba\Strata Call Manager”). In order to identify the file more easily you may then want to user Explorer to rename that file to something more appropriate (i.e. PLAYBELL.RUI). When renaming a rule file always limit the file name to 8 characters prior to the .RUI extension. - Page 150 This page is intentionally left blank.
-
Page 151: Chapter 13 -Using Microsoft Outlook
"When Ringing..." trigger use Pop User Options instead of the Open Contact or Add Contact or Add Journal options. Now, when a call is ringing on your phone, a small "User Options" window will pop up showing TOSHIBA VIPedge UG 07/12... -
Page 152: Integrating With Outlook Calendar
Appointment as part of the message. On the DSS key, the first line and DSS Message second line are appended to each other, thus the preset Status Message can be modified to become something very simple to allow for the Subject to become the predominant part of the message. TOSHIBA VIPedge UG 07/12... - Page 153 VIPedge Using Microsoft Outlook The second Action will clear the message when the appoinment ending time is reached. TOSHIBA VIPedge UG 07/12...
-
Page 154: Create Personal Call Handler Rules
Calendar Status including ‘Free’ and the clear command would be followed by a command to set the message, thus the message would never clear. The final set of PCH rules should be in the order of items 3 and 4 in the PCH Rules screen. TOSHIBA VIPedge UG 07/12... -
Page 155: Chapter 14 -Using Companion Applications
The default search method is “Starts with”, where only entries starting with the same letters as the search criteria will be shown. Other search methods are available, and can be accessed with the button to the left of the search area. Search criteria button Search criteria TOSHIBA VIPedge UG 07/12... -
Page 156: Directory
Enable the Hide Names option • to enable the filter. To Add a Filter Entry – Place • the cursor in the text box. Type in the characters to be filtered and press Enter or click the Add button. TOSHIBA VIPedge UG 07/12... -
Page 157: Personal / Speed Dial Directory
Groups” is personal and you can create their own. “System Groups” applies to all and only a user with “Admin” right can create and change the group entry. To manage the Presence Viewer 1. Click the Group tab assigned for the Presence Viewer. TOSHIBA VIPedge UG 07/12... - Page 158 2. Right click on an entry for options to either call, chat, broadcast, edit or delete group. 3. When you select Edit group, the following dialog box displays. Use the double arrow buttons to add or remove users from the group (shown right). To use view Presence Status TOSHIBA VIPedge UG 07/12...
-
Page 159: History
(Green = answered, pink = not answered). • Year Day Time – Shows the date and time that the call completed (not started). This column also includes the day-of-week for the first call of each day. TOSHIBA VIPedge UG 07/12... - Page 160 Additional Options – Right-click on the entry to access a menu of other • functions: • Call Now – Dial the phone number using Call Manager. • View Info – Provides a read-only view of all of the information about the call, including the “Notes.” TOSHIBA VIPedge UG 07/12...
- Page 161 Lookup in Outlook – Look up the telephone number in Microsoft Outlook and open any matching Contact. • Listen to Call – When the Tracer Integration is provided, this button provides a link to Replay to allow the recording to be played back. TOSHIBA VIPedge UG 07/12...
- Page 162 Account Codes – Choose “All” for calls with any or no account code. Use the “Starting with” option to limit the search to calls matching or starting with a specific account code. For example, ‘123’ returns calls with account codes 123 and 123xxx. TOSHIBA VIPedge UG 07/12...
- Page 163 Clear Filters Button – Resets all filters to ‘Off”. Press Search to re-load all Call • History record. Or, select new filter settings and start a new Filter search. Cancel Button – Closes the filters screen with no update to the “Calls • Display”. TOSHIBA VIPedge UG 07/12...
-
Page 164: Chat
Using Chat Messaging communicate with that person, how to answer an incoming Chat communication, and how to send Broadcast messages. To Access Chat – Click the Chat tab on Call Manager. The following • screen will display. TOSHIBA VIPedge UG 07/12... - Page 165 Preference Settings. 2. You must respond within 30 seconds to this message or the caller will get a message “User did not respond. However, the 30 seconds setting is configurable. TOSHIBA VIPedge UG 07/12...
- Page 166 From the Edit menu, click either Copy or Copy All to copy the highlighted or all of the conversation to the Windows Clipboard for pasting into another application. To End the Conversation • Press the Close button to end the conversation. TOSHIBA VIPedge UG 07/12...
-
Page 167: To Send A Broadcast Message
1. To initiate a broadcast message, double click on any group name in the Chat Window and click on the Broadcast icon or Right click on any group name or select Broadcast. 2. Enter a message into the Message box. TOSHIBA VIPedge UG 07/12... - Page 168 NoteBe aware that when using the "Chat Back" option sending to a group of people, all recipients will have the Chat back option and if everyone responds, it could result in a large number of simultaneous chat calls back to you. 5. Click Send. TOSHIBA VIPedge UG 07/12...
-
Page 169: Chat Feature Operation
Available” along with any return message they provided. If they didn’t setup a return message, the text “Do Not Disturb” will be shown. To Clear Do Not Disturb To Clear the DND Status – Clear the DND checkbox.. • TOSHIBA VIPedge UG 07/12... -
Page 170: Response Buttons
Send Text Message Immediately – Check the box if you are sending text and you would like to send it immediately, without clicking on the Send button. • Click OK to save the changes you have made to your Response Button. TOSHIBA VIPedge UG 07/12... -
Page 171: Personal Groups
To Delete A Personal Group To delete a group, right-click the group in the Chat List and choose the Delete Group option. A confirmation box will appear and needs to be affirmed before the group is actually deleted. TOSHIBA VIPedge UG 07/12... -
Page 172: Whiteboard Operation
Print - prints the whiteboard • Exit. • Similar to the above, you can use the Edit menu to cut, copy, edit, paste, delete, clear and clear highlighting. The View menu contains Chat Box, Canned Replies, and Whiteboard. TOSHIBA VIPedge UG 07/12... -
Page 173: Whiteboards Setup
The screen opens to a “Save” window to allow you to choose the file name and Save As... location for the file to be saved. The default location is under your “...Documents and Settings/<user name>/Local Settings/Application Data/Toshiba/Strata Call Manager”. The Chat application Setup menu provides access to the Whiteboards... -
Page 174: Configuring Chat
Chat beep each time a new line arrives into the conversation. Click Test to verify operation. • Timestamp Each Line – Check the box to show a time stamp Message Box each time a new message is received. TOSHIBA VIPedge UG 07/12... - Page 175 Send button. Once a communication channel is established, you just click the Response Button with the message you want to send. • Define the Number of rows to create response buttons. TOSHIBA VIPedge UG 07/12...
- Page 176 •Send Text Message Immediately – Check the box if you are sending text and you would like to send it immediately, without clicking on the Send button. Click OK to save the changes you have made to your Response Button. • TOSHIBA VIPedge UG 07/12...
- Page 177 Save As Local Machine Data – Click to enable this option if the settings are to apply to all users of this PC. • Save As Current User Data – Click to enable this option if the settings are unique for each user of this PC. TOSHIBA VIPedge UG 07/12...
-
Page 178: Interfacing With Other Programs
These types of operations are supported by a DDE Command interface. This section defines the format for the DDE Command Interface, its supported commands with examples with how they can be used. TOSHIBA VIPedge UG 07/12... -
Page 179: Format Of The Dde Command Interface
2. Choose a key on Call Manager, right-click and select Change Key. Name the key, choose the colors, and select a type as User Defined Actions. Select “Visitor Waiting” from the list of actions and Save. TOSHIBA VIPedge UG 07/12... - Page 180 2. Choose a key on Call Manager, right-click and select Change Key. Name the key, choose the colors, and select a type as User Defined Actions. Select “Notify Jan – Abusive Call” from the list of actions and Save. TOSHIBA VIPedge UG 07/12...
- Page 181 In DDE Message enter: DND,ON,”In Meeting Until &U+’60”” We are using the same time parameter used for setting Call Managers Note: DND which uses another User Defined Action that also includes &U=’60’ to set the time to 60 minutes from now. TOSHIBA VIPedge UG 07/12...
- Page 182 1. In Chat a Personal Group is created containing the members of <Tech Support>. 2. In Call Manager create a User Defined Action using the type Send DDE Msg and name it appropriately. In App Name|Topic enter: MSGPOP|SYSTEM TOSHIBA VIPedge UG 07/12...
- Page 183 Calendar Reminder event occurs and the Subject matches Group Meeting. This trigger will result in the action Group Meeting Broadcast to be taken. The assumption is the Outlook meeting reminder is provided 15 minutes prior to the scheduled meeting. TOSHIBA VIPedge UG 07/12...
-
Page 184: Dialer
(details below). Column Headers – these show what information is contained in each • column. Using your mouse, you can resize and reposition these headers to customize your viewing area. TOSHIBA VIPedge UG 07/12... -
Page 185: Calls Display Area
Lookup in Outlook – lookup this number in Microsoft Outlook and open the • matching contact. Print Listing – print a listing of all entries shown in the calls window. The • position and width of the columns can be changed to format the printout as desired. TOSHIBA VIPedge UG 07/12... -
Page 186: Sorting Entries
The user has the choice of Call Now or Later. If later is chosen, then you will be asked for a new time after which the call will return to the list. Pressing Cancel will disable the call before returning the call to the list. TOSHIBA VIPedge UG 07/12... - Page 187 This action could be anything, but typical uses would probably be to open a Journal entry or pop up an after-call survey form to take notes on the call. TOSHIBA VIPedge UG 07/12...
-
Page 188: Adding Calls To The Dialer
Drag-and-Drop MS Excel file In Microsoft Excel it is quite easy to create and keep a list of desired contacts and add them into the power dialer. In MS Excel simple create a spreadsheet TOSHIBA VIPedge UG 07/12... - Page 189 Note: Alternatively, if you save this file from MS Excel directly into the “..\PDimport” sub- folder of Call Manager the entries will be automatically imported into the power dialer . TOSHIBA VIPedge UG 07/12...
-
Page 190: Configuration Settings
For example the user may want to set his phone into “Do-Not- Disturb” mode to stop all incoming calls but still continue using the power dialer to place outgoing calls. Note: On some phone systems the Call TOSHIBA VIPedge UG 07/12... - Page 191 Remove Overdue calls more than ‘x’ days past due – If the dialer is disabled for an excessive amount of time, the power dialer will automatically clean out overdue calls that are way past due as defined by this setting. TOSHIBA VIPedge UG 07/12...
-
Page 192: Adding Action Buttons To Ready To Dial And Results Screens
Under the Dialer, enable either or both of the “Action” buttons and select the Action to be performed when the button is pressed. Optionally, the label can be changed to meet your needs. Press Save to keep your new settings. TOSHIBA VIPedge UG 07/12... -
Page 193: Advanced Topics
Feature Code • Speed Dial • System/PBS Commands • User Defined Actions • DSS Extension Key • Web Key • Run Program • For more information, refer to Chapter 10 – Buttons. TOSHIBA VIPedge UG 07/12... -
Page 194: Web Browser
The Call Manager Web Window is based on Microsoft Internet Explorer. You must have Internet Explorer 6.0 or higher installed on the PC. Click the setup icon to set Home URL and the tools to display in the toolbar (home, stop, refresh, go back, go forward, URL). TOSHIBA VIPedge UG 07/12... -
Page 195: Soft Phone
The user can click keys on the softphone and it behaves the same as the IP telephone. The telephone must be configured as the 10 button large display telephone in Enterprise Manager, and the SHIFT button must be disabled. TOSHIBA VIPedge UG 07/12... - Page 196 This page is intentionally left blank.
-
Page 197: Chapter 15 -Enterprise Manager Personal Administration
Your System Administrator can assign different User levels. Prerequisites Check with your System Administrator your user level (Normal or Super • User). Log in path/URL for the Web. • Security Code (password) – By default password assigned by your System • Administrator. TOSHIBA VIPedge UG 07/12... -
Page 198: Log In
Security Code/ 2. Check “Change Password”. Password 3. Enter a password in the New Login Password field confirm it. 4. Click the Save icon. Click on Log Out at the right corner of the screen. Log Out TOSHIBA VIPedge UG 07/12... -
Page 199: Home
List your name in the directory • Turn Do Not Disturb (DND) on or off • Activate/Deactivate Follow Me • To set up Follow Me button, right click the button, then select Voice Mail > Follow Me. TOSHIBA VIPedge UG 07/12... -
Page 200: Keystrip Labels
Assign and Submit a button as a One Touch button. Once the One Touch button is created, double click the button to enter the programming dialog box. Blank – Clear button assignment. • TOSHIBA VIPedge UG 07/12... -
Page 201: Dnd Activating
3. Enter the digits or special buttons for the function to be dialed. You can include the following in the dial string: Dial pad digits 0~9.To program special characters, see • Table 6 on Page 198. • A maximum of 32 characters. TOSHIBA VIPedge UG 07/12... -
Page 202: To Use A One Touch Button
– gets new dial tone on the PDN – code for All Call Page which allows the user to page the location of the orbited call. On your telephone, press the labeled One Touch button. To Use a One Touch Button TOSHIBA VIPedge UG 07/12... -
Page 203: Ring Tones
1300/1780 Hz 1 sec. On, 3 sec. Off, repeat 1300/1780 Hz 1 sec. On, 1 sec. Off, repeat 860/1180 Hz 0.5 sec. On, 1300/1780 Hz 3 sec. Off, repeat 860/1180 Hz 0.5 sec. On, 1300/1780 Hz 1 sec. Off, repeat TOSHIBA VIPedge UG 07/12... -
Page 204: Settings
1. After you have entered the settings in the parameters. 2. Click the Save icon. Hover over the bubbles located above the parameters to read the Note: flyover text for information to be entered in each field. TOSHIBA VIPedge UG 07/12... -
Page 205: Call Forward
To set up Station Call Forward 2. Enter the appropriate fields. Hover over the bubbles located above the parameters to read the flyover Note: text for information to be entered in each field. 3. Click the Save button. TOSHIBA VIPedge UG 07/12... - Page 206 Note: If Direct Line Call Forward is activated on you telephone, calls to your direct line telephone number will not forward to this destination; they will forward to the direct line CF destination - if activated. TOSHIBA VIPedge UG 07/12...
- Page 207 “Internal Call and Line Call” destinations. 2. Your telephone may forward even if you do not activate Call Forward; this is because your system administrator has activated System Call Forward on your telephone. TOSHIBA VIPedge UG 07/12...
-
Page 208: Speed Dial
This is a view only screen. System Info Advisory messaging enables you to store an informative message for LCD Display Advisory Messages telephones that call your telephone. This is view only under System Info. TOSHIBA VIPedge UG 07/12... -
Page 209: Voice Mail
1f 1~16 is set, the DRL of the station will change to the DRL selected here when the station dials the account code - in this case the DRL set for the station in Prg 200/260 etc.will be overridden to the call. TOSHIBA VIPedge UG 07/12... -
Page 210: Preferences
Using this screen you perform the following functions: Preferences Select the Phone display language Enterprise Manager display language Enterprise Manager Color scheme Email address to be displayed Enter the Remote Call Forward / DND password Change your Enterprise Manager User access password TOSHIBA VIPedge UG 07/12... - Page 211 Index A ~ C Index shift, speed dial, account code, user programmable, account codes, buttons mode, forced, verified/non-verified, account number, calendar, ACT, Call action keys, info, action variables, Window, actions call creating actions, answered, importing, control, testing, disconnect, advisory message default code table, extra call info, all call page, forward,...
- Page 212 Index D ~ K call pickup, 33, page, call waiting, enable sound, calling, exclusive hold, calls executive override, answering, exporting actions, hold, extra info, outgoing, feature, transferring, chat, class of service features, override, field name, Cnf/Trn, forced account codes (verified/non-verified), CO line, forwarding, call transfer,...
- Page 213 Index L ~ R combination, auto call record, creating keys, Tracer, special, On manual dialing, keystrokes, One, one touch, one touch button, 197, LCD display, options, LED indicators, outlook line calendar, 142, automatic selection, dialing, ringing preference, incoming calls, line button, lookup, local dialing plan, 88, outlook integration,...
- Page 214 Index S ~ W system, views screen screen docked, phone, voice first signaling, popup call info, voice mail, security code, conference, shift key, volume control, shortcut keys, voluntary account codes (verified/non- side window verified), rollout, screen, signaling WAV file, tone, web access, voice first, web browser,...