Advertisement
XMP-320/330 Media Player
Quick Start Guide
This printed quick guide provides a quick walkthrough of the set up process.
For complete documentation, please visit www.digisignage.com
Box Contents
AC Power Adapter
Standard 3.5 mm to
Ethernet Cable
Media Player Unit
12V DC output
RCA AV Cable
Wi-Fi Antenna
Quick Start Guide
CF card cover/remover
(XMP-330 only)
(this guide)
(pre-installed on unit)
USB Keyboard required
A USB keyboard is required to change system settings.
Mounting and Installation
The player can be attached to mounting posts on
the back of screens or inside cabinetry with the
built in VESA MIS-D100 (100mmx100mm)
compatible mounting flange
(For XMP-330 only)
ATTACH the wireless
antenna as shown.
Screw antenna
clockwise onto the post
Advertisement
Table of Contents

Related Manuals for IAdea XMP-320


Summary of Contents for IAdea XMP-320
-
Page 1: Quick Start Guide
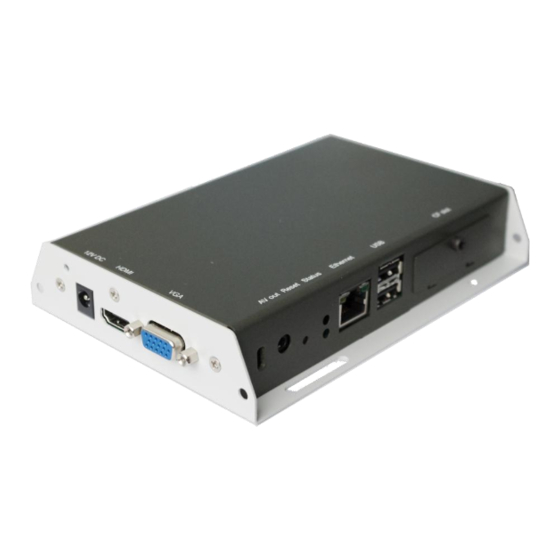
XMP-320/330 Media Player Quick Start Guide This printed quick guide provides a quick walkthrough of the set up process. For complete documentation, please visit www.digisignage.com Box Contents AC Power Adapter Standard 3.5 mm to Ethernet Cable Media Player Unit 12V DC output... - Page 2 Port connections System setup ATTACH a video cable (either VGA or HDMI) to your monitor. → When using VGA, your monitor must support XGA (1024x768) resolution or greater. Connect audio using the included AV cable. → When using HDMI, audio and video are sent over a single HDMI cable. ATTACH the AC power adapter.
- Page 3 WAIT while player boots up (up to 60 seconds) → once you see “Welcome” on screen, the unit is ready for content update or menu configuration PLUG IN a USB keyboard to the unit’s USB port → the player will enter the graphical menu system in approx. 30 sec. NAVIGATE the menus using your keyboard arrows (up), (down), (left), (right) to move the selection, (Space bar) to select, (Enter) to confirm, and (ESC) to...
-
Page 4: Troubleshooting
Content Management Please consult the software documentation for information specific to your management solution. Troubleshooting Why is there no video output on composite video connectors? The player outputs video over HDMI and VGA by default. To switch to composite video output, connect a HDMI or VGA display, then select PAL or NTSC output from the menu system (see System setup).
Need help?
Do you have a question about the XMP-320 and is the answer not in the manual?
Questions and answers
Как загрузить плеер xmp 320
To set up the IAdea XMP-320 player:
1. Attach Video Cable: Connect either a VGA or HDMI cable to your monitor.
- If using VGA, the monitor must support at least 1024x768 (XGA) resolution.
- If using HDMI, both video and audio are transmitted through the same cable.
2. Connect Audio (if using VGA): Use the included RCA AV cable for audio.
3. Attach Power Adapter: Plug in the AC power adapter. The green status LED should light up.
4. Wi-Fi Setup (if needed): Attach the Wi-Fi antenna by screwing it clockwise onto the post.
5. Keyboard Requirement: Connect a USB keyboard to change system settings if needed.
6. Mounting (optional): For XMP-330, use the VESA MIS-D100 compatible mounting flange to attach the player to a screen or inside cabinetry.
7. Ethernet Connection: If both Ethernet and Wi-Fi are available, Ethernet will be used as the priority connection. If Ethernet is disconnected, the system will switch to Wi-Fi automatically.
This answer is automatically generated