Table of Contents
Advertisement
Advertisement
Table of Contents

Related Manuals for IAdea XMP-7300


Summary of Contents for IAdea XMP-7300
- Page 1 P‐7300 0 Hard dwar U User M M anua a l ...
- Page 2 Contents Introduction 1.1. Package contents 1.2. Installation 1.3. Physical view Technical Data 2.1. Specifications i ...
- Page 3 1. Intro oduction n This do ocument desc cribes the har dware of the XMP‐6200. 1.1. Package c contents AC Adapter ia Player Unit Wi‐Fi Ante enna HDMI Cable (with h select powe r plug) lcro (2 sets) NOT IN NCLUDED: A U USB mouse is required for s system setup 1.2. Installatio ...
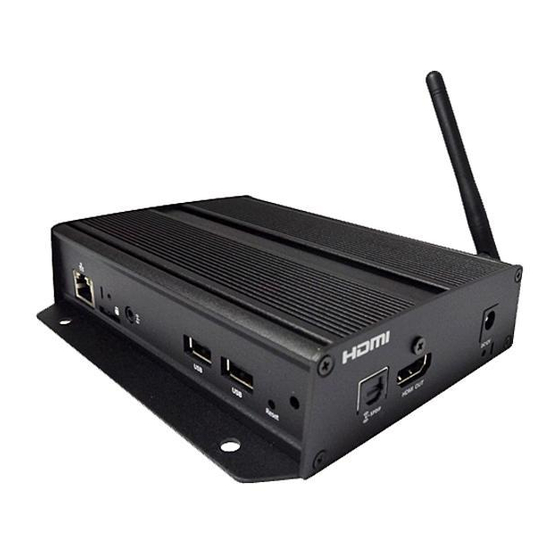
- Page 4 1.3. Physical v view Physi ical features (left to righ ht in above il lustration) Reset butt on to perform m factory reset t USB ports f for USB conte ent update an d configuratio on Power(gre en) and Statu s(orange) LED D indicator HDMI 2.0 c connector for digital video and audio com mbined outpu u t ...
-
Page 5: Specifications
2. Technical Data 2.1. Specifications XMP‐7300 Video format support POPAI Screen Media Standards S6 (MPEG‐1 SIF, 3Mbps CBR) S7 (MPEG‐1 480p, 10Mbps CBR) S8 (MPEG‐1 720p, 15Mbps CBR) S9 (MPEG‐2 480p, 6Mbps CBR) S10 (MPEG‐2 720p, 12Mbps CBR) S11 (MPEG‐4 AVC, 480p, 6Mbps CBR) S12 (MPEG‐4 AVC, 720p, 10Mbps CBR) E4 (VC‐1/WMV9, MP@ML, 720p) E7 (MPEG‐4 ASP, 480p, 10Mbps CBR) E8 (MPEG‐4 AVC, 1080p, 10Mbps CBR) H.265/HEVC POPAI Screen Media Standards Image format support S1 (JPEG 480p baseline) S2 (JPEG 720p baseline) S3 (JPEG 1080p baseline) E1 (PNG 24bpp+alpha, 480p) E2 (PNG 24bpp+alpha, 720p) E3 (PNG 24bpp+alpha, 1080p) POPAI Screen Media Standards Audio codec support S4 (MPEG L2 audio) S5 (MP3 audio, 320Kbps) W3C HTML5 (HTML, CSS, JavaScript) Dynamic content W3C SMIL 3.0 instructions (sub‐set) HDMI 2.0 Physical I/O connectors USB 2.0 x 2 RJ45 Ethernet port (Giga LAN) Wi‐Fi antenna port ... - Page 6 Warra anty ‐year limited parts & labor rmwa are U User M Manu ual mwar re vers sion – – 1.2 dia Pla ayers: ‐6200 MBR‐1100 XMP‐730 0 i ...
-
Page 7: Table Of Contents
Contents Firmware User Manual Introduction 1.1. Features Configuring the Player 2.1. System connections 2.2. Basic settings 2.3. Connect the player to your network 2.4. Time zone settings 2.5. Content settings 2.6. Player Information ... -
Page 8: Introduction
3. Introduction This document describes the basic operation of the player and frequently asked questions. 3.1. Features This is a Full HD 1080p high definition digital signage player featuring industrial grade mechanical design and versatile open‐standard HTML5 and SMIL programmability. Support for HTML5 widgets for dynamic content (W3C Widgets standard) Industry leading W3C SMIL support for developers Full HD 1080p hardware decoding of MPEG1/2/4, H.264, and VC‐1 media formats Supports full POPAI Screen Media Formats Standards profiles S1 to S12, and E1 to E8 Multiple 3 party software solution compatibility 4. Configuring the Player 4.1. System connections If it is a media player, connect it to a monitor via an HDMI cable. If it is a signboard (with built‐in screen), no monitor is required. However, a signboard player can still be connected to a monitor via HDMI for larger display area. When using an HDMI connection, audio is sent along with video over the HDMI cable, so no additional cables are required. Attach the AC power adapter to power on the unit. After approximately 15 seconds, the booting animation will be displayed on screen as shown below : The boot‐up process takes approximately 40 seconds to complete. Troubleshooting Tips for media players The operation indicators light up, but no video is displayed on screen Ensure that your video cable (HDMI) is securely connected. When using an HDMI connection, choose high quality, certified HDMI cables or try using shorter length cables Check if your monitor is turned on and the correct video input source is selected ... -
Page 9: Basic Settings
After boot‐up completes, player will stay in Basic settings menu if no content service has been configured (i.e. first boot‐up for brand new unit or after a factory reset).If you have already set content into the player, contents will play back automatically after 15 seconds after boot‐up. 4.2. Basic settings You must attach a USB mouse to the player to configure settings. If the player has touch screen, then the USB mouse is not required, and all the click action can be replaced by tap action. (Fig. 2.2.1) Basic settings: – Network, Time zone and Content. Each time the Basic settings menu is entered, playback will automatically begin after 15 seconds if content services have been previously set. Auto playback can be canceled by clicking on the button before the countdown ends. User is able to enter Advanced Settings by clicking the Advanced button. To enter the menu system at any time during playback, plug in a USB mouse and hold the left mouse key in the corner area as shown below for 10 seconds. If the player has touch screen, then tapping and holding in the corner areas for 10 seconds would also bring you to the menu. *Player will ask for password if password has been configured. 2 ... -
Page 10: Connect The Player To Your Network
4.3. Connect the player to your network Wireless connection Click the Wireless LAN setting to launch the wireless configuration UI. (Fig. 2.3.1) Click the ON/OFF button as indicated below to turn ON Wireless interface (network). (Fig. 2.3.2) The player will scan for wireless signals nearby and available access points will be listed. (Fig. 2.3.3) Click on the network ID to connect. If the network requires authentication, you will be asked to provide a password. 3 ... -
Page 11: Firmware User Manual
(Fig. 2.3.4) Static IP – manually assign network IP address Check the box that says "Show advanced options" (Fig. 2.3.5) Click down arrow to hide keyboard if needed. You can also scroll down/ swipe to see the rest of the menu. Under IP settings, change DHCP to Static. (Fig. 2.3.6) Fill the form and click Connect to complete the setting. (Scroll down/ swipe to see the rest of the menu if needed ) (Fig. 2.3.7) Wired connection To use the wired Ethernet connection, connect an Ethernet cable. Ethernet connection takes higher priority. 4 ... - Page 12 DHCP – automatically assign network IP address Turn on Ethernet. If using DHCP, no further action is required. (Fig. 2.3.8) Static IP – manually assign network IP address Click Static IP Settings to configure static IP address. (Fig. 2.3.9) Proxy settings In Basic settings, click the Advanced button, advanced configuration menu will be launched. (Fig. 2.3.10) Click Network, and then click Advanced. 5 ...
- Page 13 (Fig. 2.3.11) Proxy setting menu will be launched, input proxy hostname and port , then click Done to finish configuration. (Fig. 2.3.12) Show IP settings In Basic settings, click the Advanced button, advanced configuration menu will be launched. (Fig. 2.3.10) Click Network, and then click Show IP. (Fig. 2.3.13) This feature is to control whether the IP address being displayed in Basic settings menu. This is default enabled. When disabled, Basic settings will display “connected” instead of IP address. 6 ...
-
Page 14: Time Zone Settings
(Fig. 2.3.14) 4.4. Time zone settings Click Time zone. (Fig. 2.4.1) Choose the correct time zone from the available options. (Fig. 2.4.2) 7 ... -
Page 15: Content Settings
4.5. Content settings Click the Set content button. (Fig. 2.5.1) Input the SMIL/HTML5 content URL and click Set. It will return to Basic Settings automatically. (Fig. 2.5.2) The player will check the availability of SMIL/HTML5 content URL, with the Play button showing Checking… The checking action can be canceled by clicking Checking… button, it will change back to Play. NOTE: It is highly recommended to let the player check the availability of the content URL. Clicking Play button with a bad/invalid URL set would cause the player to reboot, if the FailSafe function is not configured. (Fig. 2.5.3) If the SMIL/HTML5 content URL is available, the Play button will change to a 15‐second countdown and the playback will start after the countdown. The countdown can be canceled by clicking the button. 8 ... -
Page 16: Player Information
If it keeps showing Checking… for a long time, please go back to Set content to check the correctness of the URL. (Fig. 2.5.4) 4.6. Player Information User can check the player’s basic information including the Health status, Firmware version, and Player ID. Click the Advanced button, advanced configuration menu will be launched. (Fig. 2.6.1) Click on Information. The definitions of the Health Status: Green – Normal. The device is connected to the URL server. Blue – Local. The device is playing content from the USB drive or SD card. Gray – Disconnected. The device is disconnected. (Fig. 2.6.2) 9 ... -
Page 17: Content Configuration - Appstart
4.7. Co ntent con nfiguratio on – AppSt tart User c can assign the URL and APP for execution n right after th he system sta rts up. ick the Advan nced button. ( Fig. 2.6.1) ick on Conten nt, and then c lick on AppSta art. nter the valid URL of HTML/ /SMIL in AppS Start (Fig. 2.7. .1). If you alre eady configure ed SMIL/HTM L5 content RL via ”Set co ntent” (Fig. 2 .5.2), the URL L would be sho owed here. he Advanced o option is used d for 3rd‐party y App configur ration only. ... - Page 18 When EasyPlay is en nabled, the pl layer will play y content only y from the USB B drive (or Mi cro SD card). If user wants to play y content from m the URL ser rver configure d via ”Set con ntent”, EasyPl lay must be d isabled. sert USB drive e or Micro SD card containi ing media con ntent that you u want to play y. ick the Advan nced button. ( Fig. 2.6.1) ick on Conten nt, and then c lick on EasyPl ay. ick Disabled/ Enabled butto on to enable E EasyPlay, and choose from 2 available op peration mod es, Photo ode and Mov vie Mode. ...
- Page 19 (Fig. 2.9.3) EasyP Play Schedul le configurat tion ick the Advan nced button. ( Fig. 2.6.1) ick on Conten nt, and then c lick on Schedu ule. ick on the but ttons marked in red below to enable/dis sable the Easy yPlay schedule e for each tim e slots. Type the sche eduled time in n the dialogue e boxes marke ed in blue belo ow by using th he pop‐up key yboard or the USB keyboard d. (Fig. 2.9.4) ...
-
Page 20: Display Settings
The exact play yback time wi ill be the time e slots marked d in blue as sh own in figure 2.9.6. The da ark blue parts are the overla ap time of C/D D and D/E. (Fig. 2.9.6) 4.10. D Display set ttings Resol lution setting gs (for medi ia players) For be est quality, set t the output re esolution to m match your dis splay’s native resolution to o avoid image scaling and blur. ... -
Page 21: Specifications
(Fig. 2.10.2) (Fig. 2.10.3) Resolution and Dual Display (for signboards) The default Output mode is set to "Panel". (Fig. 2.10.4) With Output mode set to “Panel”, the signboard is ONLY displaying image on the panel. (Fig. 2.10.4) Signboards support output to panel and external monitor at the same time, to use this function, please: Check “Enable dual display” in the Display menu. (Fig. 2.10.5) Connect signboard to a monitor via HDMI port Set the Output mode to a setting which best matches the monitor’s specification. (Fig. 2.10.6) 14 ... - Page 22 (Fig. 2.10.5) (Fig. 2.10.6) Panel Brightness (for signboards) The default panel brightness is set to maximum, and it can be adjusted in the Display settings. Click the Advanced button, advanced configuration menu will be launched. (Fig. 2.6.1) Click the Display/sound button, and then click on Display. The Display Settings page will be launched. (Fig. 2.10.1) Click on Brightness. (Fig. 2.10.7) Drag the blue dot marked in red below to adjust the brightness. Click on OK to save the configuration. 15 ...
-
Page 23: Sound Settings
(Fig. 2.10.8) Screen orientation Screen orientation is to set the display to rotate 90/180/270 degrees. Click the Advanced button, advanced configuration menu will be launched. (Fig. 2.6.1) Click the Display/sound button, and then click on Display. The Display Settings page will be launched. (Fig. 2.10.1) Click on the Screen orientation marked in red below. (Fig. 2.10.9) Click on the preferred angle from the menu. (Fig. 2.10.10) 4.11. Sound settings To control the output sound volumes and touch sounds: Click the Advanced button, advanced configuration menu will be launched. (Fig. 2.6.1) Click the Display/sound button, and then click on Sound. The Sound Settings page will be launched. 16 ... -
Page 24: System Configuration - Player Name
(Fig . 2.11.1) ick on Volume es, the Volum mes settings pa age will be lau unched. Drag the blue slide ers to adjust th he volumes fo or he selected op ptions, and the en click on OK K to save the n new settings. (Fig g. 2.11.2) (Fig g. 2.11.3) 4.12. Sy ystem con nfiguratio on – Playe er name The pl ayer’s name c can be specifie ed so the play... -
Page 25: System Configuration - Security
(Fig. 2.12.1) 4.13. System configuration – Security A password can be set to provide authentication for player access. If the password is set, a password prompt will appear if a user is trying to enter the Basic settings menu from playback. Click the Advanced button, advanced configuration menu will be launched. (Fig. 2.6.1) Click on System, and click on Security. Input a password in the field and click Set. (Fig. 2.13.1) 4.14. System configuration – Time Server The feature allows user to synchronize player’s time with the web server where the appStart URL hosted, disabled by default. When disabled, player synchronize it’s time with Android default time server( ntp.pool.org), this requires internet connection. When enabled, player synchronize it’s time with the web server where the appStart URL hosted (based on http response header’s time) Click the Advanced button, advanced configuration menu will be launched. (Fig. 2.6.1) Click on System, and click on Time server. Click the Use AppStart URL as time server button as marked in red below to enable/disable the time server function. Click on Set to save the setting. 18 ... -
Page 26: System Configuration - Scheduled Reboot
( Fig. 2.14.1) 4.15. System configuration – Scheduled reboot The feature Scheduled Reboot allows the player to reboot on the assigned time automatically every day. Click the Advanced button, advanced configuration menu will be launched. (Fig. 2.6.1) Click on System, and click on Scheduled Reboot. Click the Enable daily reboot button as marked in red below to enable/disable the daily reboot function. Click on the dialogue box to set the time. The value can be inputted with the pop‐up keyboard or the USB keyboard. Click on Set to save the setting. (Fig. 2.15.1) 4.16. System configuration ‐ Firmware update Firmware updates can be performed by using a USB flash drive. Please read the release notes regarding the changes that will be made to your player before applying the upgrade. IMPORTANT: DO NOT unplug the USB drive or power down the player while the system is performing the firmware update. Download the latest firmware from http://www.digisignage.com and copy it to the root directory of a USB drive Plug in the power cord into the device. After the boot‐up completes, click the Advanced button on the Basic settings menu. (Fig. 2.6.1) Click on System, then click Firmware update. Click on OK to begin the firmware update. 19 ... -
Page 27: System Configuration - Expansion Storage
(Fig. 2.16.1) Plug in the USB drive while the screen shows “Scanning USB drives for firmware package”. (Fig. 2.16.2) 4.17. System configuration – Expansion storage User can add extra Micro SD card to replace its internal storage, please note when internal storage being replaced, player use only the extra Micro SD card as main storage, internal storage will not be used. Manual Expansion Power off device. Insert Micro SD card and then plug in power cord to power on. In the Basic settings menu, click the Advanced button, advanced configuration menu will be launched. (Fig. 2.6.1) Click on System, click on Expansion storage and click Initialize, player will format Micro SD card then reboot by itself. 20 ... - Page 28 (Fig. 2.17.1) (Fig. 2.17.2) After boot up, check player information and new capacity will be displayed. (Fig. 2.17.3) Auto Expansion In the Basic settings menu, click the Advanced button, advanced configuration menu will be launched. (Fig. 2.6.1) Click on System, click on Expansion storage and enable auto‐format. 21 ...
-
Page 29: System Configuration - Factory Reset
(Fig. 2.17.4) Power off device. Insert Micro SD card and then plug in power cord to power on. After boot up, check player information and new capacity will be displayed.(Fig 2.17.3) 4.18. System configuration ‐ Factory reset If you forget the system password you have set, you must reset the system to regain access to the player. Using the reset button PRESS and HOLD the reset button with a pin. RE‐CONNECT the power cord. WAIT until the status LED flashes. RELEASE reset button and wait for system to initialize. Using a USB mouse System reset will re‐initialize the system, clear passwords, and return settings to their default values. Perform the following: CONNECT a USB mouse or using touch screen for input. Click the Advanced button, advanced configuration menu will be launched. (Fig. 2.6.1) Click on System configuration, and choose Factory default. Click on OK button to perform the system reset. (Fig. 2.18.1) 22 ... -
Page 30: System Configuration - Power Save
4.19. Sy ystem con nfiguratio on – Powe er save The Po ower save fea ture allows th he player to p ower off auto omatically whi ile staying at t the Basic setti ings menu withou ut any action taken for 10 m minutes. ick the Advan nced button, a advanced conf figuration me enu will be lau unched. (Fig. 2 2.6.1) ick on System m, and click on n Power save. ick the Enable e Power Save e mode button n as marked in n red below to o enable/disa ble the powe r save functio on. ick on Set to s save the settin ng. ... -
Page 31: Introduction
7.1. Introduction Using SMIL (pronounced “smile”), the language created by W3C for multimedia communications, the media player understands the language “spoken” by professional tools from companies such as Adobe, Apple, Microsoft, and Real Networks. What this means is quicker, easier, and better integration of your players into your digital signage networks, opening up avenues of software controls and realizing the full potential of your player hardware down the road. 7.2. www.a‐smil.org for developers The media player operating system utilizes W3C SMIL as the underlying scripting language, which lends well to customization to your project management needs. For resources, downloads, and community support, please visit www.a‐smil.org. 8. Appendix: FAQ What video format can I play? Video files encoded in MPEG‐4 AVC up to 1920x1080 resolutions and bitrates should play perfectly. If a certain video is not played as scheduled, or if it plays poorly, please search the support site for “transcode” instructions. The player is placed near my Wi‐Fi access point, yet the connection is unreliable. Wi‐Fi appliances in general should be placed 10 feet (3 meters) from the Wi‐Fi access point for reliable operation. Try relocating the access point further away from the player to improve connection. If both Ethernet & Wi‐Fi are connected, which one will take precedence? If both connections are available, Ethernet will be used. What should I do if I forgot my password? Please perform a factory reset. Use the S/W RESET button located at the back of the media player to restore factory settings. This will also clear the player’s password. How do I manage the playback of contents? The media appliance is designed to be interoperable with leading 3 party management software solutions or via SMIL open standard commands. Could the player display Flash or Microsoft PowerPoint presentations? The player features limited PowerPoint support, but not Flash support. While PCs can play many formats with varying degrees of success, RISC‐based media players are designed to reliably play specific video formats (see spec for details). While Microsoft PowerPoint native files cannot play directly on a RISC‐based player, the file can be converted (i.e. Manager Express) into an image format to be played as an image slideshow. Why won’t some media files play properly? The video data bit‐rate used may have exceeded the recommended bit rate. The video data bit‐rate is the amount of video or audio data used per second to store or play the contents, usually expressed in Mbps (mega‐bits per second). Video encoded with excessive bit‐rates will not playback ... - Page 32 JPEG images can be either of 2 types: baseline or progressive compression. Baseline JPEG offers greatest compatibility, while progressive JPEGs are suitable for web site images. Progressive images are downloaded and displayed “progressively,” being rendered more clearly as more data is received over the internet. Progressive images are primarily supported on PCs. For media appliances, make sure to save images as baseline JPEG in your photo editor, or resave them as baseline JPEGs using free tools such as IrfanView (http://www.irfanview.com/ ). Does the media player support video streaming? No. Media players play files from local storage and do not support real‐time video streaming over the network. This delivers an optimum viewing experience free of playback quality issues such as stuttering, blocking, or blue‐ screens. The player is not playing. What should I do? Play list errors and scheduling issues are two major causes of playback problems. To determine if the problem is caused by a bad playlist, just delete the playlist and restart the player. The player should loop through all media files, indicating a fault with the play list. If the playback is scheduled to play at specific time, check to see if the device is set to the right time zone on the world clock. If nothing seems wrong, the time zone setting is often the reason the program is not played. The video is playing but I can’t hear any sound, what should I do? Check volume (mute) settings on monitor. ...
- Page 33 Federal Communications Commission (FCC) Statement 15.21 You are cautioned that changes or modifications not expressly approved by the part responsible for compliance could void the user’s authority to operate the equipment. 15.105(b) This equipment has been tested and found to comply with the limits for a Class B digital device, pursuant to part 15 of the FCC rules. These limits are designed to provide reasonable protection against harmful interference in a residential installation. This equipment generates uses and can radiate radio frequency energy and, if not installed and used in accordance with the instructions, may cause harmful interference to radio communications. However, there is no guarantee that interference will not occur in a particular installation. If this equipment does cause harmful interference to radio or television reception, which can be determined by turning the equipment off and on, the user is encouraged to try to correct the interference by one or more of the following measures: ‐Reorient or relocate the receiving antenna. ‐Increase the separation between the equipment and receiver. ‐Connect the equipment into an outlet on a circuit different from that to which the receiver is connected. ‐Consult the dealer or an experienced radio/TV technician for help. This device complies with part 15 of the FCC Rules. Operation is subject to the following two conditions: 1) this device may not cause interference and 2) this device must accept any interference, including interference that may cause undesired operation of the device. FCC RF Radiation Exposure Statement: 1. This Transmitter must not be co‐located or operating in conjunction with any other antenna or transmitter. This equipment complies with FCC RF radiation exposure limits set forth for an uncontrolled environment. This equipment should be installed and operated with a minimum distance of 20 centimeters between the radiator and your body ...
Need help?
Do you have a question about the XMP-7300 and is the answer not in the manual?
Questions and answers