IAdea XMP-6200 Hardware User Manual
Solid-state network digital signage media player
Hide thumbs
Also See for XMP-6200:
- User manual (6 pages) ,
- Quick start manual (4 pages) ,
- Hardware user manual (9 pages)
Table of Contents
Advertisement
Quick Links
Download this manual
See also:
User Manual
Advertisement
Table of Contents

Related Manuals for IAdea XMP-6200


Summary of Contents for IAdea XMP-6200
- Page 1 P‐6200 0 Hard dware User Manu u al ...
-
Page 2: Table Of Contents
Contents Introduction 1.1. Package contents 1.2. Installation 1.3. Physical view Technical Data 2.1. Specifications i ... -
Page 3: Introduction
1. Intro oduction n This do ocument desc cribes the har dware of the XMP‐6200. 1.1. Package c contents AC Adapter ia Player Unit Wi‐Fi Ante enna HDMI Cable (with h select powe r plug) lcro (2 sets) NOT IN NCLUDED: A U USB mouse is required for s system setup ... -
Page 4: Physical View
Moun nting Option 2: [Attach th he player on n the back of f the monitor r using Velcr ro] 1. S Separate the V Velcro pads, a and stick on th he bottom of player as show wn below. 2. S Stick the othe r Velcro pad o onto the back k of monitor, a and then attac ch the player t... -
Page 5: Technical Data
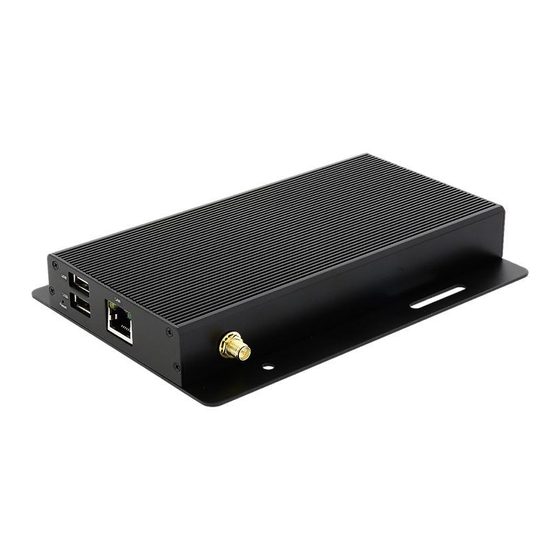
Physical features (left to right in above illustration) Reset button to perform factory reset USB ports for USB content update and configuration Power(green) and Status(orange) LED indicator HDMI 1.4 connector for digital video and audio combined output Ethernet port for network content update Wireless antenna post VESA mount Kensington lock Micro SD card slot HDMI port DC input port Micro USB for ADB , Android debug console port 2. Technical Data 2.1. Specifications XMP‐6200 POPAI Screen Media Standards Video format support S6 (MPEG‐1 SIF, 3Mbps CBR) S7 (MPEG‐1 480p, 10Mbps CBR) S8 (MPEG‐1 720p, 15Mbps CBR) ... - Page 6 LED: : Power(green n)/Status(oran nge) 8 GB B on‐board fla ash memory (u up to 6 hrs of typical 720p v video @ 3 Mb bps) Local storage Micr ro SD card exp pansion slot Acces sories AC a adapter MI cable Wi‐F Fi antenna Velc cro ( 2 sets ) 12V 1.5A DC Powe r requiremen nt 6 W Powe r consumptio on Enviro onmental rating temper rature: 0 – 38 ° C / 32 – 100 0.4° F ...
- Page 7 Separa ate the Velcro o pads, and sti ick on the bot ttom of player r as shown in right. Stick th e other Velcro o pads onto the ba ack of monitor r, and then att tach the playe er to it. Use H DMI cable to connect playe er and the mo onitor 3.3. Port conn nections Syste m setup INSTAL LL a HDMI cab ble to your monitor → → When usin g HDMI, audi o and video are sent over a single HDM I cable INSTA ALL the AC po ower adapter ...
- Page 8 3.6. Troubleshooting How do I interrupt playback and enter setup menu? You can move your mouse cursor to the corner of the screen, press and hold the left key for 10 seconds to exit playback and enter setup menu. Some video play jumpy or incorrectly, How to get best video playback performance? We provide video convert tool with pre‐configured profile for user to encode video to get best video playback performance. Visit www.digisignage.com to download video convert tool. Reset player to factory defaults (AC adapter is required) If modifying settings cause unintended results or if you have forgotten your password, please reset the player. Local contents will also be removed. 1. Press and hold the reset button with a pen. 2. Use AC adapter, re‐connect the power cord while holding reset button. 3. Wait until the orange status LED flashes, release reset button and wait for system to initialize to factory default state. ...
- Page 9 Federal Communications Commission (FCC) Statement 15.21 You are cautioned that changes or modifications not expressly approved by the part responsible for compliance could void the user’s authority to operate the equipment. 15.105(b) This equipment has been tested and found to comply with the limits for a Class B digital device, pursuant to part 15 of the FCC rules. These limits are designed to provide reasonable protection against harmful interference in a residential installation. This equipment generates uses and can radiate radio frequency energy and, if not installed and used in accordance with the instructions, may cause harmful interference to radio communications. However, there is no guarantee that interference will not occur in a particular installation. If this equipment does cause harmful interference to radio or television reception, which can be determined by turning the equipment off and on, the user is encouraged to try to correct the interference by one or more of the following measures: ‐Reorient or relocate the receiving antenna. ‐Increase the separation between the equipment and receiver. ‐Connect the equipment into an outlet on a circuit different from that to which the receiver is connected. ‐Consult the dealer or an experienced radio/TV technician for help. This device complies with part 15 of the FCC Rules. Operation is subject to the following two conditions: 1) this device may not cause interference and 2) this device must accept any interference, including interference that may cause undesired operation of the device. FCC RF Radiation Exposure Statement: 1. This Transmitter must not be co‐located or operating in conjunction with any other antenna or transmitter. This equipment complies with FCC RF radiation exposure limits set forth for an uncontrolled environment. This equipment should be installed and operated with a minimum distance of 20 centimeters between the radiator and your body 7 ...
Need help?
Do you have a question about the XMP-6200 and is the answer not in the manual?
Questions and answers