
Related Manuals for ADJ Operator 192


Summary of Contents for ADJ Operator 192
- Page 1 User Instructions A.D.J.Supply Europe B.V. Junostraat 2 6468 EW Kerkrade The Netherlands www.americandj.eu...
-
Page 2: Table Of Contents
Table of Contents Welcome ..................1 General Instruction................2 Warnings..................2 Cautions..................2 Control and Functions..............3 Front View...................3 Rear View................... 4 Operation Guide................5 Scene operation................5 Chase operation................7 Bank copy & Fixture copy............... 9 PAN/TILT Setting................10 Fade Time..................11 MIDI Control.................. -
Page 3: Welcome
Welcome Main features as below: - 8 dimming faders & total 192 DMX channels - Speed fader & Fade Time fader - 30 banks x 8 programmable scenes - 12 programmable chases, each chase can record up to 240 steps - Fade time setting &... -
Page 4: General Instruction
General Instruction This is a professional lighting controller with a total of 192 DMX output channels. 30 banks of programmable scenes (one bank contains 8 scenes) and 12 chases with up to 240 steps each are provided for your application. Speed, Fade Time & Pan/Tilt adjustment are also provided by this unit. -
Page 5: Control And Functions
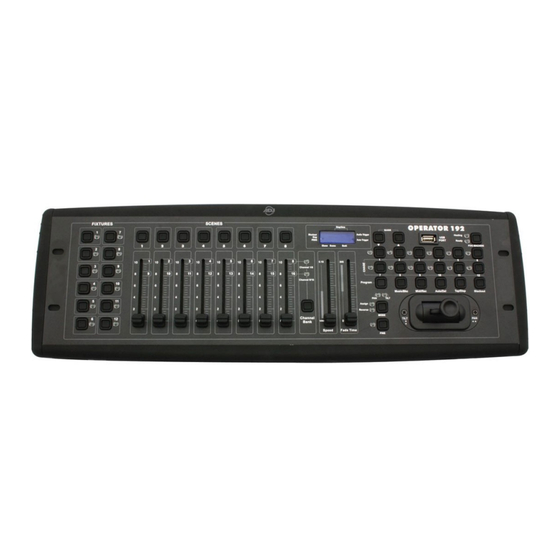
Control and Functions Front View FIXTURES SCENES OPERATOR 192 Step/time BANK Heating Blackout Audio Trigger Step Auto Trigger PORT Ready PROG FOG MACHINE Chase Scene Bank 0.1S Channel 1/8 15~20 Channel 9/16 Program Tap/Disp Music/Bkc Midi/Rec Auto/Del Blackout TILT Assign... -
Page 6: Rear View
Control and Functions 12. USB socket: It's for data backup or USB light connection. 13. Fog-machine button: It's for fog-machine control. 14. Chase button(1~12): to select a chase. 15. Program button : Used to enter/exit the programing mode. 16. Music/Bkc button: Used to enter audio control or to realize Bank copy. -
Page 7: Operation Guide
Operation Guide Scene Operation When powered on, this unit will be firstly in the Manual control mode, and all channel outputs are in black-out state (the Blackout LED flashes at the display window). You can also press the Blackout button to enable the channel output. Press and hold down the Program button for about 2 seconds till the PROG LED flashes, this means you have entered the programing mode. - Page 8 Operation Guide To copy a scene Enter the Programing mode. Select your desired being copied scene in a bank. Press Midi/Rec button. Press your selected Scene button in the relevant bank, all LEDs flash briefly, that means your copy operating has been saved. To delete a scene Enter the Programing mode.
-
Page 9: Chase Operation
Operation Guide 3. Audio trigger: Tap the Music/Bkc button, the Audio Trigger LED will light up at the display window, this indicates you that you are now in the Audio trigger mode. Tap Bank Up/Down button to select desired bank (the scenes in the bank will run sensitively by the Audio signal through the built-in microphone). - Page 10 Operation Guide Set a scene(step), and then tap the Rec button, the display will show you the follw- ing step. You tap the T ap/disp button, and then tap the Rec button again, all LEDs flash briefly, this means your operation has been saved. You can add more scenes(steps) into a chase in the same way as the above.
-
Page 11: Bank Copy & Fixture Copy
Operation Guide 2. Auto trigger: Tap the AUTO button, the Auto Trigger LED will light up at the display window, this indicates you that you are now in the Auto trigger mode. Select your desired chase and press related chase button, its LED will flash. You can then use the Speed fader (or Tap/disp button) and the Fade Time fader to adjust the running state. -
Page 12: Pan/Tilt Setting
Operation Guide PAN/TILT Setting "Assign" 1. Enter the Programming mode. 2. Press and hold down the MODE button, and then tap the FINE button at the same time, the "Assign" LED will be lit. 3. Tap the Up/Down button to select PAN or TILT. 4. -
Page 13: Fade Time
Operation Guide Fade Time 1. Press and hold down MODE button, and then tap the Tap/disp button, the display may show you "only"; Repeat this operation when "only" appears, the display will show you "All". 2. The "only" or "ALL" display will go out automatically within almost 3 seconds. "ALL"... -
Page 14: Data Sending
Operation Guide Data Sending Before data sending, make sure the connections between this unit and the connected DMX receiver are well done. Before turning on the power, press and hold down the Fixture2 button, the Fixture3 button and the Scene1 button; Then turn on the power, the display will flickeringly show you "Read"... -
Page 15: Technical Specifications
Technical Specifications Power Input ................DC9~15V, 500mA Internal Fuse..............500mA 250V, 5x20mm MIDI IN................5Pin MIDI connector DMX OUT.............5Pin/3Pin(female) DMX connector SOUND INPUT................RCA connector EXT STEP CONTROL...............DB-9 connector Dimensions ................483x135x82mm Weight(approx.) ..................2.2 kg 24-004-1685 Rev 1.1 All Rights Reserved!
Need help?
Do you have a question about the Operator 192 and is the answer not in the manual?
Questions and answers