Table of Contents
Advertisement
Quick Links
Download this manual
See also:
Operator's Manual
Advertisement
Table of Contents

Related Manuals for Univex VS9


Summary of Contents for Univex VS9
- Page 1 INSTRUCTION VS9/VS9H MANUAL VEGETABLE SLICER WE THANK YOU FOR YOUR PURCHASE OF OUR MODEL VS9/VS9H VEGETABLE SLICER. VS9494/...
-
Page 2: Table Of Contents
SAFETY PRECAUTIONS INSPECTION AND MODEL VARIATION EXPLANATION INSTALLATION OPERATOR'S INSTRUCTIONS PLATE UNITS - ASSEMBLY - USE GRATER, SHREDDER AND JULIENNE PLATE UNITS LOADING PLATE UNITS INTO VS9 HOUSING MOUNTING INSTRUCTIONS PROCESSING PRODUCT DISMOUNTING AND DISASSEMBLY FOR CLEANING LUBRICATION MECHANIC'S MAINTENANCE... -
Page 3: Introduction
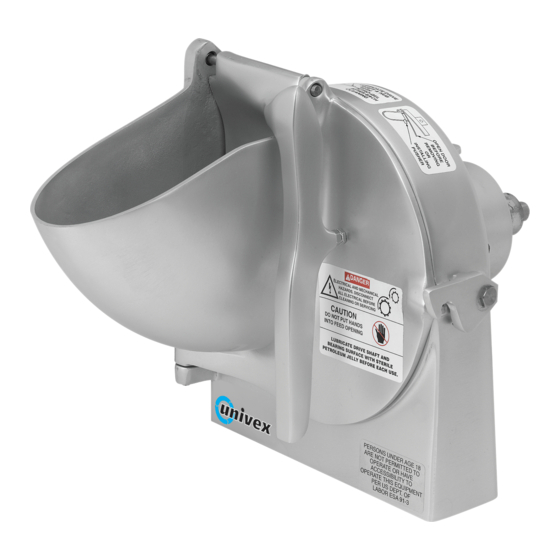
- Never insert any utensil into the hopper. Note that the front housing of the VS9 has a feed hopper [Fig. 1 (2)]. It is also equipped with a feed plate [Fig. 1 (8)]. Food to be processed must always be fed to cutting surfaces by way of the hopper, and compressed against cutting surfaces with the feed plate. -
Page 4: Inspection And Model Variation Explanation
OPERATOR'S INSTRUCTIONS SLICING, GRATING, AND SHREDDING The Univex VS9 is designed to slice, grate, and shred a wide range of food products when fitted with the proper plates and operated at the proper speeds. Before mounting the VS9 to power source equipment, refer to the application chart below. -
Page 5: Safety Precautions
"adjusting nut" per the directions accompanying Diagram 5. WARNING: Adjustments for thickness must never be attempted while the VS9 is under power or severe personal injury can occur. See safety precautions - Paragraph 2. -
Page 6: Loading Plate Units Into Vs9 Housing
LOADING PLATE UNITS INTO THE VS9 HOUSING With the VS9 resting on a stable working surface, unlatch the front housing [Figure 1 (8)] and swing it toward you. Lift the assembled plate unit and insert it into the rear housing [Figure 1 (10)]. Lift the shaft lock pin [Figure 1 (19)] and seat the plate unit with a gentle twist. -
Page 7: Typical Power Take-Off Hub
(See diagram above), while holding the VS9 at the angle pictured below. Slide the VS9 forward until the square milled shaft end firmly seats in the PTO adaptor [Diagram 3]. Gently twist the VS9 to a fully upright position, slide locating pin [Figure 1(17)] into PTO locating hole and snug the thumb screw [Diagram 3 ]. NOTE: Only the #12 tapered hub is fitted with a locating pin. -
Page 8: Processing Product
DISMOUNTING AND DISASSEMBLY FOR CLEANING AND MAINTENANCE DISMOUNTING To dismount the VS9, simply follow the mounting instructions on Page 6 in reverse order. Set the VS9 on a stable working surface. DISASSEMBLY To disassemble the VS9 for cleaning or maintenance: Unlatch the front housing and swing it toward you. - Page 9 DISMOUNTING AND DISASSEMBLY FOR CLEANING AND MAINTENANCE DISMOUNTING To dismount the VS9, simply follow the mounting instructions on Page 6 in reverse order. Set the VS9 on a stable working surface. DISASSEMBLY To disassemble the VS9 for cleaning or maintenance: Unlatch the front housing and swing it toward you.
-
Page 10: Lubrication
Enclosed is a sample tube of Petro-Gel which we recommend you use in all your food preparation equipment. It may be purchased at your local food equipment supply company, or purchased directly from: (Part No. 4400408) Univex Corporation 3 Old Rockingham Road... -
Page 11: Mechanics Maintenance
Pages 2-6. Wear gloves when handling plate units. Since the VS9 contains no internal power source, most problems can be immediately traced to improper assembly, improper adjustment or worn parts. The Trouble Shooting Guide on Page 7 lists the most common problems and corrective measures. -
Page 12: Proper Assembly Of The Slicer Plate Assembly
CAUTION: The thrust bearing must be securely tightened before the slicer plate assembly is loaded into the housing. Failure to tighten will damage the VS9 and the power source equipment. NOTE: The thrust bearing requires a left hand twist to tighten. -
Page 13: Figure 1 Vs9/Vs9H Housing Assembly
1000923 PLASTIC BUTTON - FRONT COVER * When ordering, specify #12 tapered hub or Univex rear hub. The Univex rear hub does not have accommodation for a locating pin (17), and will only fit older Univex manufactured power source equipment. - Page 14 KNIFE AND SHAFT ASSEMBLY FIGURE 2 ILLUS. NO. PART NO. DESCRIPTION QTY. 1000922 KNIFE 4400004 ROLL PIN 1/4" X 1-1/8" 4400092 DRIVE PIN 1000820 DRIVE SHAFT 1000904 PLATE ADJUSTING 1000808 NUT - ADJUSTING 1000917 SPRING - NUT ADJUSTING 1000809 BEARING - THRUST * Illustrations I through 5 are presented for illustration purposes only Replacement of any one of those illustrated parts requires the replacement of all five.
-
Page 15: Figure
SHREDDER PLATE ASSEMBLY WITH OPTIONAL PLATES FIGURE 3 ILLUS. NO. PART NO. DESCRIPTION QTY. 1000116 SHAFT 2.** 1200036 SET SCREW 5/16" -24 X 3/8" 1000973 THRUST BEARING 4400116 ROLL PIN 3/16" x 1-1/2" 1000975 PLATE PINS 1000115 PLATE HOLDER 1000906 GRATER PLATE OPTIONAL 1000907...
Need help?
Do you have a question about the VS9 and is the answer not in the manual?
Questions and answers