Table of Contents
Advertisement
Quick Links
Advertisement
Table of Contents

Subscribe to Our Youtube Channel
Related Manuals for Univex VS9


Summary of Contents for Univex VS9
- Page 1 VS9-VS9H VEGETABLE SLICER/SHREDDER ATTACHMENT OPERATOR’S MANUAL Persons under age 18 are not permitted to operate or have accessibility to operate this equipment per U.S. Dept. Of Labor Employment Standards Administration Fact Sheet No. ESA913. VS9/9H REV A...
- Page 2 TO INSURE BOTH SAFE AND TROUBLE-FREE PERFORMANCE, WE STRESS THAT ALL PERSONNEL THAT WILL BE INVOLVED WITH YOUR NEW Univex VS9 / VS9H VEGETABLE SLICER MUST READ AND UNDERSTAND THESE INSTRUCTIONS BEFORE ATTEMPTING TO OPERATE THIS UNIT....... WE APPRECIATE YOUR COOPERATION AND YOUR BUSINESS.
-
Page 3: Table Of Contents
PAGE FIGURE 1 OVERALL VIEW OF THE VS9 & VS9H ......2 FIGURE 2 ASSEMBLY OF THE SLICER PLATE ASSEMBLY ........4 FIGURE 3 SLOT AND PIN ALIGNMENT ................5... -
Page 4: Figure 1 Overall View Of The Vs9 & Vs9H
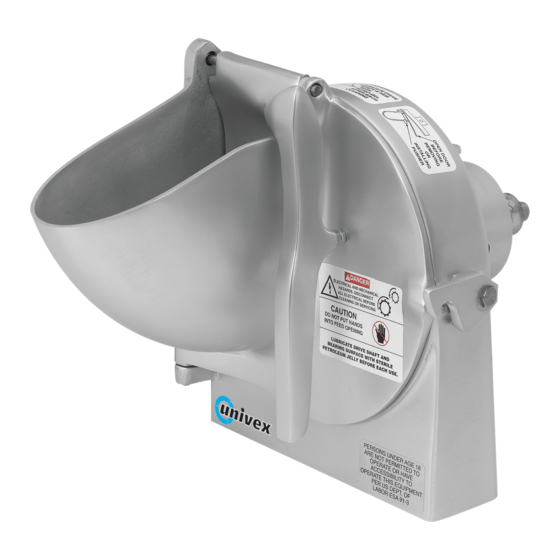
OVERALL VIEW OF VS9/VS9H FIGURE 1 FEED PLATE FEED PLATE ADJUSTING SCREW FEED HOPPER SHAFT LOCK PIN LATCH LATCH PIN FRONT HOUSING REAR HOUSING Page 2... -
Page 5: Introduction
Never insert any utensil into the hopper. Note that the front housing of the VS9 has a feed hopper (Figure 1). It is also equipped with a feed plate. Food to be processed must always be fed to the cutters by way of the hopper, and pressed against the cutting surfaces with the feed plate. -
Page 6: Inspection And Model Variation Explanation
Univex Corporation. INSTALLATION The Univex VS9 is an attachment with no internal power source. To function, it must be mounted to a power take-off on a mixer or a power base unit. Make sure that a comfortable working clearance is provided around the machinery and that the machinery is installed where it will save the operator steps. -
Page 7: Plate Units - Assembly - Use
To vary slice thickness CAUTION: The thrust bearing must be securely tightened before the slicer plate assembly is loaded into the housing. Failure to tighten the thrust bearing will damage the VS9 and the power source equipment. NOTE: The thrust bearing requires a left hand twist to tighten. -
Page 8: Grater, Shredder And Julienne Plate Unit
THE GRATER, SHREDDER AND JULIENNE PLATE UNIT (Figure 8) To fit the plate of your choice to the hub and shaft line up the key hole slots on the plate with the locating pins on the hub, slip the plate over the pins and secure it by turning the plate in a clockwise direction until it shoulders up firmly on the pins. -
Page 9: Loading Plate Units Into The Vs9 Housing
LOADING PLATE UNITS INTO THE VS9 HOUSING With the VS9 resting on a stable working surface, unlatch the front housing (Figure 1) and swing it toward you. Lift the assembled plate unit and insert it into the rear housing. Lift the shaft lock pin and seat the plate unit with a gentle twist. -
Page 10: Mounting Instructions
Remove the cover cap from the power take-off hub. Carefully lift the VS9 and insert the square milled shaft end into the PTO hub while turning the VS9 to engage the square end on the VS9 shaft with the square hole in the PTO adapter. Slide the VS9 forward until the square milled shaft end seats in the PTO adapter. -
Page 11: Processing Product
DISMOUNTING: Make sure that the power source equipment is turned off and its electrical supply is disconnected or locked out. Loosen the thumb screw and slide the VS9 from the PTO hub. Set the VS9 on a stable working surface. -
Page 12: Cleaning
Do not remove thrust bearings from julienne or shredder plate shafts. Dry component parts with a soft cloth. For the best and most sanitary product, clean the VS9 immediately after use or before switching food products. -
Page 13: Mechanics Maintenance
MECHANICS MAINTENANCE Before preforming maintenance on the VS9, please review the safety precautions on page 3 and read all assembly and reassembly instructions. Wear gloves when handling plate units. Since the VS9 contains no internal power source, most problems can be immediately traced to improper assembly, improper adjustment or worn parts. -
Page 14: Warranty
Please call the Univex Warranty Service Department at 800-258-6358 to report warranty claims before arranging for repair of the unit. The unit must be delivered to a Univex authorized service agent or to the Univex Facility for warranty repairs. The end user is responsible for all shipping or travel charges arising from the repair or servicing of this unit under warranty.
Need help?
Do you have a question about the VS9 and is the answer not in the manual?
Questions and answers