Table of Contents
Advertisement
Advertisement
Table of Contents

Related Manuals for Luraco iROBOTICS 6


Summary of Contents for Luraco iROBOTICS 6
-
Page 2: Important Safety Instructions
19. Do not attempt to repair or adjust any electrical or mechanical functions on this unit. Doing so will void the warranty. After reading this owner’s guide, if you have any questions or comments, please call +1-817-633-1080 or contact our technical support department at support@luraco.com or visit our website at www.luraco.com for more information GROUNDING INSTRUCTIONS This product must be grounded. -
Page 3: Medical Warnings
configuration as the plug. No adapter should be used with this product. Figure Illustration: Grounding MEDICAL WARNINGS Not recommended for the following people • Pregnant Women • People with distorted joints, broken bones, skin infection or injury • Children under 12 If you have a medical issue or concern, please consult your doctor before using the massage chair Do Not •... -
Page 4: Caution For User
Do not operate near young children Do not move the machine during operation NOTE: Do not use this apparatus as a bed or fall asleep in the course of massage. Do not use more than 20 minutes, the recommended time of use is 20 minutes. Prolonged massaging may cause aches, muscle or nerve issues. (The preferred total duration of massaging within the day should be 30 minutes total or less). -
Page 5: Cleaning Methods
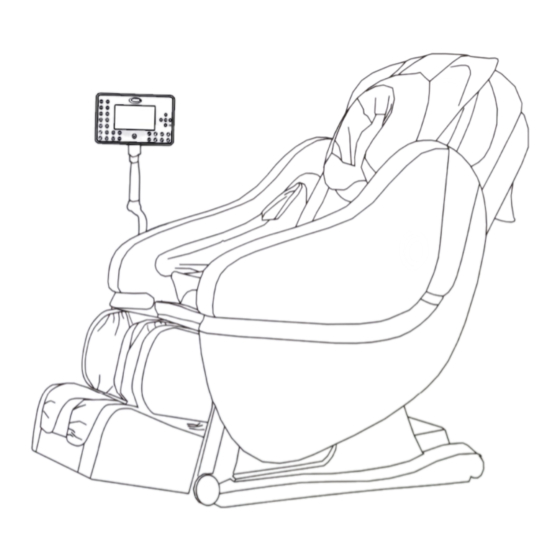
• DO NOT use a damp cloth on the electronic components which can cause shock and damage • The leather covers (headrest, seat cushion, foot cushion) can be removed for cleaning iRobotics 6 Installation Parts Pillow Back Cushion Controller Controller Holder... - Page 6 Massage Chair Dimensions Space Requirement...
-
Page 7: Installation Instruction
INSTALLATION INSTRUCTION Step 1: Unpack the two large packages Take out the main body, seat frame casing, back cushion, seat cushion, pillow, controller supporter, leg massager, controller and wireless controller of massage chair from the box carefully. In order to avoid damaging the system we suggest at least two people to assist with assembly. - Page 8 Step 2: Assemble the moving wheels Mother board cover Insert lock Insert wheel Step 3: Assemble the casing of seat frame Incline the chair main body forward to one side about 20 degrees (Fig. 3). Loosen the two screws of rubber pad at bottom of the seat frame (Fig.
- Page 9 Locked 2 connectors Step 5: Assemble the Armrests 1. Using tools provided, remove nut indicated in red circle (Fig. 4 and Fig. 5) Fig. 4 Fig. 5 2. Align armrest to the perfect position with chair frame, and then match the couple axle between armrest and backrest.
- Page 10 Armrest axis Install axis in the chute, use the screw and tighten with hand held screw driver Fig. 6 Fig. 7 3. Connect the air pipes with green clamps (Fig. 8) and power wire (Fig. 9) to chair body carefully and completely. Fig.
- Page 11 Step 6: Assemble cushion and pillow 1. Connect two air pipes of the back cushion as shown in Fig. 10 and Fig. 11. Be sure the two green clamps are tight on ALL connection air pipes. Note total number of air pipes (2-right arm, 2-left arm, 3 seat, and 2 head) Back Cushion Fig.
- Page 12 3. Put the pillow on the right position of backrest and secure (Fig. 15 and Fig. 16). Fig. 16 Fig. 17 5. Finally connect the air pipes be sure that green clamps are secure. (Fig. 17). The color on air pipes should be matched.
-
Page 13: System Control
1/ Make sure wires are connected as instructed from page 8 2/ Plug the power cord to the machine (Fig. 21) 3/ Connect the remote to the DB9 port on the back of chair as indicated by back label (Fig. 21) 4/ Turn on the power switch on the back (Switch to I position) 5/ Use the remote to choose the massage functions and enjoy the comfortable massage 6/ For MP3 music player function, please insert an SD card with MP3 music files to the back of the remote (Fig. - Page 14 Remote Control Instructions and Button Description 0. Power/Stop: This button starts/stops the massage system. The default mode is Japanese massage. The timer for each massage session is 20 minutes. When timer is up, the chair maintains its position to avoid sleep disruption. Pressing this button will put the chair back to its initial position automatically.
- Page 15 Unplug the power cord before attempting any troubleshooting or service. LURACO iRobotics 6 massage chairs come with advanced state of art electronics and software technology which support self diagnostic features to detect the individual failure of critical components in the massage system. The Master-box has different LED indications which help the user to narrow down the failure trouble shooting, if any.
-
Page 16: Troubleshooting Guide
LED Color/Function Meaning Power ( Blue) Blue is good. This LED should be on continuously If this yellow LED is on, it means that remote has technical Remote Control (Yellow) issue If this red LED is on, it means that vertical limit sensors are Up/Down Sensors (Red) having a problem If this red LED is on, it means that mechanism up/down... -
Page 17: Warranty Information
WARRANTY INFORMATION Introduction LURACO Technologies is dedicated to offering our valued customers the best massage chair buying experience available. As part of this commitment, the company works very hard to provide customers with the best warranty plan available. We guarantee that defective massage chairs will be repaired or replaced during the effective... - Page 18 LURACO’s massage chair comes with a high expectation in performance and reliability which should last for many years. However, all products have a defective rate. If something does go wrong, LURACO can back it up with an available Extended Warranty Plan. The Extended Warranty Plan provides customers a full 5 years of comprehensive protection for LURACO’s massage chairs.
- Page 19 This document supersedes and replaces all information supplied prior to the publication hereof. Suitability for use — LURACO Technologies products are not designed, authorized or warranted to be suitable for use in life support, life-critical or safety-critical systems or equipment, nor in applications where failure or malfunction of an LURACO Technologies product can reasonably be expected to result in personal injury, death or severe property or environmental damage.
- Page 20 THANK YOU FOR BUYING LURACO TECHNOLOGIES’ PRODUCTS LURACO TECHNOLOGIES, INC. 1132 107 STREET ARLINGTON, TX 76011, USA. TEL: +1-817-633-1080 FAX: +1-817-633-1085 WWW.LURACO.COM...
Need help?
Do you have a question about the iROBOTICS 6 and is the answer not in the manual?
Questions and answers
Please, let show me where is the fuse locate in Luraco irobotic 6 and how to replace it?