Table of Contents
Advertisement
Quick Links
Copyrights
Copyright © 2007 Other World Computing, Inc. All rights reserved. No part of this publication may be reproduced, stored in a
retrieval system, or transmitted in any form or by any means, electronic, mechanical, photocopying, recording or otherwise,
without the prior written consent of Other World Computing.
Changes
The material in this document is for information only and subject to change without notice. While reasonable efforts have
been made in the preparation of this document to assure its accuracy, Other World Computing assumes no liability resulting
from errors or omissions in this document, or from the use of the information contained herein. Other World Computing
reserves the right to make changes or revisions in the product design or the product manual without reservation and without
obligation to notify any person of such revisions and changes.
FCC Statement:
Warning! Modifications not authorized by the manufacturer may void the user's authority to operate this device.
NOTE: This equipment has been tested and found to comply with the limits for a Class A digital device, pursuant to Part 15 of
the FCC Rules. These limits are designed to provide reasonable protection against harmful interference when the equipment
is operated in a commercial environment. This equipment generates, uses, and can radiate radio frequency energy and, if
not installed and used in accordance with the instruction manual, may cause harmful interference to radio communications.
Operation of this equipment in a residential area is likely to cause harmful interference in which case the user will be required
to correct the interference at his own expense.
NOTE: This equipment has been tested and found to comply with the limits for a Class B digital device, pursuant to Part 15 of
the FCC Rules. These limits are designed to provide reasonable protection against harmful interference in a residential installa-
tion. This equipment generates, uses and can radiate radio frequency energy and, if not installed and used in accordance with
the instructions, may cause harmful interference to radio communications. However, there is no guarantee that interference
will not occur in a particular installation. If this equipment does cause harmful interference to radio or television reception,
which can be determined by turning the equipment off and on, the user is encouraged to try and correct the interference by
one or more of the following measures:
• Reorient or relocate the receiving antenna.
• Increase the separation between the equipment and receiver.
• Connect the equipment into an outlet on a circuit different from that to which the receiver is connected.
Health And Safety Precautions
• Use proper anti-static precautions while performing the installation of your hard drives into this drive enclosure. Failure to
do so can cause damage to your drive mechanisms, and / or the hard drive enclosure.
• Read this User's Guide carefully, and follow the correct procedure when setting up the device.
• Do not open your hard drive or attempt to disassemble or modify it. Never insert any metallic object into the drive to avoid
any risk of electrical shock, fire, short-circuiting or dangerous emissions. Your hard drive contains no user-serviceable parts. If
it appears to be malfunctioning, have it inspected by a qualified Other World Computing Technical Support representative.
• Never expose your device to rain, or use it near water, or in damp or wet conditions. Never place objects containing liquids
on the drive, as they may spill into its openings. Doing so increases the risk of electrical shock, short-circuiting, fire or personal
injury.
General Use Precautions:
• Do not expose the hard drive to temperatures outside the range of 5° C to 40° C (41° F to 104° F). Doing so may damage the
drive or disfigure its casing. Avoid placing your drive near a source of heat or exposing it to sunlight (even through a window).
Inversely, placing your drive in an environment that is too cold or humid may damage the unit.
• Always unplug the hard drive from the electrical outlet if there is a risk of lightning or if it will be unused for an extended
period of time. Otherwise, there is an increased risk of electrical shock, short-circuiting or fire.
• Use only the power supply shipped with the device.
• Do not use the hard drive near other electrical appliances such as televisions, radios or speakers. Doing so may cause inter-
ference which will adversely affect the operation of the other products.
• Do not place the drive near sources of magnetic interference, such as computer displays, televisions or speakers. Magnetic
interference can affect the operation and stability of your hard drive.
• Do not place heavy objects on top of the drive or use excessive force on it.
• Never use excessive force on your drive. If you detect a problem, consult the Troubleshooting section in this manual.
• Protect your hard drive from excessive exposure to dust during use or storage. Dust can build up inside the device, increas-
ing the risk of damage or malfunction.
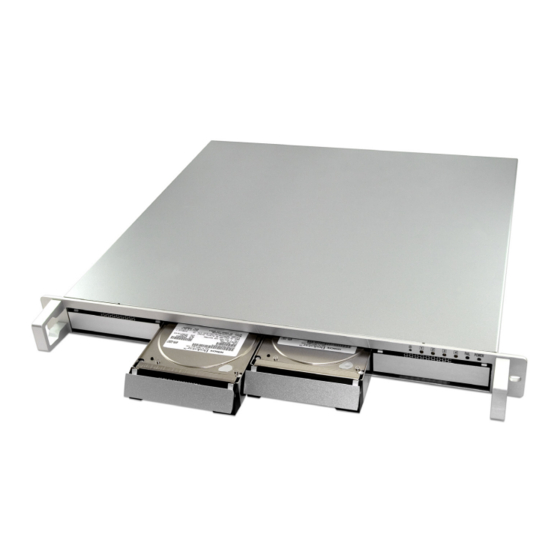
OWC Mercury Rack Pro
• Other World Computing recommends the use of normal glass cleaning products to keep the high lustre finish at it's finest
with this product. Be sure to not get any moisture inside the holes and if you do, allow time to air dry before use.
• Do not block the ventilation outlets on the rear of the drive. These help to keep your drive cool during operation. Blocking
4 Bay Storage Enclosure
the ventilation outlets may cause damage to your drive and cause an increased risk of short-circuiting or fire.
Owner's Manual
OWCMANFWRACK
Copyright ®2007 Other World Computing All Rights Reserved. Other World Computing's 2 year Limited Warranty is not transferable and subject to limitations.
Advertisement
Table of Contents

Subscribe to Our Youtube Channel
Related Manuals for OWC Mercury Rack Pro 4 Bay Storage Enclosure


Summary of Contents for OWC Mercury Rack Pro 4 Bay Storage Enclosure
- Page 1 • Protect your hard drive from excessive exposure to dust during use or storage. Dust can build up inside the device, increas- ing the risk of damage or malfunction. OWC Mercury Rack Pro • Other World Computing recommends the use of normal glass cleaning products to keep the high lustre finish at it’s finest with this product.
-
Page 2: Table Of Contents
Table of Contents Chapter 1 • Quickstart Guide Chapter 2 • Package Contents and Accessories Chapter 3 • Hardware Overview • Important note before proceeding! Chapter 4 • Cable Connections • FireWire 800 (1394B) connection options • USB 2.0 connection options •... -
Page 3: Quickstart Guide
Quickstart Guide Chapter 10 Chapter 1 You can start using your OWC Mercury Rack Pro storage solution imme- Before contacting Customer Service: diately with a few easy steps if you don’t want to read the entire manual. • Read the manuals and review Chapter 8: Troubleshooting The drive solution is formatted for a Macintosh and ready to use right •... -
Page 4: Package Contents And Accessories Chapter
SATA Hard Drive in carrier (installed) 1394b (FireWire 800) cable If you wish to disconnect your OWC Mercury Rack Pro storage solution USB 2.0 (A-B) cable Power cable without shutting down your computer, simply drag the OWC Mercury... -
Page 5: Important Note Before Proceeding
Troubleshooting Chapter 8 Please read before proceeding with installation If your OWC Mercury Rack Pro is not functioning properly, begin by 1. Before installing, make sure that you have reviewed the previous checking some basic possibilities, such as: page and that all necessary cables and parts are present. -
Page 6: Cable Connections
You will need to decide if you are going to hook the Now that you have your new OWC Mercury Elite Rack Pro configured to solution up via FireWire 800 (1394b) - which is the fastest interface this your needs, dress it up! Change the icon of the hard drive! We have cre- drive solution uses, or via USB 2.0, or both. -
Page 7: Firewire 800 (1394B) Connection Options
FireWire 800 (1394B) Connection Options You will see the drive begin to format. This will take up to 5 Step minutes to complete. Connection option #1 - Connect to the same FireWire 800 source (built in FireWire 800 ports, or a PCI/PCIe FireWire 800 card) using two cables - direct connection for each bridge card. -
Page 8: Usb 2.0 Connection Options
USB 2.0 & Other Connection Options Connection option #4 - Connect to the same USB 2.0 source (built in USB 2.0 ports, or a PCI/PCIe USB 2.0 card) using two cables - direct con- nection for each bridge card. Check “Perform a quick format” and choose which file system Step you want to use. -
Page 9: How To Daisy Chain Multiple Enclosures
Daisy Chaining Multiple Enclosures Together Mercury Elite RAID #1 Mercury Elite RAID #2 The maximum volume size will automatically be prompted in Step the box at the bottom. If you wish to adjust the size smaller, you can do so. In this demonstration we will use a maximum size volume. Click Next when you are ready. -
Page 10: How To Not Hook Up Your Enclosure (What Not To Do)
puter Ways to NOT hook your storage enclosure to your com The below described methods show what NOT to do to hook your storage enclosure to your computer. You will see the above box appear in the middle of the screen. Step Right click on the first unallocated volume that you wish to format. -
Page 11: Using With A Macintosh
The methods are: JBOD - All 4 hard drives formatted independently, as four individual hard drive volumes. If you had 4 1TB drives in your OWC Mercury Rack Pro, you would have 4 1TB volumes mount on your desktop. Stripe (RAID 0) - Two volumes will mount on your desktop, each made up of a high-speed RAID-0 Stripe - combining two volumes each. -
Page 12: Setting Up As Jbod (4 Individual Hard Drives)
RAID-0 Stripe - combining two volumes each. Using hard drive volumes. If you had 4 1TB drives in your OWC Mercury Rack a RAID-0 Stripe format, if you had 4 1TB drives in your OWC Mercury Pro, you would have 4 1TB volumes mount on your desktop. - Page 13 You will see the drive begin to format. This will take up to 5 Step minutes to complete. Once Disk Utility opens, you will see a screen that looks similar Step to this - note the 4 individual hard drives shown on the left side, all unformatted with no volumes listed.
- Page 14 Enter a name for your new hard drive, select a volume format, Step Check “Perform a quick format” and choose which file system and click Erase. Step you want to use. NTFS is default and recommended. Click Next when you are ready. Step Are you sure? Click Erase.
-
Page 15: Setting Up As Raid-0 (2 Hard Drives Striped For Performance)
Stripe (RAID 0) - Two volumes will mount on your desktop, each made up of a high-speed RAID-0 Stripe - combining two volumes each. Using a RAID-0 Stripe format, if you had 4 1TB drives in your OWC Mercury Rack Pro, you would have 2 2TB volumes mount on your desktop. - Page 16 Once Disk Utility opens, you will see a screen that looks similar Step You will see the above box appear in the middle of the screen. to this - note the 4 individual hard drives shown on the left side, Step Right click on the first unallocated volume that you wish to all unformatted with no volumes listed.
- Page 17 Are you sure? Click Erase. Step Open Administrative Tools. Step 1 pair of drives down, 1 more pair to go. Repeat on the 2nd set Step Double click on Computer Management. and you’re all done! Step Click on Disk Management under the Storage subcategory. Step Page 19 Page 16...
-
Page 18: Using With A Pc
Chapter 6 JBOD - All 4 hard drives formatted independently, as four individual hard drive volumes. If you had 4 1TB drives in your OWC Mercury Rack Once you have decided on the proper way to connect the OWC Mercury Pro, you would have 4 1TB volumes mount on your desktop.
Need help?
Do you have a question about the Mercury Rack Pro 4 Bay Storage Enclosure and is the answer not in the manual?
Questions and answers