Table of Contents
Advertisement
Quick Links
Advertisement
Table of Contents

Related Manuals for Ayrton easyColor


Summary of Contents for Ayrton easyColor
- Page 1 INSTRUCTION MANUAL Rev 1.0 NO. 24 - 004 - 0962...
-
Page 2: Table Of Contents
Table of contents Foreword...................................2 Safety Instructions................................2 Environment Utilization..............................3 Dimensions..................................3 Descriptions..................................4 Installation..................................4 Diffuser filter Installation to achieve 21° aperture…………………………………………………………….4 Rigging of the projector............................5 Connection to mains of the projector........................6 DMX 512 Connections............................6 Protocol....................................6 Control....................................7 Language.................................7 DMX Address.................................8 8.2.1 DMX Assignment...........................8 8.2.2 Mode Master Assignment........................8 Information................................9 8.3.1... -
Page 3: Foreword
Once manual has been thoroughly read, we recommend that you should file it for future reference. SAFETY INSTRUCTIONS Before using the EASYCOLOR, you must first read the safety instructions as well as the precautions to be taken. CAUTION! ELECTRIC-SHOCK RISK Handle this product with great care, unit needs high-voltage tension that can generate risk of electric shock. -
Page 4: Environment Utilization
Make sure that neither objects nor liquid are dropped inside the EASYCOLOR When used for the first time, smoke or scent might be emitted from the EASYCOLOR. This is an harmless chemical process that will fade away after a few minutes of utilisation. -
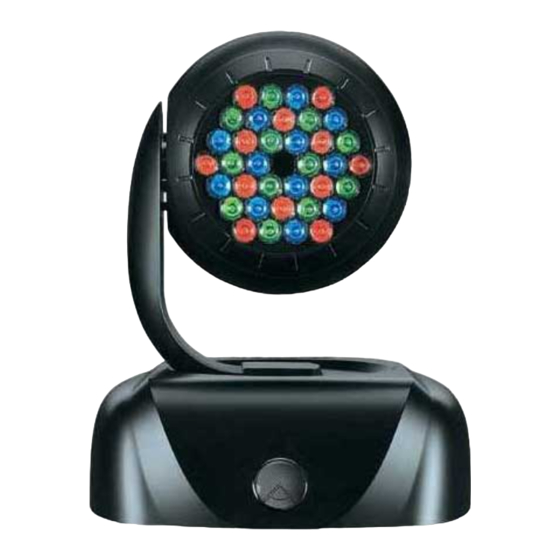
Page 5: Descriptions
14. Safety-cord security point INSTALLATION 6.1 diffuser filter Installation to achieve 21° aperture EASYCOLOR is delivered with an optional diffuser filter to achieve 21° when a wider aperture is required. When filter is used, please follow these instructions: (fig.07) - 4 -... -
Page 6: Rigging Of The Projector
106 mm. 6.2 Rigging of the projector EASYCOLOR can operate if placed on the floor as well as in all positions when rigged up on truss. Installation positions will not affect operations of the unit EASYCOLOR is delivered with two Omega aluminium stands. (you will find these parts outside the Polystyrene forms) When installing EASYCOLOR use the G-Clamps with M12 thread-screw (G-clamp not delivered).G-... -
Page 7: Connection To Mains Of The Projector
Connect DMX cable from controller to the base of DMX IN of the first EASYCOLOR. Set-up a serial DMX- line by connecting DMX-output of the first EASYCOLOR with the DMX-input of the next unit. Repeat the same procedure until all units are connected. -
Page 8: Control
Stepping CONTROL The rear LCD display control panel located in the rear base of the EASYCOLOR allows you to select the address as well as the function criteria. LCD display shows also other information i.e. unit working hours, or unit internal temperatures. Should any failure occur, the problems will be shown on LCD-display. -
Page 9: Dmx Address
When same address is used for numerous EASYCOLOR, they all will receive the same information and the same sequence. This mode is significantly important during maintenance to detect working faults. When EASYCOLOR is powered, LCD display will detect if DMX signal is received, if not displayed it reads the following message. Absent In this event please check the following: Ensure that cable between controller and projector is securely connected. -
Page 10: Mode Master Assignment
• 8.2.2 Mode Master Assignment This menu allows you to select operation mode of your EASYCOLOR. Should you not use external controller and wants to operate your unit on stand-alone mode, then select "Mode Master” function. In the event your projector is connected to a controller, we recommend it should be disconnected before selecting “Mode Master”... -
Page 11: Maximum Temperature
40° C. Temp. It is possible to view recorded max temp of the head of your EASYCOLOR since the unit left production plant. It is not possible to re-set meter to zero not even when software updating is effected Press (MODE) to access “Max Temp”... -
Page 12: Dmx Values
8.3.6 Serial n. This menu will allow you to read information relevant to the Serial number of your EASYCOLOR. This will enable you to identify your projector at any time. Serial number Press (MODE) to access “ Serial Number ” menu •... -
Page 13: Tilt Movement Inversion
Should you wish to disable this option, you only have to repeat instructions and then select “no TILT Inversion” 8.4.3 Swapping PAN & TILT Movements This menu will allow you to swap PAN & TILT movements of your EASYCOLOR. Swap PAN-TILT Press (MODE) to access “... -
Page 14: Movement Accuracy
Press (MODE) to return to main menu • 16-bit High resolution mode is disabled by default. 8.4.6 Ventilation system operation This menu will allow you to apply ventilation system of EASYCOLOR in accordance with your requirements Ventil. Oper. There are four utilisation options (1) Automatic Mode: This function ensures extreme accuracy to the ventilation system. -
Page 15: Self-Mode
For obvious safety reasons, in any case, beyond critical threshold temperature, Power- contrivance will disconnect power to LEDs. 8.5 Self-Mode This menu will allow you to configure your EASYCOLOR to be used without any controller 8.5.1 Program reading This menu allows you to read the built-in program Built -in Program. -
Page 16: Program Editing
Automatic Read. 8.5.3 Program Editing This menu will allow you to set-up or modify programs Program Edit 9. INFORMATION Messages d’erreur & d’in - 15 -...
Need help?
Do you have a question about the easyColor and is the answer not in the manual?
Questions and answers