Table of Contents
Advertisement
Advertisement
Table of Contents

Related Manuals for Horizon Fitness Omega III HRC Entertainment


Summary of Contents for Horizon Fitness Omega III HRC Entertainment
-
Page 2: Table Of Contents
T A B L E O F C O N T E N T S SAFETY INSTRUCTIONS FOLDING & MOVING LEVELLING, POWER & EMERGENCY STOP KNOW YOUR TREADMILL GETTING STARTED PROGRAMMING/DISPLAY PROGRAMME PROFILES COLOUR MONITOR OPERATING INSTRUCTIONS USING YOUR HRC PROGRAMME USING YOUR ADVENTURE PROGRAMME TROUBLESHOOTING COMMON QUESTIONS... -
Page 3: Safety Instructions
I M P O R T A N T S A F E T Y I N S T R U C T I O N S SAVE THESE INSTRUCTIONS Read all instructions before using this Horizon Fitness Treadmill. When using an electri- cal product, these basic precautions should always be followed. - Page 4 10 feet away. CLEANING • Clean with soap and a slightly damp cloth only; never use solvents. OTHER SAFETY TIPS FOR YOUR HORIZON FITNESS TREADMILL OPERATION To reduce the risk of damaging important components on your treadmill, it is strongly rec- ommended that your treadmill is plugged into a dedicated circuit, without the use of an additional extension cord.
- Page 5 • Help In Countering Anxiety and Depression • An Improved Self Image The key to reaping these benefits is to develop the exercise habit. Your new Horizon Fitness Treadmill will help you eliminate the obstacles that prevent you from getting in your exer- cise time.
- Page 6 FOOT LOCK-LATCH MOVING Your Horizon Fitness treadmill has a pair of transport wheels built into the base frame. To move, make sure the treadmill is folded and securely latched. Then firmly grasp the han- CAUTION! dlebars, tilt the treadmill back and roll.
-
Page 7: Turn Power On
LEVELLING The treadmill should be level for optimum use. Once you have placed the treadmill where you intend to use it, raise or lower the adjustable levellers located on the treadmill base frame. Once you have levelled the treadmill, lock the levellers in place by tightening the nuts against the frame. -
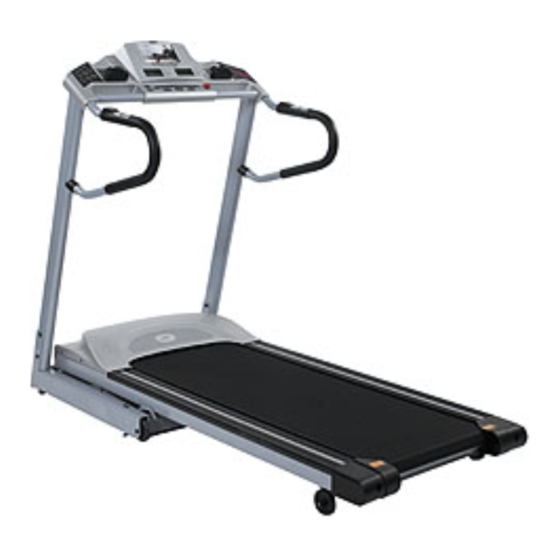
Page 8: Know Your Treadmill
K N O W Y O U R T R E A D M I L L CONSOLE WATER BOT TLE HOLDER QUICK SPEED KEY GRIP PULSE HANDLEBARS QUICK INCLINE KEY UPRIGHT SUPPORT MOTOR COVER SIDE RAIL ROLLER END C AP LEVELLER TRANSPORT WHEEL RUNNING BELT... - Page 9 QUICK START UP Simply press the Start button to begin exercising. Metric 10.00 British 10.00...
- Page 10 PAUSE Press the Stop button to pause your workout. RESET Press and hold the Stop button to reset the treadmill. Metric 10.00 British 10.00...
-
Page 11: Choosing The Time
P R O G R A M M I N G CHOOSING THE TIME Press SELECT and use the + or - buttons to set Time. Once the desired Time is selected, press the START button. Select your desired speed using the + or - (speed) buttons. FINISHING A WORKOUT When your workout is finished, the treadmill console will beep twice and ‘END’... - Page 12 D I S P L A Y SPEED Indicates how fast your walking or running sur- face is moving. ELEVATION Indicates the incline of your walking or running surface. DISTANCE Indicates the miles or kilometres travelled during your workout. PULSE/LAPS Indicates the number of times you have travelled around the lap profile window.
-
Page 13: Programme Profiles
P R O G R A M P R O F I L E S MANUAL Customised workout, with no default time CROSS COUNTRY Speed changes; time defaults to 30 minutes HILL RUN Speed changes; time defaults to 30 minutes AFTER BURNER Elevation changes;... -
Page 16: Colour Monitor Operating Instructions
C O L O U R M O N I T O R O P E R A T I N G I N S T R U C T I O N S Caution • Do not try to repair the device by yourself. Please switch off the television immediate- ly and then inform our dealers if there is a problem. - Page 17 1.DISPLAY 2.BUILT-IN SPEAKER 3.INDICATOR 4.POWER 5.REMOTE SENSOR 6.AV/TV 7.MENU 8.VOLUME- 9.VOLUME+ 10.PROGRAM- 11.PROGRAM+ 12 13 12.AUDIO/VIDEO IN 13.HEADPHONES 14. TV CONNECTION...
- Page 18 Remote Control Operation Guide MUTE MUTE on/off ON/OFF Power switch TIME Off-time Audio mode Digit key (0~9) and -/-- MIRROR Mirror image setting VIDEO AV/TV selection MENU Main menu -/-- Tens digit channel select VIEWMODE Setting picture display dimension. Volume increase (submenu adjust) Volume decrease (submenu adjust) To the next higher program (the cursor is moved upwards) To the next lower program (the cursor is moved downwards)
- Page 19 Important 1). Please align the remote control with the infrared-receiving window on the TV. 2). Never add pressure, drop, immerse in water or disassemble the remote control. 3). Never press any button continuously and swiftly. Operation interval is at least 2 sec onds.
- Page 20 Menu Operation Press MENU to display TV programming menu. PICTURE AUDIO FUNCTION SYSTEM EXIT CLOCK PRESET 1. PICTURE. Brightness, Colour, Contrast and Sharpness are displayed on the screen 1>. Press Menu to display program as follows: Brightness, Colour, Contrast, Sharpness . 2>.
- Page 21 3. FUNCTION 1>. The functions in this menu, are as follows: Language, Calendar and Game. 2>. Press CH+/ CH- to select the item, which you require to programme. This is indi- cated by an arrowhead. Characters are in red. 3>. Press VOL+/ VOL- to set the number of the selected items. 4>.
- Page 22 5. PRESET 1>. Includes such functions as: Auto Search, Search, Fine Tune, Band, Programme and Clear. 2>. Enter into PRESET, Press CH+/CH- to select the item which needs to be set and is indicated by an arrowhead. Characters are in red. 3>.
- Page 23 3>. Adjustment of other items is the same as that of Clock, and setup of clock is shown in 24 hour format. 4>. Upon setup of Clock, press CH+/CH- to choose Time, upon setup, press CH+/CH- again to choose position, and push VOL+/ VOL- to adjust the channel number of the desired programme, the you will not miss the desired program.
-
Page 24: Specifications
Specifications 700A Type Product name LCD colour television Receivable VHF-L: CH1~5,49.75MHz~91.75MHz; VHF-H: CH6~12,168.25MHz~222.75MHz;UHF:CH13~57,471.2 5MHz~869.75MHz; Display component Colour TFT-LCD Audio system Screen dimensions Inches 150mW (Max) Audio output Speaker One 4.5cm round-type speaker Connectors External antenna jack, earphone jack, audio/video(AV) input jack, External power input jack. -
Page 25: Using Your Hrc Programme
U S I N G Y O U R H R C P R O G R A M M E Once the HRC programme is selected, press 'Select'. Using the chart on page 26, deter- mine your target heart rate zone. Your target heart rate zone should be set at a number that you will be able to exercise at throughout the majority of your workout. - Page 26 Center the chest strap just below the breast or pectoral muscles, directly over NOTE: your sternum, with the Horizon Fitness logo facing out. The chest strap must be tight and properly placed to receive an accurate and consistent readout. If the chest strap...
-
Page 27: Using Your Adventure Programme
U S I N G Y O U R A D V E N T U R E P R O G R A M M E Your Adventure Programme is designed to allow you to create your own programming, with the ability to save your program settings for future workouts. -
Page 28: Troubleshooting
T R O U B L E S H O O T I N G Y O U R T R E A D M I L L Horizon Fitness treadmills are designed to be reliable and easy to use. However, if you expe- rience a problem, please reference the troubleshooting guide listed below. - Page 29 36 inches. SOLUTION: The battery in the chest strap may be dead. Take the chest strap to a jewellery store or return to Horizon Fitness for a battery replacement. PROBLEM: Erratic or inconsistent readout. SOLUTION: This is often caused by dry electrodes or a loose chest strap.
- Page 30 We use sealed bearings throughout our treadmills so lubrication is not needed. The most important maintenance step is to simply wipe your perspiration off the treadmill after each use. HOW DO I CLEAN MY HORIZON FITNESS TREADMILL? Clean with soap and water cleaners only. Never use solvents on plastic parts.
-
Page 31: Tensioning The Belt
TENSIONING THE BELT If you can feel a slipping sensation when running on the treadmill, the running belt must be tightened. In most cases, the belt has stretched from use, causing the belt to slip. This is a normal and common adjust- ment. -
Page 32: Maintenance Procedures
M A I N T E N A N C E P R O C E D U R E S Cleanliness of your Horizon Fitness treadmill and its operating environment will keep main- tenance problems and service calls to a minimum. For this reason, Horizon Fitness recom- mends that the following preventative maintenance schedule be followed. -
Page 33: Exercise Guidelines
HOW HARD? How hard you workout is also determined by your goals. If you use your Horizon Fitness Treadmill to prepare for a 5K run, you will probably work out at a higher intensity than if your goal is general fitness. -
Page 34: Developing A Fitness Programme
D E V E L O P I N G A F I T N E S S P R O G R A M M E STRETCH FIRST Before using your Horizon Fitness product, it is best to take a few minutes doing a few gen- tle stretching exercises. Stretching prior to exercise will improve flexibility and reduce chances of exercise related injury. -
Page 35: Fitness Goals
An important step in developing a long term fitness program is to determine your goals. Is your primary goal for exercising on your Horizon Fitness Treadmill to lose weight? Improve muscle? Burn Stress? Prepare for the spring racing schedule? Knowing what your goals are will help you develop a more successful exercise program. -
Page 36: Weekly Log Sheets
W E E K L Y L O G S H E E T WEEKLY GOAL: WEEK# DATE DISTANCE CALORIES TIME COMMENTS TUES THUR WEEK TOTALS WEEKLY GOAL: WEEK# DATE DISTANCE CALORIES TIME COMMENTS TUES THUR WEEK TOTALS... -
Page 37: Monthly Log Sheets
M O N T H L Y L O G S H E E T MONTHLY GOAL: MONTH WEEK# TIME CALORIES DISTANCE MONTHLY TOTALS MONTHLY GOAL: MONTH WEEK# TIME DISTANCE CALORIES MONTHLY TOTALS... -
Page 38: Limited Home Use Warranty
LABOUR Horizon Fitness shall cover the labour cost for the repair of the device for a period from the date of the original purchase, so long as the device remains in the possession of the origi- nal owner.
Need help?
Do you have a question about the Omega III HRC Entertainment and is the answer not in the manual?
Questions and answers