Table of Contents
Advertisement
A A S S S S E E M M B B L L Y Y I I N N S S T T R R U U C C T T I I O O N N S S
O O P P E E R R A A T T O O R R ' ' S S M M A A N N U U A A L L
P P A A R R T T S S L L I I S S T T
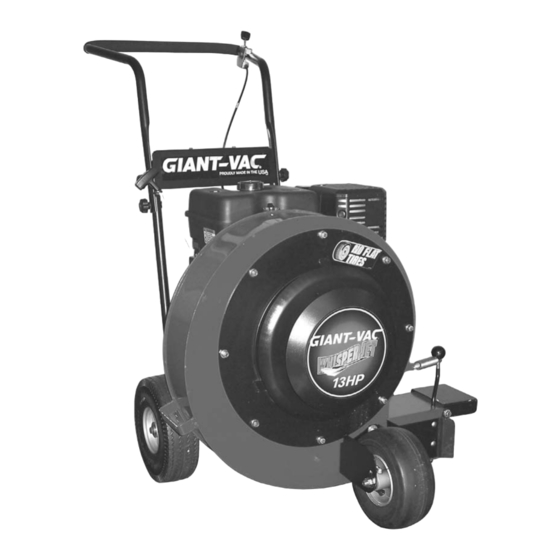
Actual product may differ slightly from product pictured above
Manual No. 7078231 (Rev. 1, 07/27/2006)
TP 900-5219-R1-BL-G
'Whisper-Jet'
Walk-Behind
Leaf Blower
Series 2
LBWJ10172BV
LBWJ13172BV
Models Covered:
(Part # 7800063)
(Part # 7085919)
Advertisement
Table of Contents

Subscribe to Our Youtube Channel
Related Manuals for Giant-Vac Whisper-Jet LBWJ10172BV


Summary of Contents for Giant-Vac Whisper-Jet LBWJ10172BV
- Page 1 A A S S S S E E M M B B L L Y Y I I N N S S T T R R U U C C T T I I O O N N S S O O P P E E R R A A T T O O R R ’...
-
Page 2: Model Number
preliminaries Congratulations! You have just purchased one of the finest pieces of outdoor power equipment on the market today. If properly cared for, your new blower will provide years of dependable service. Please read and follow this instruction manual carefully in order to get the most out of your new equipment. -
Page 3: Slope Operation
safety rules regarding outdoor power equipment IMPORTANT! READ CAREFULLY THE FOLLOWING SAFETY RULES BEFORE ASSEMBLING OR OPERATING UNIT. TRAINING • Never operate with guards not securely in place. Be sure all safety features are attached, adjusted properly and func- • Read, understand, and follow all instructions in the manu- tioning properly. -
Page 4: Maintenance And Storage
safety rules regarding outdoor power equipment (cont.) CHILDREN • Shut off fuel while storing or transporting. Do not store fuel near flames or drain indoors. Tragic accidents can occur if the operator is not alert to the • Keep all hardware, especially impeller bolt, tight and keep presence of children. -
Page 5: Front Wheel Assembly
unit assembly Note: Please refer to Parts List for correct part identification and placement. FRONT WHEEL ASSEMBLY • Place Mounting Bracket against lower right corner of Blower Housing, aligning holes in bracket with threaded holes in housing. Secure with three 3/8-16 x 1 hex bolts, split lock washers and flat washers. -
Page 6: Starting The Engine
unit operation STARTING THE ENGINE IMPORTANT NOTE: The procedures outlined within this section are general guidelines, and are in no way meant to replace or supercede engine manufacturer’s operating instructions. In order to obtain optimum performance from your engine, refer to your engine manual. - Page 7 unit operation (cont.) STARTING THE ENGINE (cont.) TO START ENGINE (CONT.): Vanguard Engines (cont.): • Be sure that fuel valve is set to open position. CLOSED CLOSED OPEN • Move choke control located on engine to the closed “ON” position. CHOKED All Engines: •...
-
Page 8: Blower Operation
unit operation (cont.) STARTING THE ENGINE (cont.) TO SHUT ENGINE DOWN: • Move engine speed control to slow “Turtle” position. • Allow engine to idle for 2-3 minutes before shutting down. • Move engine speed control to “STOP” position. Turn fuel valve to closed position. IMPORTANT NOTE: If you experience problems with your engine that cannot be satisfactorily resolved by following the instructions con- tained within the engine manual, contact your local engine dealer, or call the toll-free service number listed in the repair section of the engine manual. - Page 9 unit operation (cont.) BLOWER OPERATION (cont.) TO CHANGE AIR DISCHARGE DIRECTION: • To direct air discharge out from the front of the machine, open the forward air deflector door, mounted on the front of the discharge end of the blower, by pushing the control lever to the front of the machine.
- Page 10 maintenance BEFORE MAKING ANY ADJUSTMENTS, STOP ENGINE AND DISCONNECT SPARK PLUG WIRE TO PREVENT INADVERTENT STARTING OF UNIT. GENERAL: • Follow implicitly the engine manufacturer’s recommendations for maintenance. • Always keep your machine clean – especially the engine. Check all adjustments periodically. Also, periodically check that all fasteners are secure.
-
Page 11: Troubleshooting
maintenance (cont.) BEFORE MAKING ANY ADJUSTMENTS, STOP ENGINE AND DISCONNECT SPARK PLUG WIRE TO PREVENT INADVERTENT STARTING OF UNIT. TROUBLESHOOTING: • UNIT WILL NOT START: • Check fuel and oil levels. • Check to make sure choke is set when engine is cold, off when hot. •... -
Page 12: Replacement Parts
maintenance (cont.) ADJUSTMENTS: BEFORE MAKING ANY ADJUSTMENTS, STOP ENGINE AND DISCONNECT SPARK PLUG WIRE TO PREVENT INADVERTENT STARTING OF UNIT. • THROTTLE CABLE ADJUSTMENT: Correct cable adjustment allows for full range of movement of throttle body on engine in conjunction with throttle control on handle. - Page 13 warranty registration...
- Page 14 illustrated parts list - LBWJ10172BV LBWJ10172BV...
- Page 15 illustrated parts list - LBWJ10172BV Item Part No. Description 3400000 WELDMENT, Housing - LBWJ10172BV 33874 DECAL, Thrown Objects - See DECAL IDENTIFICATION 3039111 ENGINE, 10HP Briggs & Stratton Intek OHV 91540 SCREW, 5/16-18 x 1-1/2 Hex Head Cap, GR5 91601 NUT, 5/16-18 Hex Flange Lock, GR5 33686 DECAL, Warning- Leaf Blower - See DECAL IDENTIFICATION...
- Page 16 illustrated parts list - LBWJ10172BV (cont.) LBWJ10172BV...
- Page 17 DECAL, Personal Protection - See DECAL IDENTIFICATION 13010 DECAL, Danger, Cut Finger - See DECAL IDENTIFICATION 29445 DECAL, GIANT-VAC (Small) - See DECAL IDENTIFICATION 75861 DECAL, GIANT VAC - See DECAL IDENTIFICATION 3046686 DECAL, 10 HP Whisper Jet - See DECAL IDENTIFICATION 91304 SCREW, 3/8-16 x 1"...
- Page 18 illustrated parts list - LBWJ13172BV...
- Page 19 illustrated parts list - LBWJ13172BV Item Part No. Description 7043271 WELDMENT, Housing - LBWJ13172BV 33874 DECAL, Thrown Objects - See DECAL IDENTIFICATION 7078052 ENGINE, 13HP Briggs & Stratton Vanguard 91540 SCREW, 5/16-18 x 1-1/2 Hex Head Cap, GR5 91601 NUT, 5/16-18 Hex Flange Lock, GR5 33686 DECAL, Warning- Leaf Blower - See DECAL IDENTIFICATION 91513...
- Page 20 illustrated parts list - LBWJ13172BV (cont.)
- Page 21 DECAL, Personal Protection - See DECAL IDENTIFICATION 13010 DECAL, Danger, Cut Finger - See DECAL IDENTIFICATION 29445 DECAL, GIANT-VAC (Small) - See DECAL IDENTIFICATION 75861 DECAL, GIANT VAC - See DECAL IDENTIFICATION 3046622 DECAL, 13 HP Whisper Jet - See DECAL IDENTIFICATION 91304 SCREW, 3/8-16 x 1"...
- Page 22 decal identification 75893 - EAR/EYE/BREATHING PROTECTION REQUIRED - LOCATED ON SIDE OF BLOWER HOUSING 33686 - WARNING-LEAF BLOWER - LOCATED ON SIDE OF BLOWER HOUSING 13010 - WARNING-CUT FINGER - LOCATED ABOVE BLOWER DISCHARGE 33874 - THROWN OBJECTS - LOCATED ON SIDE OF BLOWER HOUSING 3079268 - ‘NO-FLAT TIRES’...
- Page 23 3046622 - 13HP WHISPER-JET LOGO 3046686 - 10HP WHISPER-JET LOGO - LOCATED ON INTAKE BAFFLE - LOCATED ON INTAKE BAFFLE (LBWJ13172BV ONLY) (LBWJ10172BV ONLY) 75861 / 29445 - GIANT-VAC LOGO - LOCATED ON MID-HANDLE PANEL (75861 ON FRONT OF PANEL; 29445 ON BACK)
- Page 24 A A S S S S E E M M B B L L Y Y I I N N S S T T R R U U C C T T I I O O N N S S O O P P E E R R A A T T O O R R ’...
Need help?
Do you have a question about the Whisper-Jet LBWJ10172BV and is the answer not in the manual?
Questions and answers