Table of Contents
Advertisement
Quick Links
Advertisement
Table of Contents

Related Manuals for Focal Point 18" High-Tech


Summary of Contents for Focal Point 18" High-Tech
- Page 2 INST T ALLAT T ION I I NST T RUCT T IONS Blenheim 20” P P relim m in n ary N N otes B B efore I I n n stallation n This appliance is an Inset Live Fuel Effect appliance that provides radiant warmth utilising the latest type burner technology.
-
Page 3: Important N N Otes
Sec c tion Contents s Pag g e N N o. Sec c tion Contents s Pag g e N N o. Important Notes 11.0 Fitting the Firebox Appliance Data 11.1 Installation by Cable Fixing Kit Installation Requirements Fuel Bed Layout 12.0 Site Requirements 13.0... -
Page 4: Appliance D D Ata
APPLIANCE D D ATA Manual Control Version Gas Group G20 Natural Gas CAT I2H Inlet Pressure 20 mbar Max Energy Input (gross) 8.75 kW Min Energy Input (gross) 3.5 kW Pilot Energy Input (gross) 166 W Setting Pressure (cold) 16.1 mbar (+/- 0.75mbar) Main Injector Burner Stereo size 95 Gas Inlet Connection... -
Page 5: Site R R Equirements
SITE R R EQUIREMENTS The fireplace opening should be inspected and repairs made where necessary. Any chair brick or fireback may be left in situ, providing that the dimensional requirements for debris collection space and spigot clearances are met. See diagram below.. The opening WIDTH and HEIGHT dimensions should be between 470mm and 530mm wide, and 540mm (see n n ote b b elow) to 575mm high. -
Page 6: Unpacking The Appliance
DEBRIS C C OLLECTION S S PACE The mounting depth of this appliance is 180mm. In accordance with BS 5871 part 2, minimum debris collection volumes are required behind the installed appliance. These are shown in the table below and as dimension X on the fireplace diagram shown previously. CLAY/ / CEMENT L L INES O O R B B LOCK F F LUE W W HICH I I S N N EW, , U U NUSED, , O O R P P REVIOUSLY O O NLY U U SED W W ITH A A G G AS F F IRE. -
Page 7: Preparing T T He A A Ppliance
COMPONENT C C HECKLIST QUANTITY DESCRIPTION Firebox and burner tray assembly Three piece decorative trim Cast firefront Moulded ceramic fibre combustion matrix Left-hand Moulded ceramic front strip Right-hand Moulded ceramic front strip Individual ceramic coals Ceramic ribbed effect radiant panels Ceramic brick panel retaining clips Cable fixing kit;... -
Page 8: Fitting The Decorative Frame
FITTING THE DECORATIVE FRAME The appliance is supplied with a decorative frame. The frame attaches as a three piece clip-on assembly. If the firebox is to be retained by the cable method, this is the most convenient stage at which to fit the three piece clip on frame. -
Page 9: Fitting The Firebox
10.0 GAS S S UPPLY R R OUTING ( ( continued) The gas pipe must be suitably protected where it passes through fireplace openings. Any sleeving should be sealed to the pipe at its ends. This appliance is fitted with an inlet restrictor elbow. The open end of the supply pipe should be sealed temporarily during the installation of the firebox to prevent the ingress of dirt and dust. -
Page 10: Testing And Commissioning
12.0 FUEL BED LAYOUT Please see the relevant section of the user instructions. 13.0 FITTING THE FIREFRONT Place the decorative firefront in front of the fire and slide the ashpan door into place. The firefront shown in these instructions may be dif- ferent to the one supplied with the appliance. -
Page 11: Testing For Spillage
14.4 FLUE SPILLAGE MONITORING SYSTEM ( ( continued) The aeration hole of the pilot must be carefully cleaned out on each annual service to ensure continued function of the ODS. The spillage monitoring system shall not be adjusted, modified, or put out of operation by the installer. Any spare parts fitted MUST be of a type supplied for the purpose by the appliance manufacturer. -
Page 12: Pilot Assembly
15.0 SERVICING ( ( continued) 12. Clean out the injector, pilot assembly and burner tube. DO NOT remove the pilot injector. 13. Re-assemble and re-fit the burner tray. 14. Turn on the gas supply, and leak test. 15. Refit the decorative casting and ceramics. 16. -
Page 13: Troubleshooting G G Uide
TROUBLESHOOTING G G UIDE 16.0 Fire s s parks b b ut p p ilot d d oes n n ot l l ight No gas to fire, check isolators are open. Pipework blockage, clean out. Air not fully purged, repurge supply or wait longer. Spark earthing to metal work, reset gap correctly. -
Page 14: Important N N Otes
USER INST T RUCT T IONS Sec c tion Contents s Pag g e N N o. Important Notes Firefront Clearances to Combustibles Ventilation Fuel Bed Layout Servicing Operating Instructions Flue Spillage Monitoring System Cleaning 10.0 Cleaning the Ceramics 11.0 List of spare parts IMPORTANT N N OTES The installation of this fire MUST only be carried out by a competent person (such as a CORGI registered fitter) -
Page 15: Fuel Bed Layout
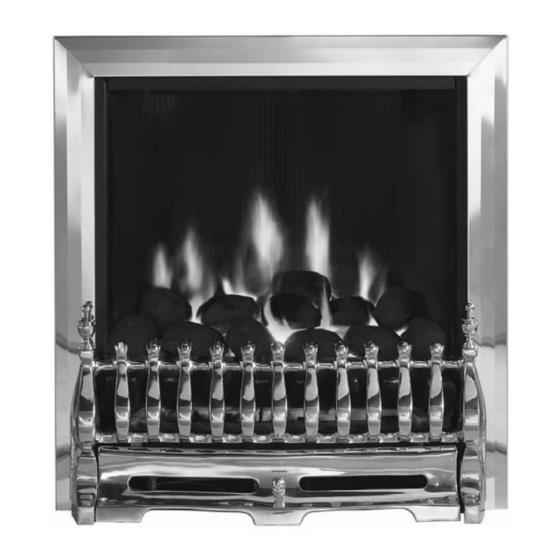
CLEARANCES T T O C C OMBUSTIBLES A combustible shelf may be fixed to the wall above the fire, providing that it complies with the dimensions given below. Maximum d d epth o o f s s helf M M inimum d d istance f f rom f f inished h h earth surface t t o u u nderside o o f s s helf 100mm (4in) 745mm (29 1/4 in) - Page 16 FUEL BED LAYOUT (continued) 3. Locate the two front coal sections marked ‘L’ and ‘R’ into the slot along the front of the burner tray as shown. The legs of the coals have a slightly tapered front face which is intended to give a tight interference fit into the tray.
-
Page 17: List Of Spares
SERVICING The fire and flue should be checked on an annual basis to ensure all of the product of combustion are entering the flue and that there is no excessive build up of soot. The frequency of service will depend on usage, but MUST be carried out at least once annually. Servicing must be carried out by a competent person, such as a CORGI registered installer.
Need help?
Do you have a question about the 18" High-Tech and is the answer not in the manual?
Questions and answers