Advertisement
Quick Links
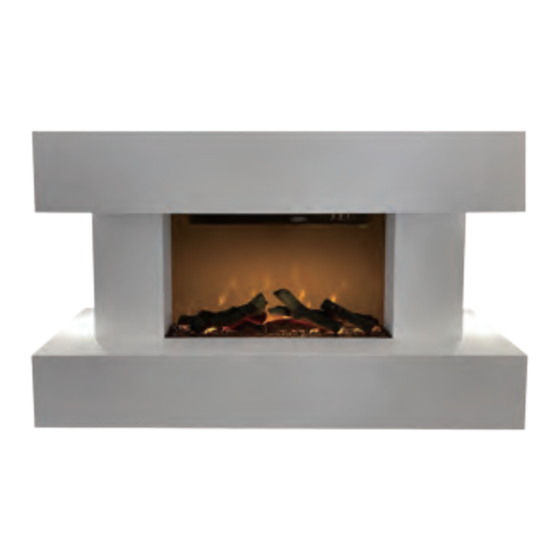
WALL MOUNTED OR FLOOR MOUNTED LED ELECTRIC FIRE
Rivenhall White - DS-EHS01-41E
Rivenhall Black - DS-EHS01-39E
Focal Point Fires Ltd.
RBK House, Irishtown, Athlone,
Co. Westmeath, N37 XP52, Ireland
Tel: 01202 499330
Fax: 01202 499326
www.focalpointfires.co.uk
e: sales@focalpointfires.co.uk
MODELS SHOWN: RIVENHALL LED ELECTRIC SUITE
Revision B-11/21
2021
Advertisement

Subscribe to Our Youtube Channel
Related Manuals for Focal Point Rivenhall DS-EHS01-41E


Summary of Contents for Focal Point Rivenhall DS-EHS01-41E
- Page 1 WALL MOUNTED OR FLOOR MOUNTED LED ELECTRIC FIRE Rivenhall White - DS-EHS01-41E Rivenhall Black - DS-EHS01-39E Focal Point Fires Ltd. RBK House, Irishtown, Athlone, Co. Westmeath, N37 XP52, Ireland Tel: 01202 499330 Fax: 01202 499326 www.focalpointfires.co.uk e: sales@focalpointfires.co.uk MODELS SHOWN: RIVENHALL LED ELECTRIC SUITE...
- Page 2 2021...
- Page 3 1.80 24 kg H600x W1000 x D265(mm) RIVENHALL WHITE - DS-EHS01-41E RIVENHALL BLACK - DS-EHS01-39E 2021...
- Page 4 0.0003 Heater unit L shape brackets Long bracket Wall fixing screws Wall plugs Firebox screws It should be noted that the appliance creates warm convected air currents. These currents move heat from the room surroundings to, and up the wall surfaces adjacent to the heater. Installing the heater next to these types of wall coverings or operating the heater where impurities in the air ,(such as tobacco smoke) exist, may slightly discolour wall finishing.
- Page 5 2021...
- Page 6 For wall mounted installations Please note: Before drilling into walls, always check that there are no hidden wires, pipes, etc.Make sure that screws and wall plugs supplied are suitable for 4x30mm x 7pcs supporting the unit in your surface. Consult a qualified person if you are not 6mm x 7pcs sure.
- Page 7 Remove the appliance from the position and drill a 1x hole (6mm diameter, 40mm deep) Gently hammer the wall plug into position. Carefully lift the appliance back into position. Using a screwdriver, screw through the fixing strap and into the wall plug you have just installed into the wall.
- Page 8 LED Display Up Selection Power ON/OFF Date Time Setting Clear button Timer Set “+” Selection “-” Selection Down Selection Downlights DOWN Open Window/Door detection LIGHT Flame Effect Heat II Heat I Timer ON/OFF Before using any operation with the remote control, Insert 2 x AAA batteries to the back of the remote control. The remote control will not respond until the digital display is illuminated as it is in sleep mode.Before operating , press any button once to illuminate the digital display in order to activate the remote control.
-
Page 9: Safety Cut-Out System
NOTE: TIMER ON logo showed on the handset screen indicates that the weekly timer is enabled, the fire will operate according to the set time. If you want to operate the fire manually press the TIMER ON/OFF button to turn off the weekly timer. - Page 10 NOTE: If the sensor fault of shortcut and open circuit, the indicator light on button on the appliance will blink in the same time. If the fault is removed, the indicator light on button on the appliance stop blink.
- Page 11 1000 1000...
- Page 12 3G Service Department to the address below. Alternatively, you can email or fax. Focal Point Fires, 3G Service Department, Reid Street, Christchurch, Dorset, BH23 2BT. Email: 3g@focalpointfires.co.uk, Fax.
Need help?
Do you have a question about the Rivenhall DS-EHS01-41E and is the answer not in the manual?
Questions and answers