Table of Contents
Advertisement
Advertisement
Table of Contents

Related Manuals for Focal Point Fireglo Slimline


Summary of Contents for Focal Point Fireglo Slimline
- Page 2 INSTALLATION I I NSTRUCTIONS Preliminary N N otes B B efore I I nstallation This appliance is an Inset Live Fuel Effect appliance that provides radiant warmth utilising the latest type burner technology. The fire is designed to fit various types of fireplaces and natural draught flues as listed in the Installation Requirements.
-
Page 3: Table Of Contents
Section Contents Page N N o. Section Contents Page N N o. Cable Fixing Important Notes Fitting the Burner Tray Appliance Data Fuel Bed Layout Installation Requirements 10.0 Fitting the Fireframe Site Requirements 11.0 Testing and Commissioning Debris Collection Space 11.1 Operating the Appliance Ventilation... -
Page 4: Appliance Data
APPLIANCE D D ATA Gas Group G20 Natural Gas CAT I2H Inlet Pressure 20 mbar Max Energy Input (gross) 6.2 kW Min Energy Input (gross) 3.5 kW Pilot Energy Input (gross) 210 W Setting Pressure (+/-0.75mbar) 18.6 mbar Main Injector Burner Stereo size 77 Gas Inlet Connection 8mm compression... -
Page 5: Site Requirements
SITE R R EQUIREMENTS The fireplace opening should be inspected and repairs made where necessary. Any chair brick or fireback may be left in situ, providing that the dimensional requirements for debris collection space and spigot clearances are met. See diagram below.. The opening WIDTH and HEIGHT dimensions should be between 385mm and 450mm wide, and 540mm to 575mm high. -
Page 6: Debris Collection Space
DEBRIS C C OLLECTION S S PACE The mounting depth of this appliance is 108mm. In accordance with BS 5871 part 2, minimum debris collection volumes are required behind the installed appliance. These are shown in the table below and as dimension X on the fireplace diagram shown previously. CLAY/CEMENT L L INES O O R B B LOCK F F LUE W W HICH I I S N N EW, U U NUSED, O O R P P REVIOUSLY O O NLY U U SED W W ITH A A G G AS F F IRE. -
Page 7: Component Checklist
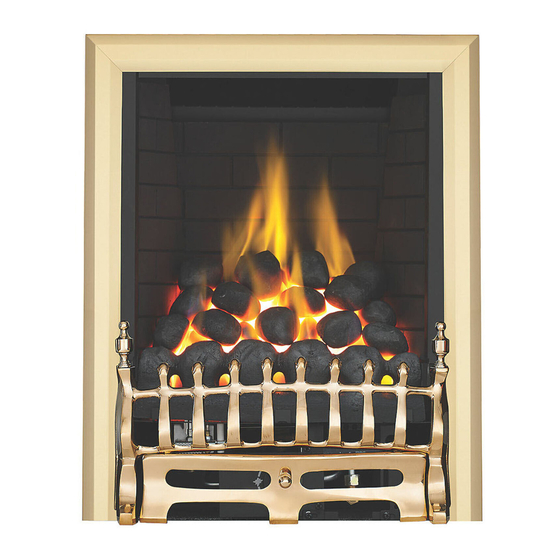
COMPONENT C C HECKLIST QUANTITY DESCRIPTION Firebox and burner tray assembly. Decorative frame Cast front fret with seperate ashpan door. Moulded ceramic fibre combustion matrix. Individual ceramic coals. Ceramic fibre side cheeks Ceramic brick panel. Cable fixing kit; 2 cables, 2 tensioners, 2 cable clamps, 4 fixing eyes. Sealing grommet Lengths of adhesive sealing strip. -
Page 8: Preparing The Opening
PREPARING THE OPENING ( ( continued) Cable f f ixing: For fixing the fire by the cable method, see relevant section. Fixing b b y s s crew: Mark and drill the fireframe or base, and relevant points in the opening or on the wall. Rawlplugs will be required. NOTE: Plastic rawlplugs are not suitable for this application. -
Page 9: Fitting The Burner Tray
FITTING THE BURNER TRAY Imoprtant N N ote: C C heck t t he t t hermocouple n n ut c c onnection i i nto t t he r r ear o o f t t he v v alve i i s s s ecure. Temporarily fit the burner tray and ensure a suitable gas route can be achieved. -
Page 10: Fitting The Fireframe
FUEL BED LAYOUT ( ( continued) Coals may be rotated slightly within their positions to give a good visual effect. The edges or corners of the front row of coals MUST NOT be allowed to enter the flame slots in the matrix. If in doubt, pull them forward as far as possible. -
Page 11: Spillage Monitoring System
12.1 FLUE SPILLAGE MONITORING SYSTEM This fire is fitted with a flue spillage safety device (ODS). If the fire shuts down during use for no apparent reason then several things may be suspected. If a door or window has been opened creating a draught, then pilot disturbance is the problem, and removal of the draught should resolve this. -
Page 12: Servicing
15.0 SERVICING Isolate the fire from the gas supply. Ensure that the fire is fully cold before attempting service. A suggested procedure for servicing is detailed below. 1. Lay out the dust sheet and tools. 2. Carefully remove the ceramic components. 3. -
Page 13: Troubleshooting Guide
15.4 PILOT ASSEMBLY Remove the burner tray as in relevant section and pilot unit as described. Clean the pilot assembly with a soft brush and blow through. Check the aeration holes are free of any dirt or lint. Clean thoroughly internal- ly, the connection can be removed from the base of the pilot unit using two spanners to make cleaning easier. -
Page 14: User Instructions
USER INSTRUCTIONS Section Contents Page N N o. Important Notes Firefront Clearances to Combustibles Ventilation Operating Instructions Flue Spillage Monitoring System Cleaning Coals and Ceramics Servicing IMPORTANT N N OTES The installation of this fire MUST only be carried out by a competent person (such as a CORGI registered fitter) in accordance with the Gas Safety (Installation and Use) Regulations 1998, the relevant British Standards, Codes of Practice, the Building Regulations and the manufacturers’... - Page 15 FIREFRONT This fire is supplied with a particular style of firefront. Use of the firefront will ensure an adequate airflow under the firebed for the correct functioning of this appliance. Compliance with safety standards cannot be guaranteed if another style of front is used. CLEARANCES T T O C C OMBUSTIBLES A combustible shelf may be fixed to the wall above the fire, providing that it complies with the dimensions given below.
-
Page 16: List Of Spares
CLEANING Before carrying out any of the following operations, ensure that the fire is OFF and completely cold. Debris that may form on the firebed should be periodically removed by a competent person. Large deposits could indicate deterioration of the flue. This should be repaired by a competent person, and the fire serviced before further use. FIREFRONT - Any dust accumulating in the firefront may be removed using a vacuum cleaner or dry cloth.
Need help?
Do you have a question about the Fireglo Slimline and is the answer not in the manual?
Questions and answers