Pride Mobility Go-Go Elite Traveller Owner's Manual
Hide thumbs
Also See for Go-Go Elite Traveller:
- Owner's manual (44 pages) ,
- Owner's manual (45 pages) ,
- Technical troubleshooting manual (19 pages)
Table of Contents
Advertisement
Advertisement
Table of Contents

Related Manuals for Pride Mobility Go-Go Elite Traveller


Summary of Contents for Pride Mobility Go-Go Elite Traveller
- Page 1 ELITE TRAVELLER ® The First Name in Travel Mobility...
- Page 2 The latest/current version of this manual is available on our website. 088 609 661 Copyright © 2007 Pride Mobility Products Corp. INFMANU3107/Rev E/August 2007...
- Page 3 C O N T E N T S INTRODUCTION......................... 4 SAFETY ............................5 III. SPECIFICATIONS ........................17 IV. YOUR TRAVEL SCOOTER ....................19 BATTERIES AND CHARGING .................... 23 VI. OPERATION ..........................28 VII. COMFORT ADJUSTMENTS....................30 VIII. DISASSEMBLY AND ASSEMBLY ..................32 IX.
- Page 4 I N T R O D U C T I O N SAFETY WELCOME to Pride Mobility Products Corporation (Pride). The product you have purchased combines state-of the-art components with safety, comfort, and styling in mind. We are confident the design features will provide you with the conveniences you expect during your daily activities.
- Page 5 I I . S A F E T Y PRODUCT SAFETY SYMBOLS The symbols below are used on the Travel Scooter to identify warnings, mandatory actions, and prohibited ac- tions. It is very important for you to read and understand them completely. Read and follow the information in the owner’s manual.
- Page 6 I I . S A F E T Y Use only AGM or Gel-Cell batteries. Do not remove anti-tip wheels. Do not use a cell phone, walkie/talkie, laptop, or other radio transmitter while operating. Avoid exposure to rain, snow, ice, salt, or standing water whenever possible. Maintain and store in a clean and dry condition.
- Page 7 I I . S A F E T Y Do not use batteries with different amp-hour (Ah) capacities. Do not mix old and new batteries. Always replace both batteries at the same time. Do not lift the mobility product while seated in it. Explosive conditions exist! Disposal and recycling—Contact your authorized Pride Provider for information on proper disposal of your Pride product and its packaging.
- Page 8 I I . S A F E T Y GENERAL MANDATORY! Do not operate your new Travel Scooter for the first time without completely reading and understanding this owner’s manual. Your Travel Scooter is a state-of-the-art life-enhancement device designed to increase mobility. Pride provides an extensive variety of products to best fit the individual needs of the Travel Scooter user.
- Page 9 I I . S A F E T Y PRE-RIDE SAFETY CHECK Get to know the feel of your Travel Scooter and its capabilities. Pride recommends that you perform a safety check before each use to make sure your Travel Scooter operates smoothly and safely. Perform the following inspections prior to using your Travel Scooter: ! Check for proper tire inflation (if equipped with pneumatic tires).
- Page 10 I I . S A F E T Y When climbing an incline, try to keep your Travel Scooter moving. If you must stop, start up again slowly, and then accelerate cautiously. When driving down an incline, do so by setting the speed adjustment dial to the slowest setting and driving in the forward direction only.
- Page 11 I I . S A F E T Y When you approach an incline, it is best to lean forward. See figures 2 and 2A. This shifts the center of gravity of you and your Travel Scooter toward the front of the Travel Scooter for improved stability. NOTE: When negotiating ramps, if the throttle control lever is released while moving forward, the powered Travel Scooter may roll back approximately 1 foot (30.5 cm) before the brake engages.
- Page 12 I I . S A F E T Y OUTDOOR DRIVING SURFACES Your Travel Scooter is designed to provide optimum stability under normal driving conditions—dry, level surfaces composed of concrete, blacktop, or asphalt. However, Pride recognizes that there will be times when you will encounter other surface types.
- Page 13 I I . S A F E T Y INCLEMENT WEATHER PRECAUTIONS Exposure of your Travel Scooter to inclement weather conditions should be avoided whenever possible. If suddenly caught up in rain, snow, severe cold or heat while operating your Travel Scooter, proceed to shelter at the earliest opportunity.
- Page 14 I I . S A F E T Y ELEVATORS Modern elevators have a door edge safety mechanism that, when pushed, reopens the door(s). ! If you are in the doorway of an elevator when the door(s) begin to close, push on the rubber door edge or allow the rubber door edge to contact the Travel Scooter and the door will reopen.
- Page 15 I I . S A F E T Y WARNING! Do not sit on your Travel Scooter while it is in a moving vehicle. WARNING! Always be sure your Travel Scooter and its batteries are properly secured when it is being transported. Batteries should be secured in an upright position, and protective caps should be installed on the battery terminals.
- Page 16 I I . S A F E T Y PRESCRIPTION DRUGS/PHYSICAL LIMITATIONS The Travel Scooter user must exercise care and common sense when operating his/her Travel Scooter. This includes awareness of safety issues when taking prescribed or over-the-counter drugs or when the user has specific physical limitations.
- Page 17 I I I . S P E C I F I C A T I O N S Model Number 3-wheel: SC40E 4-wheel: SC44E Maximum Safe Slope See figure 1. Maximum Climbing Ability See figure 1. Maximum Obstacle Climbing Ability 2 in. (5 cm) Colors Red, Blue, Silver (interchangeable panels) Overall Length...
- Page 18 I I I . S P E C I F I C A T I O N S 2.50" (6.35 cm) 3-wheel: 36.50" (92.71 cm) 4-wheel: 39.75" (100.97 cm) 3-wheel: 32.50" (82.55 cm) 4-wheel: 43.25" (109.86 cm) Turning Radius 19.25" (48.9 cm) Figure 4.
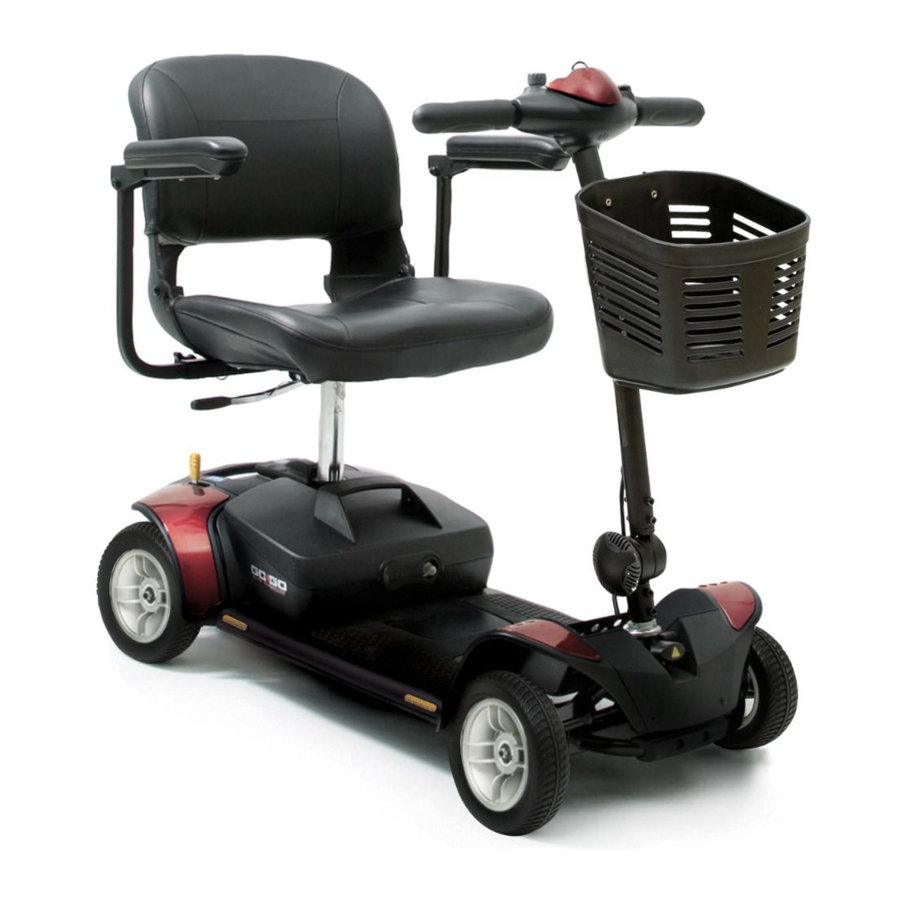
- Page 19 I V . Y O U R T R A V E L S C O O T E R TILLER CONSOLE The tiller console houses all controls needed to drive your Travel Scooter, including the key switch, throttle control lever, horn button, speed adjustment dial, and the battery condition meter.
- Page 20 I V . Y O U R T R A V E L S C O O T E R Speed Adjustment Dial MANUAL This dial allows you to preselect and limit your Travel FREEWHEEL Scooter’s top speed. LEVER ! The image of the tortoise represents the slowest speed setting.
- Page 21 I V . Y O U R T R A V E L S C O O T E R BATTERY PACK Your Travel Scooter is equipped with an innovative, easy to remove battery pack. A handle on the top of the battery pack makes it easy to lift the pack off of the Travel Scooter with one hand.
- Page 22 I V . Y O U R T R A V E L S C O O T E R OFF-BOARD BATTERY CHARGER PLUGS INTO STANDARD The off-board battery charger, when ELECTRICAL OUTLET plugged into the charger power cord receptacle (located on the battery pack) and a standard electrical outlet, charges the Travel Scooter’s batteries.
- Page 23 V . B A T T E R I E S A N D C H A R G I N G Your Travel Scooter requires two long-lasting, 12-volt, deep-cycle batteries that are sealed and maintenance free. They are recharged by the supplied off-board charging system. ! Charge your Travel Scooter’s batteries for 8 to 14 hours prior to using it for the first time.
- Page 24 V . B A T T E R I E S A N D C H A R G I N G Follow these easy steps to charge your batteries safely: 1. Position your Travel Scooter or battery pack close to a standard electrical outlet. See figure 15. 2.
- Page 25 V . B A T T E R I E S A N D C H A R G I N G How often must I charge the batteries? Two major factors must be considered when deciding how often to charge your Travel Scooter’s batteries: ! All day use on a daily basis.
- Page 26 V . B A T T E R I E S A N D C H A R G I N G How do I change a battery in my Travel Scooter? WARNING! Contact your Pride Provider if you have any questions regarding the batteries in your Travel Scooter.
- Page 27 V . B A T T E R I E S A N D C H A R G I N G Why do my new batteries seem weak? Deep-cycle batteries employ a different chemical technology than that used in car batteries, nickel-cadmium batteries (nicads), and other common battery types.
- Page 28 V I . O P E R A T I O N BEFORE GETTING ONTO YOUR TRAVEL SCOOTER ! Have you fully charged the batteries? See V. “Batteries and Charging.” ! Is the manual freewheel lever in the drive (rearward) position? Never leave the manual freewheel lever in the forward position unless you are manually pushing your Travel Scooter.
- Page 29 V I . O P E R A T I O N ! Pull on the left handgrip to steer your Travel Scooter to the left. ! Pull on the right handgrip to steer your Travel Scooter to the right. ! Move the tiller to the center position to drive straight ahead.
- Page 30 V I I . C O M F O R T A D J U S T M E N T S TILLER ANGLE ADJUSTMENT TILLER ADJUSTMENT KNOB WARNING! Remove the key from the key switch before adjusting the tiller or the seat.
- Page 31 V I I . C O M F O R T A D J U S T M E N T S SEAT HEIGHT ADJUSTMENT UPPER SEAT POST The seat can be repositioned to different heights. See figure 19. LOWER SEAT POST 1.
- Page 32 V I I I . D I S A S S E M B L Y A N D A S S E M B L Y DISASSEMBLY You can disassemble the Travel Scooter into five BASKET SEAT pieces: the seat, the front section, the rear section, the basket, and the battery pack.
- Page 33 V I I I . D I S A S S E M B L Y A N D A S S E M B L Y ASSEMBLY NOTE: Before attempting assembly, tilt the rear half of the Travel Scooter slightly back on the anti-tip wheels as show in figure 24.
- Page 34 I X . B A S I C T R O U B L E S H O O T I N G Any electromechanical device occasionally requires some troubleshooting. However, most of the problems that may arise can usually be solved with a bit of thought and common sense. Many of these problems occur because the batteries are not fully charged or because the batteries are worn down and can no longer hold a charge.
- Page 35 I X . B A S I C T R O U B L E S H O O T I N G What if the Travel Scooter’s batteries won’t charge? ! Check the fuse located on the battery pack. Replace if necessary. ! During the charging process, if the charger LED’s never indicate a full charge, check the fuse located on the battery pack.
- Page 36 X . C A R E A N D M A I N T E N A N C E Your Travel Scooter requires a minimal amount of care and maintenance. If you do not feel confident in your ability to perform the maintenance listed below, you may schedule inspection and maintenance at your authorized Pride Provider.
- Page 37 X . C A R E A N D M A I N T E N A N C E WIRING HARNESSES ! Regularly check all wiring connections. ! Regularly check all wiring insulation, including the charger power cord, for wear or damage. ! Have your authorized Pride Provider repair or replace any damaged connector, connection, or insulation that you find before using your Travel Scooter again.
- Page 38 X . C A R E A N D M A I N T E N A N C E For prolonged storage, you may wish to place several boards under the frame of your Travel Scooter to raise it off of the ground.
- Page 39 ! Labor, service calls, shipping, and other charges incurred for repair of the product, unless specifically autho- rized, IN ADVANCE, by Pride Mobility Products Corporation ! Repairs and/or modifications made to any part of the Travel Scooter without specific and prior consent...
- Page 40 X I . W A R R A N T Y Exclusions also include components with damage caused by: ! Contamination ! Abuse, misuse, accident, or negligence ! Battery fluid spillage or leakage ! Commercial use or use other than normal ! Improper operation, maintenance, or storage ! Batteries not properly maintained by recommended charging and storage procedures There is no other express warranty.
- Page 41 N O T E S Elite Traveller www.pridemobility.com...
- Page 42 N O T E S www.pridemobility.com Elite Traveller...
- Page 44 *INFMANU3107*...
Need help?
Do you have a question about the Go-Go Elite Traveller and is the answer not in the manual?
Questions and answers
Are these battery types airline & cruises hip approved?
The Pride Mobility Elite Traveller uses 2 12V 18Ah batteries, which are typically non-spillable sealed lead-acid batteries. These are generally approved for airline and cruise ship use, provided they are securely attached, terminals are protected, and the device can be stored upright. However, specific approval depends on the airline or cruise line's policies, so travelers should confirm with them in advance.
This answer is automatically generated
what are the dimensions of the scooter
The dimensions of the Pride Mobility Go-Go Elite Traveller scooter are:
- Length:
- 3-wheel: 36.50" (92.71 cm)
- 4-wheel: 39.75" (100.97 cm)
- Width:
- 3-wheel: 32.50" (82.55 cm)
- 4-wheel: 43.25" (109.86 cm)
- Turning Radius: 19.25" (48.9 cm)
- Ground Clearance:
- Front: 2 in. (5 cm)
- Rear: 2.5 in. (6.35 cm)
- Tire Size:
- Front tires: 7 in. (17.78 cm)
- Rear tires: 8 in. (20.32 cm)
This answer is automatically generated
One of the pins connecting the motor to the battery got bent. Can they be repaired or replaced?