Table of Contents
Advertisement
Quick Links
Download this manual
See also:
User Manual
Advertisement
Table of Contents

Related Manuals for GRASS VALLEY Turbo


Summary of Contents for GRASS VALLEY Turbo
- Page 1 Turbo™ INTELLIGENT DIGITAL DISK RECORDER Quick Start Guide SOFTWARE VERSION 2.1 071-8379-00 03 MAY 2005 the mos t watched worl dwide...
- Page 2 Nevada City, California 95959-7900 Trademarks Grass Valley, Turbo, M-Series, Profile, and Profile XP are either registered trademarks or trademarks of Thomson Broadcast and Media Solutions, Inc. in the United States and/or other countries. Other trademarks used in this document are either registered trademarks or trademarks of the manufacturers or vendors of the associated products.
-
Page 3: Unpack And Check Contents
Keyboard Mouse If desired, mount in an equipment rack Power-off the Turbo iDDR, and remove the power cord. Rack-mount the Turbo using the optional rack-mount kit. Refer to the Turbo Rack-Mount Kit Instructions on the Documentation CD-ROM. Install rails using screws... - Page 4 Installation Connect mouse, keyboard, & monitor (if desired) You can operate the Turbo iDDR in Front Panel Control mode or Workstation Control mode. Make connections as described in the following table. To use this control mode: Make these connections: Front Panel Control...
- Page 5 The DVI-I connector provides both digital and component analog output signals at the same time. You must supply a standard DVI-I cable or adapter to make DVI digital and/or component analog video connections. (Optional cable available, contact your Thomson Grass Valley representative.)
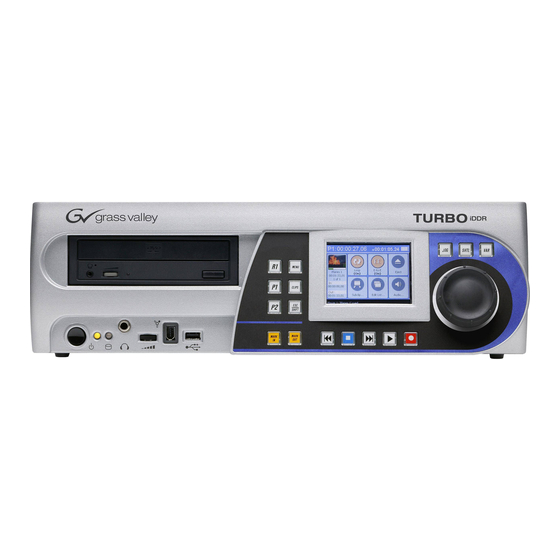
- Page 6 Front Panel Features Standby button Turns Turbo iDDR on and off. Power indicator ON: Power is on and the Turbo is operational. Blinking: Turbo needs service. Refer to Turbo Service and Troubleshooting Guide. OFF: Power is in standby mode. Drive busy indicator Indicates data is being written or read.
-
Page 7: Configuration And Operation
Front Panel Operation: Refer to page 8 to configure AppCenter Workstation Operation: Refer to page 15 and operate the Turbo iDDR using the front panel to configure and operate the Turbo iDDR using App- control mode. Center Workstation mode. (Keyboard if desired) -
Page 8: Front Panel Operation
Front Panel Operation Modify settings as required To access Turbo iDDR configuration: P1 and P2 (Player Channels) Settings Setting Choices Scroll Press Menu Scroll and select button twice a menu item Push to Video Output Format NTSC (SD), XGA (1024x768), WXGA... -
Page 9: Recording A Clip
SHTL MENU CLIPS SHIFT MARK MARK Other Turbo iDDR Record Modes Touch to name the clip first, then Press to start record, then start recording. press to stop. Touch to specify a loop length, then start recording. - Page 10 MPEG2 format. After connecting the DV device and selecting the IEEE 1394 input for the Record channel, you can use the Turbo transport controls to control the DV device remotely through the 1394 connection. NOTE: The front panel 1394 port...
-
Page 11: Importing Media
Front Panel Operation Importing media You can import media created on other digital video devices or PCs. The media may be imported from a CD-ROM, DVD, USB flash drive, and external USB or 1394 disk drives. Do one of the following: Insert a CD-ROM or DVD Connect 1394 external disk drive... -
Page 12: Playing A Clip
SHIFT to return. Other Turbo Player Modes To output black when the play channel is stopped, make sure E-to-E is Off. To output the record channel input signal when the play channel is stopped, touch E-to-E to turn On. -
Page 13: Trimming A Clip
Front Panel Operation Trimming a clip Scroll Press P1 , Scroll and Push to then Clips select a clip Select SHTL MENU CLIPS SHIFT MARK MARK Verify clip name Make sure E to E is Shuttle/Jog and thumbnail Off to display first to a new frame of the clip frame... - Page 14 Front Panel Operation Creating a simple playist Press P1 or P2 Press Edit List SHTL MENU CLIPS SHIFT MARK MARK Scroll Push to Press Scroll and select Select Clips to add clips SHTL MENU CLIPS SHIFT MARK MARK SHTL MENU CLIPS SHIFT MARK...
- Page 15 Workstation Operation Using AppCenter Workstation Select View | Workstation Open the AppCenter shortcut Modify settings as required To access Turbo iDDR configuration: Select System, then Click a tab and Configuration select menu items 03 May 2005...
- Page 16 Workstation Operation P1 and P2 (Player Channels) Settings System Settings Setting Choices Setting Choices Video Output Format NTSC (SD), XGA (1024x768), WXGA Reference Standard NTSC (59.94) or PAL (50Hz) (1365x768), 1080i (1920x1080) Time of Day Source System Clock or LTC Input Aspect Ratio Standard or Widescreen Audio Reference Level...
-
Page 17: Record A Clip
Workstation Operation Record a clip Verify Recorder mode Select record channel Begin record Adjust audio Stop record Rename clip Related operations To change the timecode source, click Recorder | Options, select your Recorder timecode source, and click OK. Options If video source is widescreen format (16:9), click Recorder | Widescreen. Recorder ✓... -
Page 18: Play A Clip
Workstation Operation Play a clip Drag a clip into the play channel Verify Player mode Select a play channel Play the clip Related operations To output black when the play channel is stopped, open the Player Player menu and uncheck E-to-E. E to E To output the record channel input signals when the play Player... - Page 19 Workstation Operation Trim a clip Drag a clip into the play channel Verify Player mode Select a play channel Locate a frame Set in or out mark to the current frame 03 May 2005...
-
Page 20: Create A Playlist
Locked. To add a section to a playlist click Playlist | Add Section. Playlist Add Section The Turbo iDDR can play clips Source Clip Play Channel Widescreen Setting and conversion Method with different aspect ratios in a Aspect Ratio... -
Page 21: Front Panel Controls
Operator Tips Front Panel Controls The following table describes clip playout using front panel transport controls. Front Panel Task Customized Operation Control Record – Press REC. You can change to PLAY + REC (hold down Play, then press Record) Stop – Press STOP to stop Record/Play. Play –... - Page 22 Operator Tips Front Panel Controls: List playout While playing a list, you can perform the following operations using the Turbo iDDR front panel transport controls and touch screen. Do this: Continue playout after a pause in the list Select the Play button.
-
Page 23: Keyboard Shortcuts
Keyboard shortcuts A keyboard can be connected and used in Front Panel control mode or AppCenter Workstation mode to control the Turbo iDDR. The following describes the keyboard shortcuts available. Keyboard shortcuts are disabled when text entry dialog boxes are open. -
Page 24: If You Have A Problem
Operator Tips If you have a problem If you have trouble recording or playing, verify basic configuration using the following checklist. Verify these settings Control Mode Front Panel Workstation " Video Reference Standard (50Hz/59.9Hz) page 8 page 15 " Video Record channel input selection page 8 page 15 "... -
Page 25: Finding More Information
Operator Tips Finding more information Other documentation • Turbo iDDR Documentation CD-ROM • Online Help in AppCenter Workstation Web Technical Support • World Wide Web: http://www.thomsongrassvalley.com/support/ • Technical Support E-mail Address: gvgtechsupport@thomson.net Contacting Grass Valley Support Before placing a call •...
Need help?
Do you have a question about the Turbo and is the answer not in the manual?
Questions and answers